This web page was created programmatically, to learn the article in its unique location you’ll be able to go to the hyperlink bellow:
https://www.bgr.com/2118646/handy-arduino-accessories-diy-project/
and if you wish to take away this text from our website please contact us
We could obtain a fee on purchases comprised of hyperlinks.
The world of electronics is fascinating, but it surely has a excessive barrier to entry. Trying to program a full-blown pc or perceive the advanced circuitry of a complicated digital gadget is unimaginable for a newbie. The Arduino overcomes this barrier by offering a easy pc assembled on a single board, small and simple to deal with. You join numerous modules, put collectively fundamental circuits, and watch the magic occur.
As you would possibly count on from this open-ended premise, what your Arduino can do relies upon fully on the type of equipment you have got. The starter equipment does include fairly just a few odds and ends, however any precise venture would require greater than the default choices. Of course, the precise parts you want rely largely on what venture you are attempting to assemble. But there are some equipment which might be helpful for any venture, along with the instruments you want. And we do not imply general-purpose DIY devices and instruments.
The Arduino could also be easier to get into than a extra superior pc, however it’s certainly not a cakewalk. You are nonetheless coping with an digital circuit with a number of digital parts. This means managing issues just like the voltages, present, and even the sign logic that flows between them. The default Arduino equipment would not embrace many instruments for these features, leaving you to determine issues out by means of trial and error. It is healthier to make use of specialised instruments to diagnose and perceive your Arduino circuits extra simply.
Multimeter
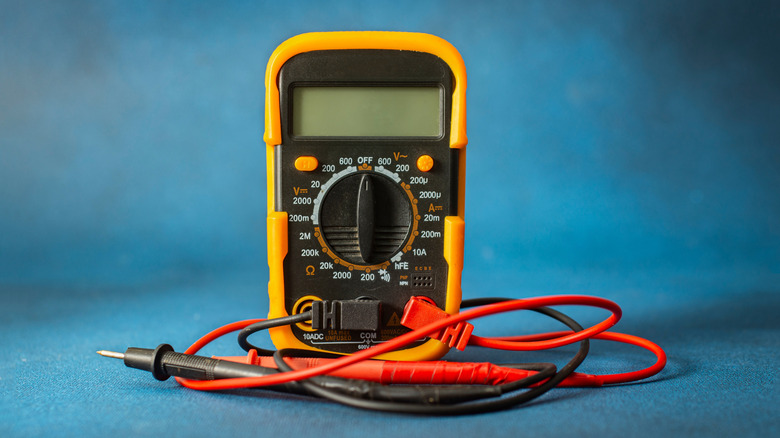
A multimeter is just not even an Arduino-specific accent, however a helpful software usually. You have in all probability seen the digital multimeter really helpful as essential for a house toolbox earlier than. The purpose for that is easy: The multimeter is a really versatile diagnostic software. It can be utilized to grasp the important thing metrics of any electrical circuit, together with the home equipment plugged into your mains or a small Arduino venture you might be tinkering with. It is even a simple strategy to test your automotive battery.
But what does it really do? A multimeter can measure features akin to present, voltage, and resistance in a circuit, amongst different issues. Older fashions have been analog, however trendy digital variations show the outcomes on an LCD, making them very straightforward to make use of even for an entire newbie. You need not perceive each characteristic of a multimeter, both; simply take note of fundamental measurements like voltage and present to diagnose electrical points.
For an Arduino particularly, this helps you determine which a part of a circuit is misconfigured. Normally, in case your venture would not work as meant, you might be simply compelled to take all of it aside and test each connection. But with a digital multimeter, you’ll be able to work out precisely the place the present is stalling, or which part is failing to obtain the right voltage. This saves a variety of time troubleshooting your Arduino circuits and precisely pinpointing the issue. Pick up a multimeter online or out of your native Walmart; it’s price it.
DC-DC converter
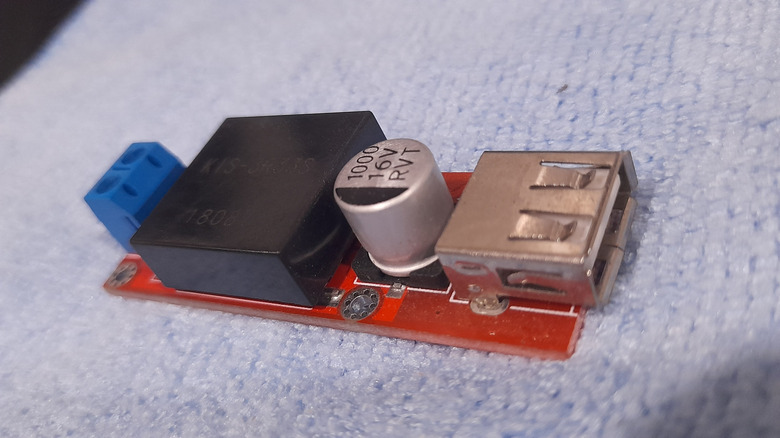
The Arduino is an digital circuit, which implies it runs on DC present with regular voltages. This present is normally equipped by utilizing a battery, as the facility wants of the Arduino are fairly low. The actual quantity is dependent upon the assorted parts wired into the circuit, and may fluctuate from one part to a different. This is the place it’s possible you’ll discover an issue -– how do you guarantee each half will get solely the quantity of volts it wants?
For instance, any sensor you utilize in your Arduino venture would run on very low energy, whereas one thing like a stepper motor would require far more energy. You can all the time hook up a bigger battery to satisfy the utmost energy wants, however then you’ll fry the sensors. This is the place DC-DC converters come in useful. They are available in numerous sorts, from step-up (enhance) converters to step-down (buck) converters. There can be the hybrid buck-boost converter that may operate in both function relying on configuration.
Converters like this work precisely as their names counsel: They remodel the present flowing by means of them, both growing or reducing its voltage. With just a few of those, you’ll be able to put collectively any type of circuit you need, no matter the potential variations between the assorted modules. Go for one with multiple outputs for max flexibility.
Benchtop energy provide
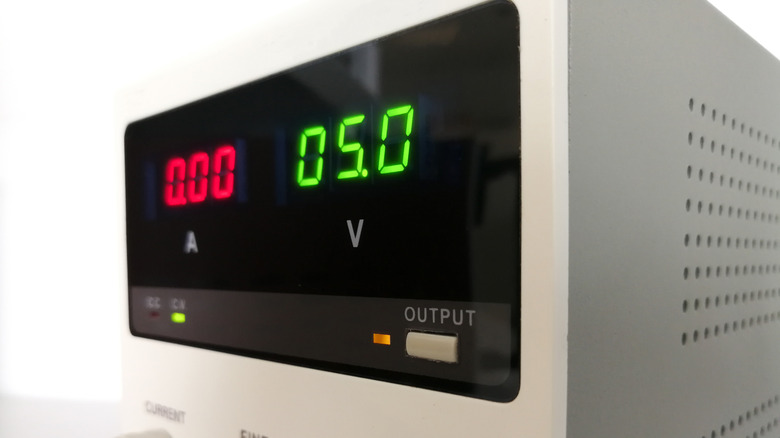
Arduino initiatives, like most small electronics, run on batteries. This is okay when you realize precisely what number of volts your venture wants, however within the preliminary stage, if you end up nonetheless figuring issues out, that isn’t the case. Having to swap out batteries each couple of minutes to match your venture’s altering energy draw could be very cumbersome. And you’ll be able to’t simply plug it into the mains provide immediately, as electronics like this run on DC energy, whereas your private home provide is AC. Plenty of transportable energy stations have DC outputs, however they’re fastened voltage.
But what should you may get a tool that converts the AC present right into a DC provide of any required voltage? That’s precisely what a benchtop energy provide can do. A bench energy provide is an adjustable system that plugs into the mains socket and converts that into a gentle DC present for powering any digital system. The better part is that you may exactly set the precise present and voltage you need.
This makes it actually helpful for experimenting with an Arduino venture, as you’ll be able to regulate the facility stage based on the parts you might be connecting to your board. Some superior benchtop provides even have an autoranging energy provide that adjusts energy parameters primarily based on the linked load. This means you’ll be able to simply tinker away with out having to manually regulate something and get the correct amount of energy. A great accessory for any beginning Arduino dabbler.
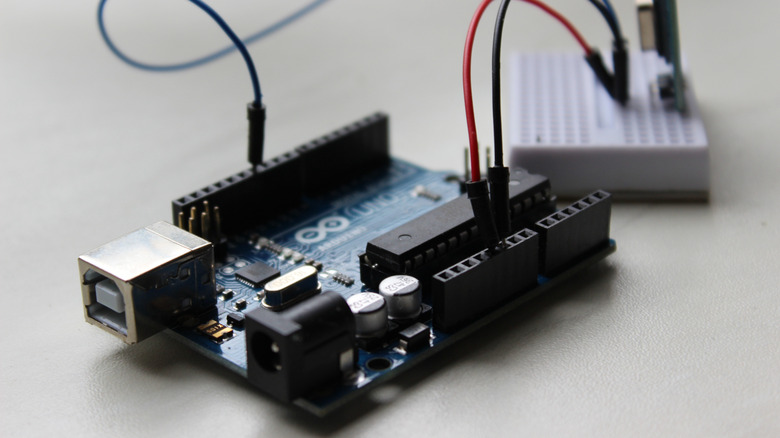
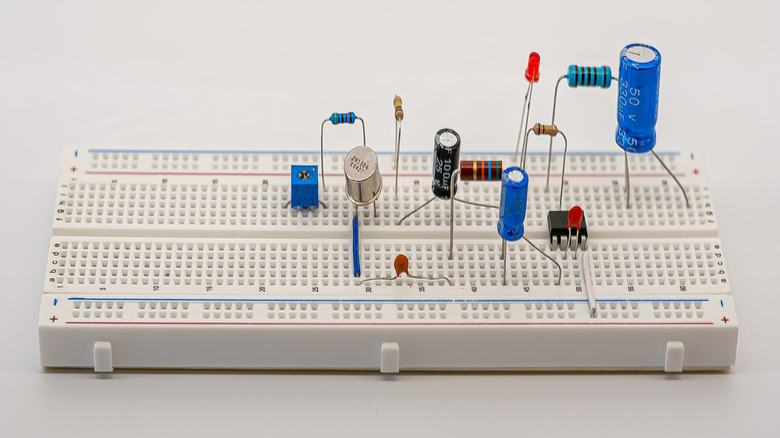
Breadboard
Any digital gadget is constructed on a PCB board, with soldered connections bridging the assorted energetic parts of the circuit. Of course, that is solely splendid for everlasting circuits, and also you desire a extra versatile choice for connecting issues when experimenting. The Arduino solves this to some extent by offering numerous headers for connecting to any modules. You can plug some issues in immediately with the suitable header pins, or use cables.
The downside with this strategy is that even this could get tedious. If you are attempting to prototype a venture and deciding on the precise structure of the circuit, the very last thing you need is to fiddle with a multitude of cables as you plug out and in numerous modules. The resolution is to make use of a breadboard. The title could sound unusual, however it’s mainly a solderless board with a grid of tiny holes for mounting digital parts. The holes are all linked by design, so you’ll be able to merely push in any half and it turns into part of the circuit, with no need any cables or soldering.
A decent-sized breadboard is crucial for getting began with Arduino, because it enables you to take a look at out any enjoyable venture concepts with out being daunted by the connections. As a newbie, additionally, you will have a a lot simpler time determining circuits on a breadboard. It can be attainable to construct your circuit completely on the breadboard itself, even soldering the connections if you would like.
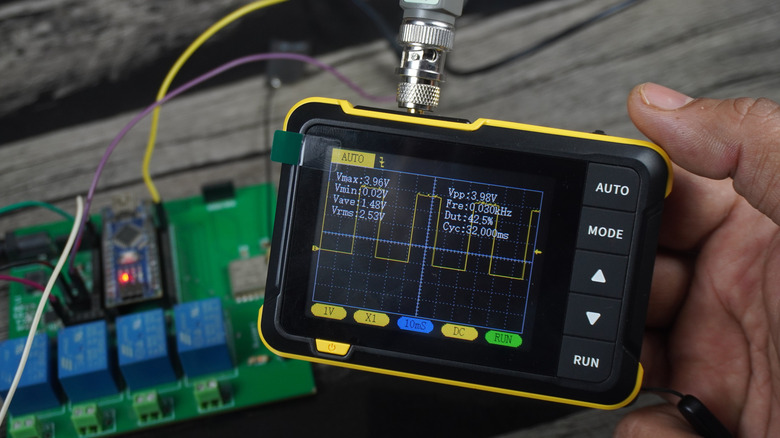
Logic analyzer
The foremost factor that separates the Arduino from a easy electronics board is that it’s really a completely useful microcontroller. This means it has a CPU, RAM, and various parts that may deal with advanced logic and be programmed with directions. But this additionally creates a brand new dimension of troubleshooting to cope with. When an Arduino circuit you design would not work as meant, is the issue purely electrical or logical? Incorrectly configured sensors can find yourself interfering with one another or sending the fallacious sign, resulting in the Arduino processing their inputs in an sudden method.
Normally, there is no such thing as a easy manner of diagnosing a logical problem. A multimeter can solely let you know in regards to the electrical features of the circuit, and logic indicators are too low-power to be detected this manner. You are left with simply trial and error to manually work out the difficulty. Unless you have got a logic analyzer.
A logic analyzer is a gadget that may connect with a digital circuit and precisely seize its sign circulation, serving to you simply work out how the logic is shifting by means of the circuit. With a logic analyzer, you’ll be able to see precisely what is going on to every particular person sign and pinpoint the place issues go fallacious, saving hours of guide debugging. It can appear to be a frightening gadget to get began with, however it’s straightforward to make use of for less complicated digital boards just like the Arduino. Highly really helpful for any critical Arduino hobbyist.
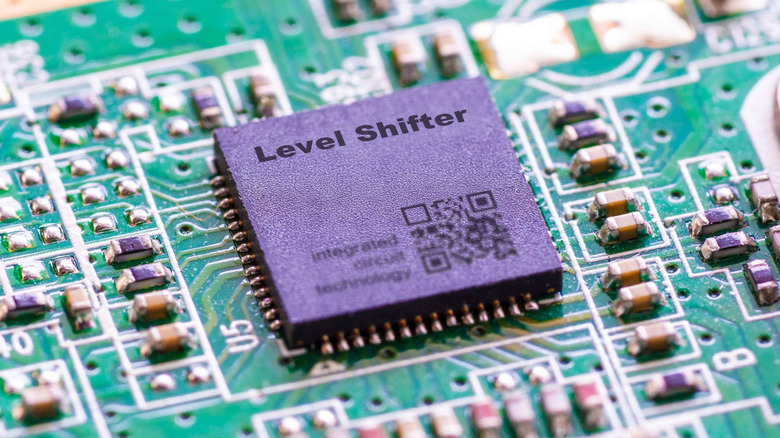
Level shifter
We talked in regards to the logical points in digital circuits and the right way to diagnose them with logic analyzers, however how do you resolve them? For issues like incorrect wiring, you’ll be able to simply repair your connections, however that is not helpful for dealing with the interplay amongst a number of enter sorts. When you have got a number of sensors and even a number of shields linked to the identical circuit, you want to fastidiously deal with the circulation of sign knowledge between them. If linked immediately, the various voltages will overpower one another, giving inconsistent outcomes.
What you want is a stage shifter. It is an easy module that may shift the logic stage of any sign greater or decrease, relying on the necessity and configuration. Usually, that is between 3.3V and 5V, as most Arduino equipment are rated for these voltages. A single bi-directional logic level shifter can normally deal with a number of such conversions, so getting even a single one is sufficient for any Arduino venture you take note of.
And should you assume you’ll be able to simply use DC-DC converters as an alternative, assume once more. Boost or buck converters are used to regulate the facility provide on your parts, not for logic circulation. You use them when there’s a mismatch between the facility your battery supplies and the facility a part wants. A stage shifter, however, shifts the voltage stage of a digital sign, preserving its data. You use this to bridge totally different digital parts interacting in a circuit. Essential Arduino accent.
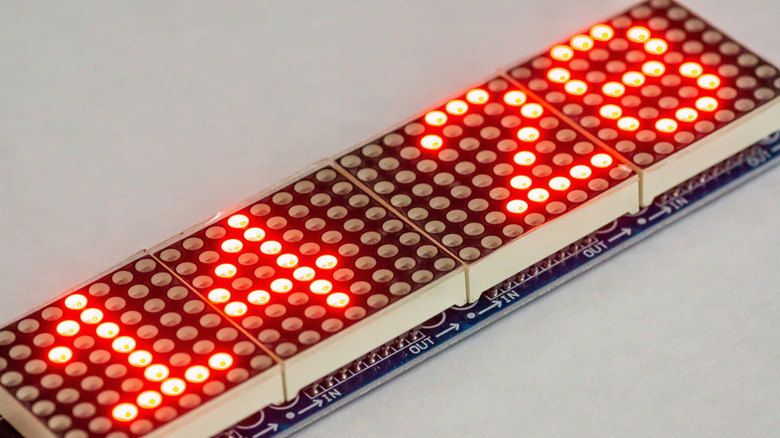
LED matrix panel
The starter equipment comes with just a few LEDs of assorted colours, and it may be actually enjoyable connecting them and programming your Arduino to mild them up in cool patterns. The downside is that there’s solely a lot you are able to do with a handful of LEDs, and single-color LEDs at that. What you really want is a grid of RGB lights that you may then program to really talk.
You may even use this methodology to “print” out letters or digits, displaying easy messages. Since the Arduino lacks a display or something related, this visible suggestions might be very helpful. Of course, it’s attainable to purchase an LCD display for this function as nicely and to print textual content immediately. But that will not educate you the basics of dealing with a number of parts and having them work in tandem. Besides, an LED matrix panel is extra noticeable at a distance and a extra enjoyable venture.
There is a variety of selection in RGB LED matrices in the market. The foremost distinction is within the decision, or the variety of LEDs in a grid like this. You desire a grid that’s large enough for fundamental shapes and patterns, however not so dense that it turns into a ache to program with an Arduino’s restricted RAM. An 8×8 RGB LED matrix is the most effective for Arduino initiatives.
Solid state relay
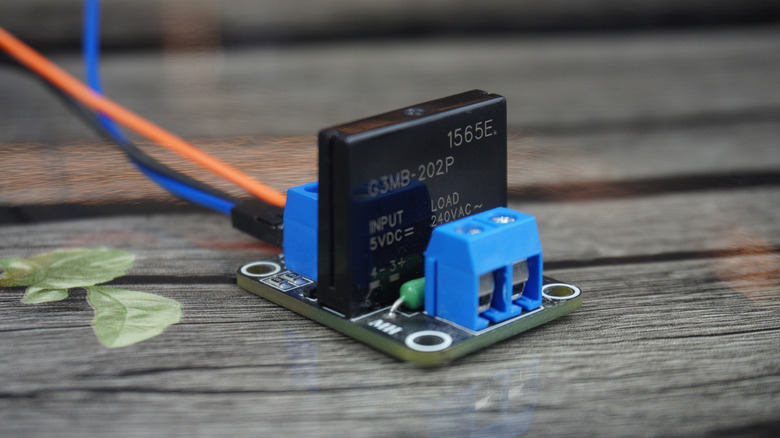
The Arduino’s foremost draw is being a easy, low-power pc that may be programmed to function on good logic primarily based on sensors and different elements. But what if you wish to management precise house gadgets utilizing your Arduino as an alternative? With one thing like a Raspberry Pi, that is simply doable, as you have got a correct pc with community entry. As such, there are a variety of DIY Raspberry Pi good house initiatives.
For an Arduino, you want a solid-state relay (SSR). Normally, you can not immediately join your Arduino circuit to a house equipment. The Arduino is a single-board pc operating on low-voltage DC present, whereas gadgets that plug into the mains are constructed for high-voltage AC present. An SSR bridges this hole by working like an digital swap that may deal with the high-power hundreds whereas being triggered by low-power indicators.
Basically, you join any customary machine to the socket by way of the SSR, then use your Arduino to regulate its conduct, as you’ll with an LED. This manner, you’ll be able to program the microcontroller to modify the system on and off primarily based on advanced logic, together with enter from any sensors, successfully turning your Arduino right into a home-automation system. A solid-state relay is quite cheap, so you’ll be able to simply buy a few for numerous initiatives. Just remember that the output voltage issues, because it wants to have the ability to deal with the system’s load with out getting fried.
Stacking headers
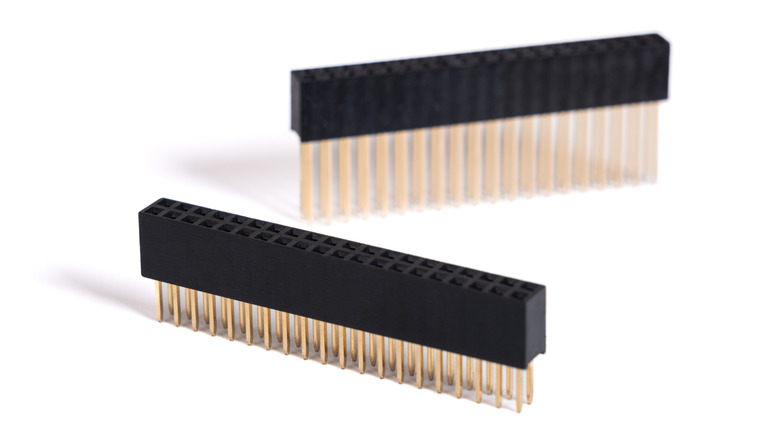
A breadboard is nice for experimenting with numerous circuit configurations, however when the time involves put the venture collectively on a extra everlasting foundation, you want direct connections. The design of the Arduino makes this straightforward, with a number of headers accessible that you may plug any modules into. For easy circuits, this is sufficient to accommodate every thing you want. But when you begin including just a few extra parts, you notice you’ll be able to’t precisely match every thing within the scarce few headers on the board.
The compatibility itself is not the issue. In phrases of {hardware}, the Arduino is able to accommodating a variety of add-on modules. The downside is bodily becoming all these connections in, since there are solely so many headers, and past a degree, the parts wrestle to suit on one tiny board. The reply is stacking headers.
These headers are designed with very lengthy pins that undergo the board, permitting you to mount parts vertically. The peak ensures that something you connect this manner is obvious of the parts immediately on the bottom Arduino board. And since they characteristic female and male connectors on totally different sides, you’ll be able to repeat the method, mounting one other board on high with its personal set of parts. This is named a defend and is how folks stack layers of modules on the Arduino, making it infinitely extensible. Definitely get a stackable header kit to make your subsequent venture simpler to assemble. Maybe even a finances soldering iron to put in them.
Case
The Arduino comes as an open digital board with all its key parts mounted visibly on the printed circuit board. This design alternative is deliberate, because the Arduino is supposed to assist college students and hobbyists get began with electronics. But after getting put collectively a venture with a number of parts, this identical design philosophy appears dangerous. The Arduino is unprotected, and by accident dropping this mass of fragile digital parts might be devastating.
One key accent price investing in is an Arduino case. It would not need to be something fancy; even a easy clear plastic shell can shield it from scratches and impacts with out hiding the internal workings. The downside is that Arduino itself doesn’t promote something prefer it, and the various sizes of the Arduino fashions imply that a regular case can’t exist. Instead, people 3D print cases.
A 3D printed case is totally customizable, and other people have give you all kinds of designs to accommodate totally different sizes and wishes. It is simple to switch a design like this to go away cutouts for the ports your venture wants, and a flat case is simple to 3D print as nicely. You do not need to trouble developing with a design your self, both, as there are many websites with free 3D printing initiatives and open supply fashions you’ll be able to search from.
This web page was created programmatically, to learn the article in its unique location you’ll be able to go to the hyperlink bellow:
https://www.bgr.com/2118646/handy-arduino-accessories-diy-project/
and if you wish to take away this text from our website please contact us