This web page was created programmatically, to learn the article in its authentic location you possibly can go to the hyperlink bellow:
https://www.goonhammer.com/burrows-badgers-jakes-gaming-table/
and if you wish to take away this text from our web site please contact us
Hey, fellow badger lovers! I’ve been engaged on getting collectively the elements to create a pleasant board for some Burrows & Badgers video games. Now that it’s nearing completion, I’d wish to share it with anybody else who is likely to be doing one thing comparable. There have been a number of surprising bumps alongside the best way, however the finish result’s one thing I’m fairly pleased with. I hope it may possibly present some inspiration for anybody who’s excited about doing one thing comparable and likewise present that errors can function studying and rising experiences. Don’t let pursuit of perfection cease you from making an attempt out new strategies and even doing one thing you’re fairly positive you’re dangerous at!
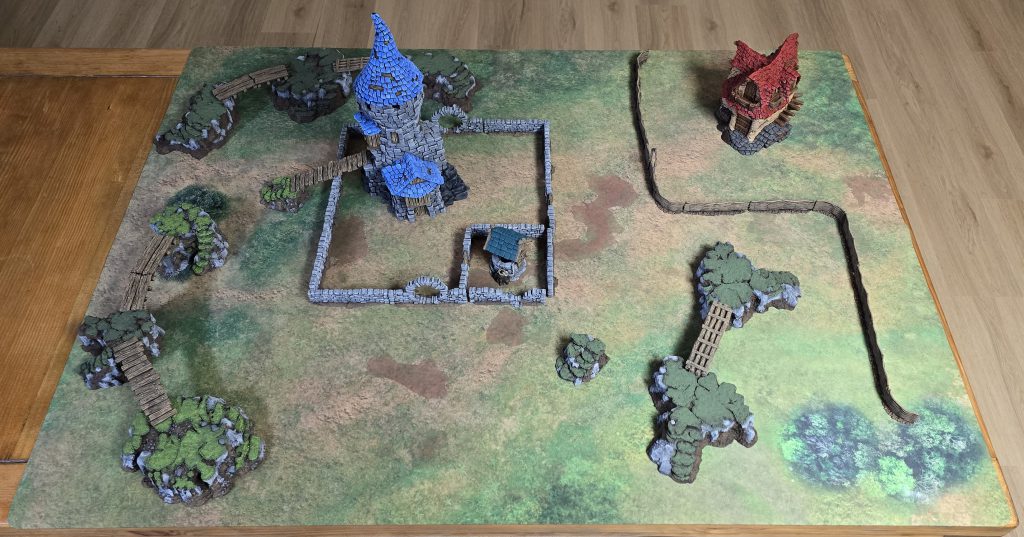
My preliminary strategy was fairly easy. I wished a recreation mat and a few fundamental terrain options to interrupt it up and supply an immersive and interesting play house. Starting with the mat, I did some trying to find completely different corporations that made play mats with some first rate trying grassy discipline kind sample. I used to be considerably shocked at what number of locations supplied the bigger mats for greater video games however didn’t have the smaller choices that I used to be in search of. I spent a number of days studying opinions, evaluating costs, seeing how lengthy transport can be (I’m within the US and this was additionally throughout one of many many intervals of worldwide transport uncertainty that we’re being plagued with). I ultimately pulled the set off on a 36″ x 48″ model of the Traveler’s Road from Grey Matter Gaming, pictured above and under. The day after I positioned the order, I found that Goonhammer had already positively reviewed it – I might have saved a variety of time if I simply utilized the final word useful resource that’s Goonhammer dot com! Learn from me and you should definitely verify this beautiful web site.
Once it arrived, I discovered that I used to be fairly pleased with the standard of the mat and the transport bag. The included thick cardboard tube to roll the mat round proved to be fairly helpful, as effectively.
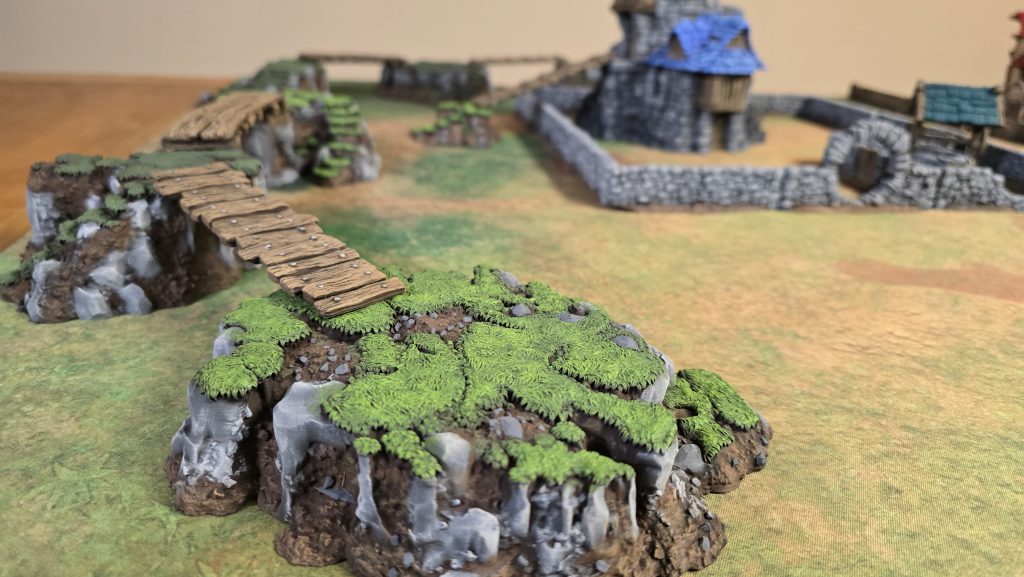
For terrain, I didn’t have too many specifics in thoughts. I largely wished one thing that match the whimsical however grounded vibe I get from trying on the artwork within the rulebook. Sure, there’s a ferret carrying plate armor but it surely’s sensible armor – no outsized pauldrons or eternally burning demon fires on the helmet. Given my obsession with a sure hex-based board recreation (shameless plug for Goonhammer’s Warhammer Underworlds protection), it has been a number of years since I performed any video games with terrain; my final full on wargame expertise had a variety of L-shaped ruins, so this time round I wished my desk to be one thing considerably completely different from that. I began digging round for my choices. There are loads of superior options for terrain on the market and plenty of of them work with the aesthetic that Burrows and Badgers has, whether or not you’re leveraging fantasy themed or historic terrain.
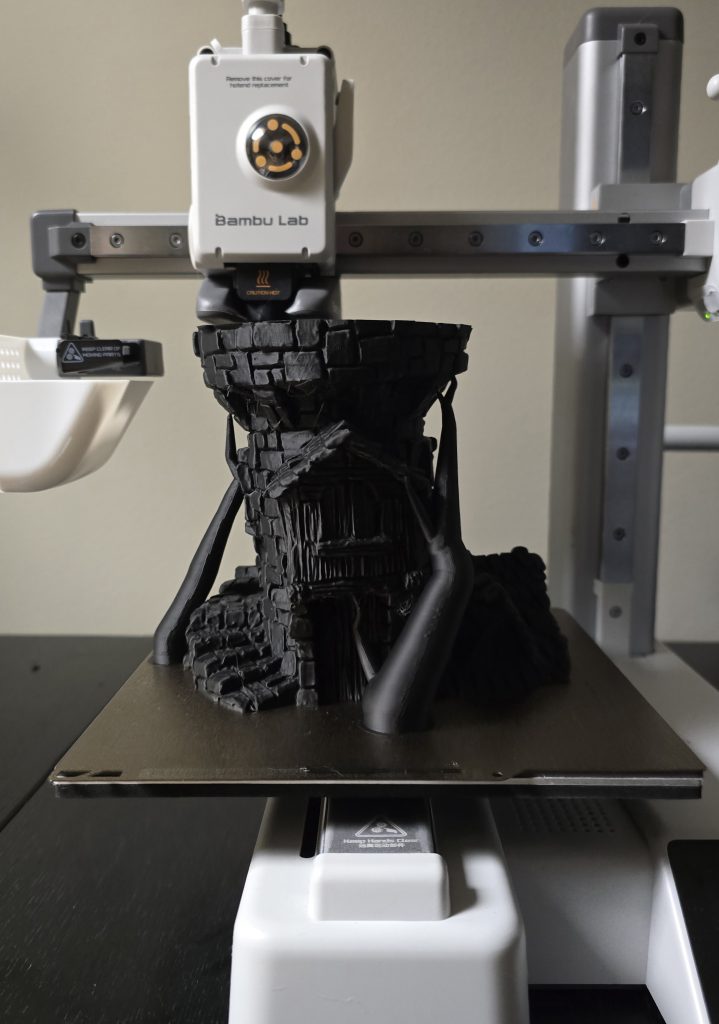
The official kits from Sarissa Precision Limited look nice (try the proof on this evaluate!). Scratch constructing terrain can be a time honored passion custom. I do know that I personally have many fond reminiscences of flipping via the outdated 90s terrain constructing passion books I had as a child. I even just lately constructed somewhat Hobbit home ebook nook for my beloved spouse as a Christmas reward final 12 months (using yet one more Goonhammer useful resource within the helpful tutorial) and had a variety of enjoyable. However, for this specific enterprise, I wished to leverage the brand new toy I had picked up – a 3d FDM printer. Specifically, it was a Bambu A1 mini that I bought as a result of I used to be fed up with the poisonous annoyance of my earlier resin printer. If you’re curious, there’s additionally a 2-part Goonhammer evaluate of the A1 mini.
There are innumerable gifted 3d sculptors on the market who’ve recordsdata listed on numerous locations. I spent one other few days simply poking round these web sites, asking completely different passion communities what they use, and getting aggravated at how typically Pinterest outcomes present up when doing picture searches. I can’t bear in mind the place I finally discovered the Hagglethorn Hollow line from Printable Scenery, however as soon as I did I instantly fell for the attraction current within the constructing sculpts.
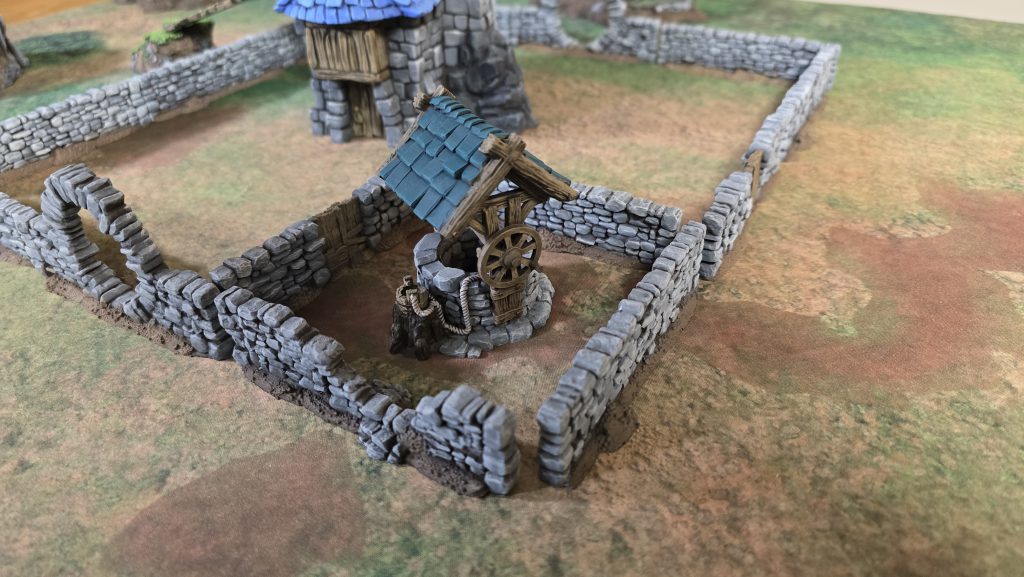
After trying into them somewhat bit, I discovered the construct course of was that they have been first bodily sculpted by Weta-Workshop sculptor Johnny Fraser-Allen earlier than being digitally scanned. This is likely to be one motive why I felt prefer it’s an ideal match for Burrows & Badgers – the Oathsworn fashions for the sport are lovingly hand sculpted by Michael Lovejoy, so having terrain that can be hand sculpted by one other gifted artist lends itself towards a thematically constant board full of caprice. There’s an added bonus in that not solely are there loads of buildings, however there are fences, bridges, gardens, and different miscellaneous bits that may function scatter terrain from this identical launch. This isn’t a sponsored evaluate in any means; I simply actually like how they appear and leaned in on them when printing out terrain.
There have been a few hiccups I bumped into whereas printing, however they have been all 100% my fault as I bought the cling of my new printer. The recordsdata for the fashions labored nice out of the digital field. Many of the bigger buildings additionally come pre-sliced into chunks for smaller printers just like the A1 Mini, as effectively. That stated, I caught to printing the smaller buildings that might be capable of match comfortably on my construct plate. I selected to print many of the items out in black filament simply to make sure that if something will get scratched or paint chips off throughout a recreation, it received’t be as noticeable as if I used fluorescent orange or one thing equally brilliant.
While I kicked off the print queue that might final a number of weeks of off-and-on printing, I began to additionally prep for portray. I would like to emphasise that I’m not a prolific painter. I’ve talked about in earlier articles that it’s a miracle if I can get myself to color a single squad dimension of fashions, not to mention a whole board of terrain. I knew this is able to require some planning each when it comes to shade scheme however most significantly in making it one thing quick, simple, and repeatable throughout a number of objects. I made a decision to lean arduous on leveraging the time-honored terrain pace portray strategy of dry brushing. This comes with some dangers on printed terrain as a result of the method can emphasize the layer strains, however I used to be fairly pleased with the standard of my prints from utilizing a smaller 0.2mm nozzle and a helpful print profile that I discovered on-line. Sure, it meant that the small homes would take upwards of two days to print all of the elements, however I wasn’t actually in a rush. Partly as a result of I had no deadline and likewise partly as a result of portray is a perpetually looming specter that fills me with dread and placing it off spares me for a number of extra days.
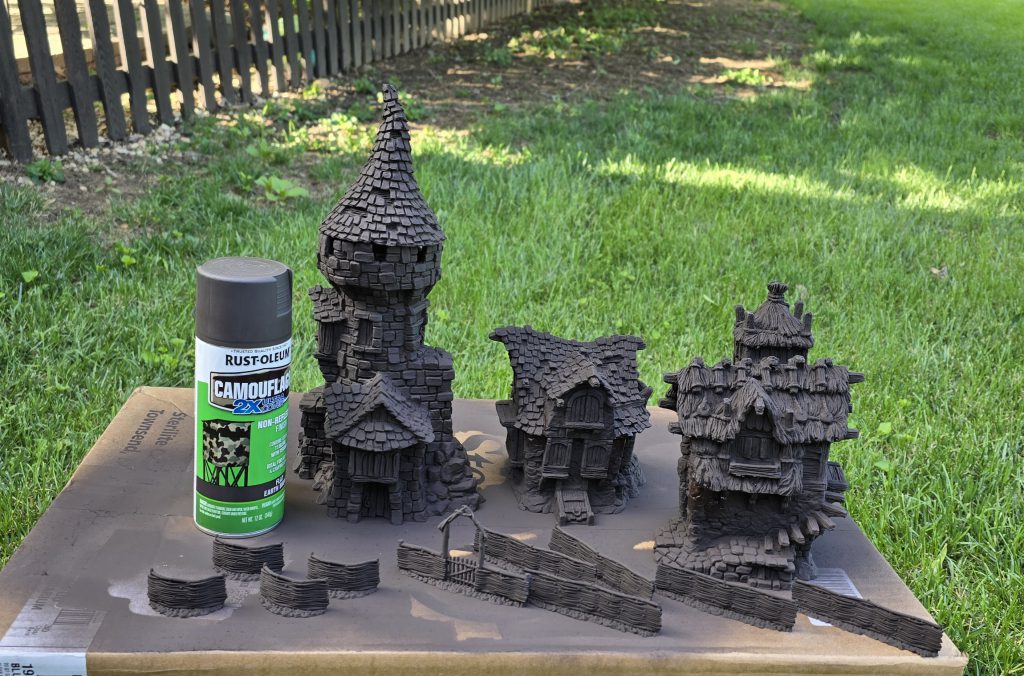
For anybody who has been within the miniatures passion for some time, you’ve most likely heard of us recommend utilizing low-cost craft paints for stuff like terrain – all these buildings and partitions require a variety of paint to cowl, so it makes a variety of sense to go for a cost-effective resolution. With this in thoughts, I made a visit all the way down to the native craft retailer and picked up a number of bottles of no matter model of generic acrylic paint they’d. I picked up a wide range of browns for the wooden, grime, and straw; some greens to hit the grassy elements of the hills; greys for the varied varieties of stones; and an assortment of brighter colours like crimson, teal, and blue to pick spots of shade just like the roof tiles and doorways. While I used to be there, I grabbed a few low-cost brushes. No sense in needlessly beating up my fancy Artis Opus drybrush set, proper? I ended subsequent door and picked up a can of very matte Rust-oleum Camouflage Flat Earth Brown to make use of because the primer for every part. I went with brown as a result of I deliberate to basically use that as the bottom coat for many of the colours and simply drybrush successive highlights. Again, pace and ease are the secret.
Honestly, it was a depressing expertise. The protection of the paint was horrible and I used to be needing to do a number of coats to get something trying even near good. The low-cost brushes I purchased had some bizarre bristles that felt like they have been product of plastic as a substitute of (even artificial) hair, inflicting the paint to simply slide proper off immediately. I stored with it as a result of I had at all times heard that is what of us do with terrain – you employ low-cost paint to save cash in comparison with the considerably larger value per quantity of miniature paint and since you possibly can’t inform a lot of a distinction within the last product.
The finish consequence was… positive. The paint had fairly weak protection, so I used to be doing a number of passes of every shade which took extra time than I anticipated. In an try to hurry it up, I made the beginner mistake of going type of heavy on a number of the paints. This meant a little bit of the definition of the sculpts was misplaced, notably within the plaster cracks and in a number of the wooden grain. I tried to salvage by making an attempt a instrument I had picked up some time in the past and had but to make use of – Streaking Grime from AMMO by Mig – which did assist fairly a bit after a beneficiant coating and elimination with some make-up sponges. This introduced out the small print once more properly, however did go away a surprisingly shiny end to the home.
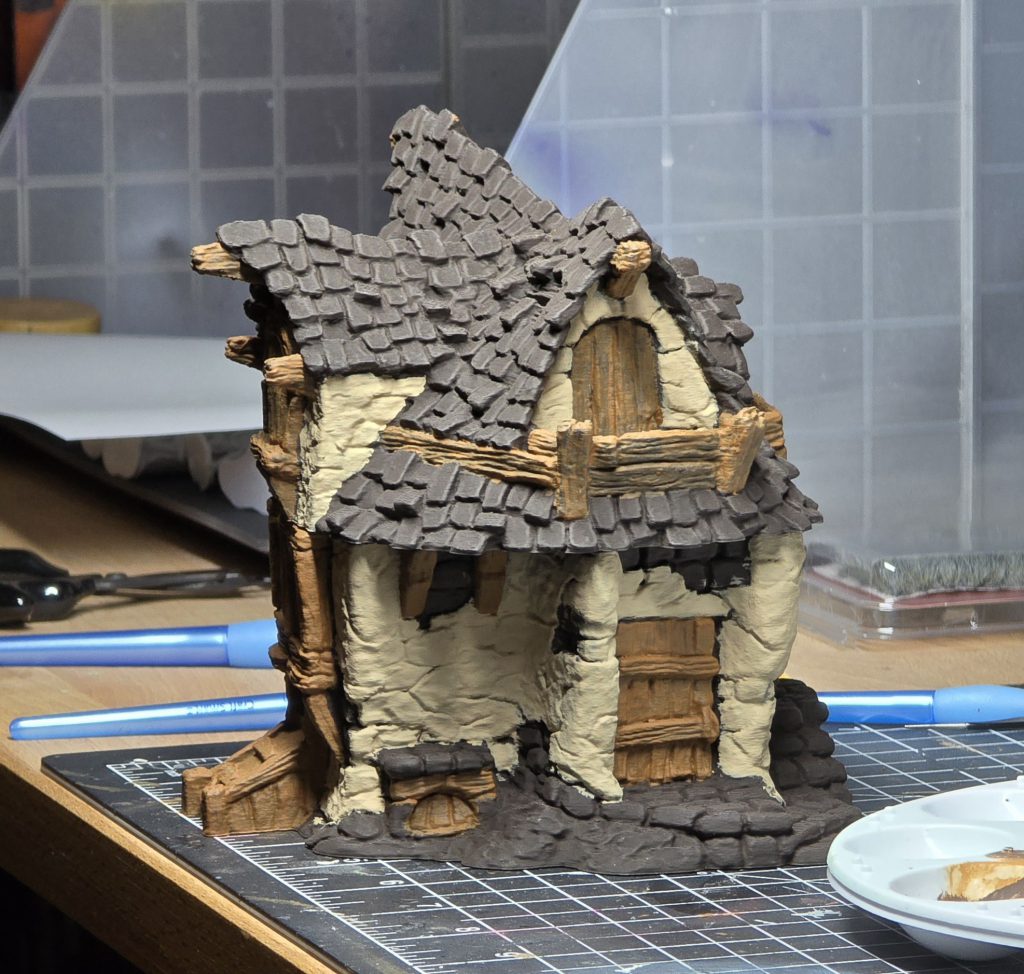
This experiment wasn’t an entire failure regardless of the disagreeable paints, brushes, and my time spent making an attempt to make all of it come collectively. The finish consequence was acceptable and attending to lastly check out streaking grime was enjoyable. The primer was nice. It had a pleasant brown shade that I really feel works as a base for all the opposite colours I’m including. I’d say it was “rich” or “warm” or “color theory complementary to my hues” another artsy sounding factor however I truthfully don’t know what these phrases imply so I’ll simply go away it at “it was a really nice brown.” It did really feel extraordinarily matte with some additional texture that wasn’t there earlier than priming. I believe this served double responsibility of disguising a number of the layer strains from printing, but additionally gave the surfaces extra tooth so subsequent drybrushing would work a bit higher.
At this level I did some considering and got here to a call. I already personal extra miniature paints than I’m conceivably ever going to make use of. Why am I making an attempt to make use of subpar merchandise to spare the bottles of paint which have been sitting on a rack for over a 12 months? I purchased them to make use of them, so I made a decision to make use of them. While I used to be at it, I wasn’t going to make use of the cheap-ass plastic feeling brushes that I purchased – it was time to seize the most important Artis Opus drybrush I had and go to city.
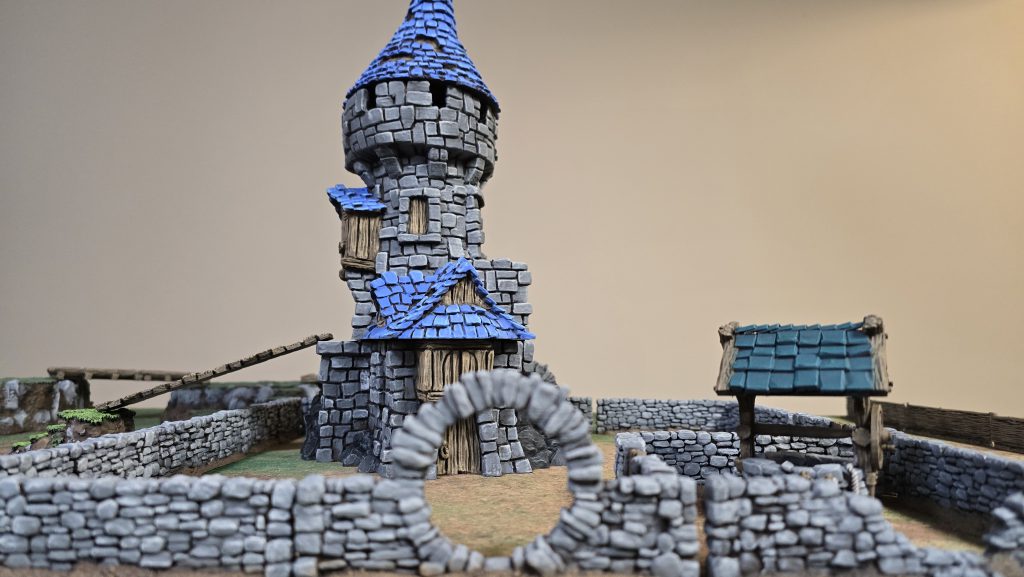
This expertise was considerably extra pleasing. There’s most likely a lesson right here about utilizing high quality instruments. The passion paint coated considerably higher, which means I needed to do fewer coats which saved each time and paint, bringing the price of paint per terrain bit somewhat extra in line (I received’t lie and say utilizing Pro Acryl is cheaper than Apple Barrel or no matter, but it surely’s most likely not as dangerous as you assume). The brushes have been extra predictable when utilizing them, so I wasn’t battling unpleasant streaks. I used to be shocked with simply how briskly I used to be capable of get via a pretty big tower – so massive that I needed to print it in three or 4 elements earlier than assembling it.
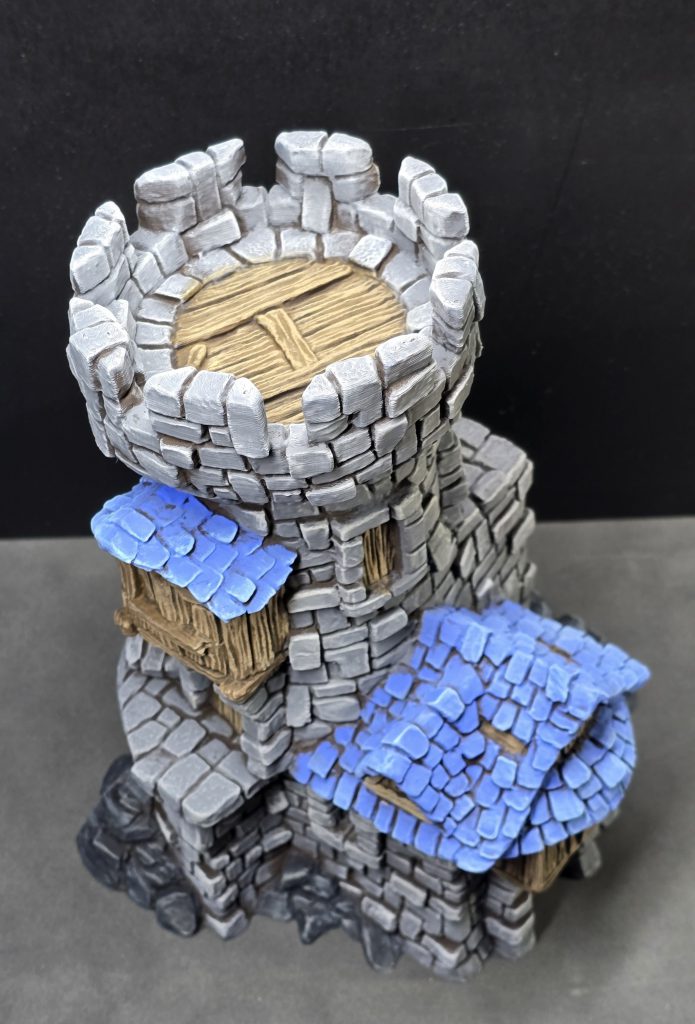
The pace was solely as a result of ease of drybrushing and utilizing the Rust-oleum Camouflage Flat Earth Brown primer as my base. Each a part of the terrain is simply two completely different colours utilized on to the primer brown – the primary is a reasonably heavy drybrush, the second a a lot lighter one focusing on the sides of the shapes.
Worked stone: PA Neutral Grey, PA Bright Neutral Grey
Natural stone: PA Payne’s Grey, PA Bright Warm Grey
Wood: PA Dark Golden Brown, PA Caramel Brown
Roof tiles: PA Ultramarine, PA Grey Blue
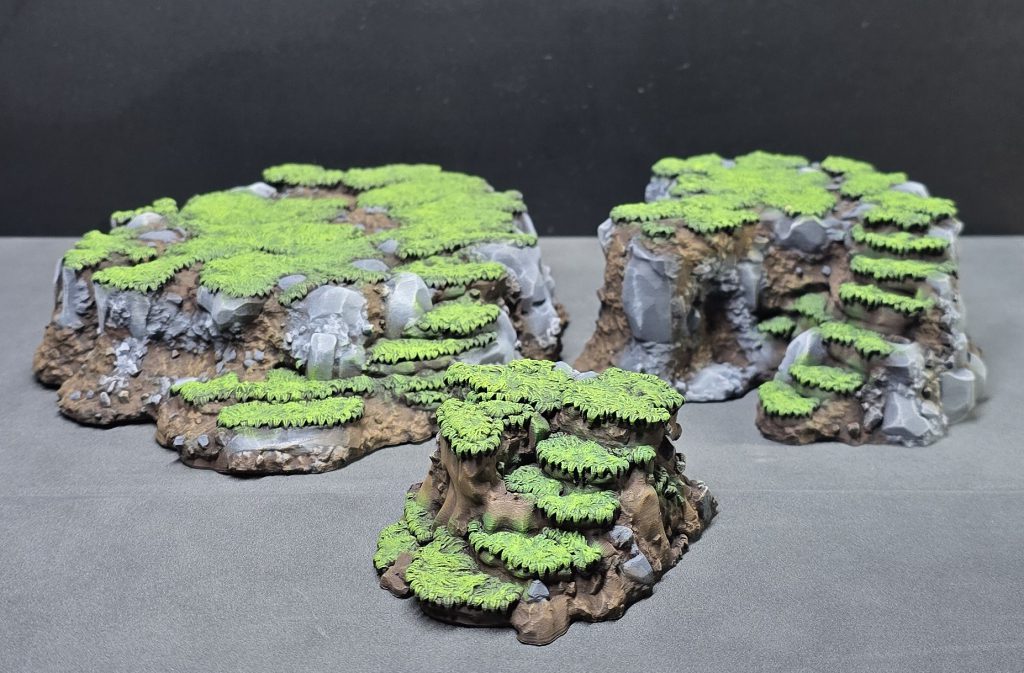
I’m glad I caught with it, as a result of after finishing this piece of terrain I felt like I had momentum. It wasn’t a chore now; it was enjoyable. I did one other check piece to pick some colours for hills I had additionally discovered and after some trial and error, I settled on the next. Again, I’m letting the brown primer function the bottom layer and making use of a heavy and lightweight drybrush of two colours.
Stone: PA Neutral Grey, PA Bright Neutral Grey
Grass: PA Camo Green, PA Bright Yellow Green
Dirt: PA Dark Orange Brown (yep, only one shade on high of the primer right here)
I used to be pumped. I had a plan and the tip was in sight. I spent the subsequent few weeks churning out a mass of prints, constructing as much as one other couple small buildings, half a dozen hills, and I bought bold by printing out an entire river and a bridge crossing it. Once I had this large backlog able to go, I took it exterior on a gloriously nice summer time day right here in Maryland and primed all of it. I left it exterior within the yard for an hour so the primer fumes would dissipate earlier than bringing it again inside.
![]()
![]()
When I went again out to retrieve my weeks of prints, I noticed one thing necessary. PLA (the fabric I used to be printing in) doesn’t have a really excessive threshold for warmth. The summer time solar had blasted my terrain and the darkish brown primer solely served to soak in additional warmth. By the time I bought to them, all of the items had warped. The edges of the hills had curled up a lot that they have been wobbling round like awkward Weebles. The river sections had buckled and folded over like unhappy sizzling canine buns. My bridge, which I had hung out determining the right way to slice into two items to suit on my print mattress and punctiliously assembled with Vallejo plastic putty to cover the seam, had ripped itself aside.
Damn. This truthfully set me again a bit. An insightful reader could have observed that this was the fault of the summer time solar, but it surely’s clearly not summer time as you’re studying this in late October. I had set this venture apart after shedding momentum, however after a number of weeks and the continued need to have a reasonably board for as soon as, I began it up once more. More hills, extra fences, somewhat effectively for the middle of city… I used the magic of recent printing to transform plastic into otherwise formed plastic and tried once more. I even had a piece journey the place I introduced some paint and a bag stuffed with hills and painted them within the resort room within the evenings.

And that’s the place my Burrows & Badgers board is at now. I’ve a accomplished pair of buildings, an assortment of fence and wall lengths, a number of hills, a cute little effectively, and a few walkways/bridges that have been meant to go over rivers however I assume can be utilized to attach numerous hilltops within the meantime. This is sufficient to begin getting video games in with a thematic backdrop. I undoubtedly wish to do extra – I’ve one other pair of buildings printed and primed, in addition to numerous bits of scatter terrain picked out, and a number of units of the Games Workshop Sylvaneth bushes to do subsequent – however I really feel like it is a fairly first rate place to begin.
There have been a number of setbacks alongside the best way, however I really feel like I’ve realized issues. The major one is that there’s no level in being a passion hoarder – in case you have the provides, use the rattling provides. The different is that I would like to verify I by no means go away this terrain in a sizzling automotive when taking it locations or I might be unhappy. Finally, don’t let excellent be the enemy of the nice. Having any painted terrain (or fashions) is considerably higher than unpainted ones, even when they’re simply merely drybrushed or have an utility of distinction paints. In this passion, making an attempt is nice whatever the end result.
Now I simply want to hold these classes over to all of the attractive fashions I’ve picked up from Oathsworn…
Have any questions or suggestions? Drop us a word within the feedback under or e-mail us at [email protected]. Want articles like this linked in your inbox each Monday morning? Sign up for our e-newsletter. And don’t overlook you can support us on Patreon for backer rewards like early video content material, Administratum entry, an ad-free expertise on our web site, and extra.

Related
This web page was created programmatically, to learn the article in its authentic location you possibly can go to the hyperlink bellow:
https://www.goonhammer.com/burrows-badgers-jakes-gaming-table/
and if you wish to take away this text from our web site please contact us