This web page was created programmatically, to learn the article in its unique location you possibly can go to the hyperlink bellow:
https://www.bgr.com/2146834/essential-gadgets-raspberry-pi/
and if you wish to take away this text from our website please contact us
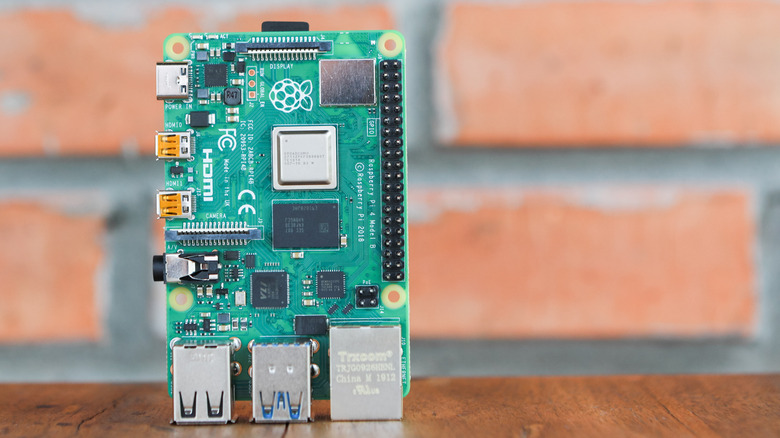
The newest model of Raspberry Pi, the Pi 5, is full of options that make much more intelligent initiatives potential. It comes full with a quicker chip to assist with smoother multi-camera builds, PCI Express to accommodate machine studying setups, and a dual-display port to assist a dual-screen digital kiosk station. Even with out these options, although, the older Raspberry Pi fashions are able to a variety of initiatives too.
But whichever mannequin you go for, there’s one necessary factor to remember: the board itself is just one a part of the equation. Before you possibly can really get began along with your cool Raspberry Pi initiatives, you may want extra than simply the SBC. Yes, working with a Raspberry Pi means having a set of important devices which can be both used immediately within the mission or to optimize its efficiency. Here are a few of these key units each Raspberry Pi fanatic ought to have.
Touch Display 2
While having the Raspberry Pi linked to a monitor, keyboard, and mouse is a beginner-friendly option to work with the Pi, this sacrifices portability. You cannot simply haul across the total setup each time it’s good to. In such circumstances, you’d need one thing extra compact and cellular. That’s the place the Touch Display 2 involves your rescue.
This touchscreen is an official Raspberry Pi accent, that includes a 720×1280, 24-bit RGB TFT LCD with an anti-glare end. It can deal with five-finger gestures, and like some other touchscreen, comes full with an on-screen keyboard for comfort. By default, the Touch Display 2 is in portrait mode, so your Raspberry Pi will initially appear to be a pill. If you favor the usual laptop setup, although, you possibly can rotate the display to panorama mode at any time.
You can get the Touch Display 2 within the five-inch or seven-inch variant. Both are perfect for show initiatives like good residence hubs, retro gaming consoles, and digital image frames. But they will additionally simply change your at-home monitor in the event you simply wish to use your Raspberry Pi as a pc.
SSD Kit
The Raspberry Pi already performs effectively with only a microSD card, however when working extra demanding purposes or in the event you want quicker processing, you are higher off switching to an SSD. An SSD can change your microSD card utterly, which means you possibly can run the OS straight from it, retailer information there, and depend on it for processing. In flip, you get quicker boot occasions, improved efficiency, and improved general reliability.
If you could have a Raspberry Pi 5, the extra environment friendly option to combine an SSD into your setup is with the official SSD Kit. It comes with the NVMe SSD itself and the Raspberry Pi M.2 HAT+ it is going to be linked to. The included SSD is an official Raspberry Pi SSD, so that you’re positive it would work easily along with your board. It’s additionally PCIe Gen 3-compliant and out there in 256GB or 512GB capability. The HAT+, then again, serves because the adapter for the SSD. It plugs on to the Raspberry Pi by means of the PCIe connector and matches completely, even with the Pi 5 Active Cooler put in.
This SSD Kit contains a peak switch charge of 500MBps, making it among the best Raspberry Pi equipment for supercharging your mission. Unfortunately, the HAT+ solely features a single PCIe lane, which is already occupied by the SSD. You can at all times take away it and change it with different equipment, like an AI acceleration module or a bigger Raspberry Pi SSD (additionally out there in 1TB).
Camera Module 3
A digital camera offers your Raspberry Pi the flexibility to see, file, and work together with its environment. It’s really one of many core elements in most of the coolest Raspberry Pi initiatives, starting from a easy time-lapse setup to a extra advanced ball-balancing robotic. While there are many Raspberry Pi digital camera choices out there from the official retailer alone, the Camera Module 3 is an efficient stability between efficiency and price.
It’s a compact digital camera fitted with a 12MP IMX708 Quad Bayer sensor. It options an HDR mode of as much as 3MP output and may file full HD movies at 50fps. It additionally contains autofocus, which you’ll be able to configure by way of software program instructions. Like its predecessor, the Camera Module 3 works with the libcamera software program stack. So in the event you’ve used different official Raspberry Pi cameras earlier than, you would be acquainted with the instructions. To set up the Camera Module 3, merely join it utilizing the included CSI ribbon cable. It’s appropriate with any Raspberry Pi board, however you’d want an adapter to pair it with Raspberry Pi Zero fashions.
In phrases of choices, the Camera Module 3 is available in 4 variations: commonplace 75-degree view, wide-angle 120-degree view, commonplace infrared, and wide-angle infrared. Both infrared variations allow you to use the digital camera for night time purposes, whereas the wide-angle model might be useful whenever you wish to seize extra of the environment, like for residence surveillance and cellular robots.
Keyboard and Hub
Many beginner-friendly Raspberry Pi initiatives begin with connecting the board to a monitor, a wired keyboard, and a mouse. This is the simplest option to arrange and program the Pi for no matter mission you are excited about. The downside is, all these peripherals will dissipate the restricted USB ports on the SBC, which you would possibly want for extra necessary elements of the mission. Fortunately, Raspberry Pi affords an answer to this: the Keyboard and Hub.
True to its identify, the Keyboard and Hub is each a keyboard and a hub rolled into one. It packs in three further USB 2.0 ports to your different Raspberry Pi equipment, like a webcam, flash drive, and mouse. The different port on the again of the keyboard is a microUSB, designed to attach the keyboard to one of many Raspberry Pi’s built-in USB ports.
The keyboard itself appears like a typical QWERTY structure with 79 keys general (78 for the US variant and 83 for the Japan variant), together with Num Lock, Caps Lock, and Scroll Lock, together with their corresponding LED indicators. In the Japanese model, the keys are even printed with Japanese characters for ease of use. Since the Keyboard and Hub is not full-size, it is compact sufficient to hold and use on the go. Like most different Raspberry Pi equipment, this important gadget is available in the usual raspberry and white colour, however you possibly can go for a black and gray mannequin as effectively.
Active Cooler
Like some other laptop, the Raspberry Pi heats up throughout operation. You may not want so as to add any kind of cooling to your setup in the event you’re simply utilizing the Pi for easy duties like writing a doc or controlling an LED. In these circumstances, correct air flow will do the trick. But when you begin working intensive initiatives, that is whenever you’ll want a cooling resolution just like the Raspberry Pi Active Cooler.
Specifically designed for the Raspberry Pi 5, the Active Cooler combines a blower fan and an aluminum heatsink. The fan is temperature-controlled and mechanically activates at 140°F (60°C). It will then enhance its velocity as soon as temperatures attain 153.5°F (67.5°C) and eventually change to the max setting at 167°F (75°C). At full capability, the fan can ship 1.09 CFM airflow and spins as much as 8,000 RPM.
The Active Cooler connects on to the Raspberry Pi’s devoted FAN connector. Once put in, the heatsink sits on high of the wi-fi module and different elements, whereas the fan is over the RP1 input-output controller chip and the primary processor. Unlike different Raspberry Pi equipment, the Active Cooler is a everlasting set up. You cannot uninstall it with out damaging the pre-applied thermal pads and push pins. Don’t fear, although, as you possibly can at all times unplug the fan in the event you’re positive you will not be needing it. But the unit itself ought to nonetheless stay on the Pi.
This web page was created programmatically, to learn the article in its unique location you possibly can go to the hyperlink bellow:
https://www.bgr.com/2146834/essential-gadgets-raspberry-pi/
and if you wish to take away this text from our website please contact us