This web page was created programmatically, to learn the article in its unique location you may go to the hyperlink bellow:
https://petapixel.com/2026/06/24/how-to-turn-a-flat-noisy-raw-into-a-finished-milky-way-photograph/
and if you wish to take away this text from our website please contact us
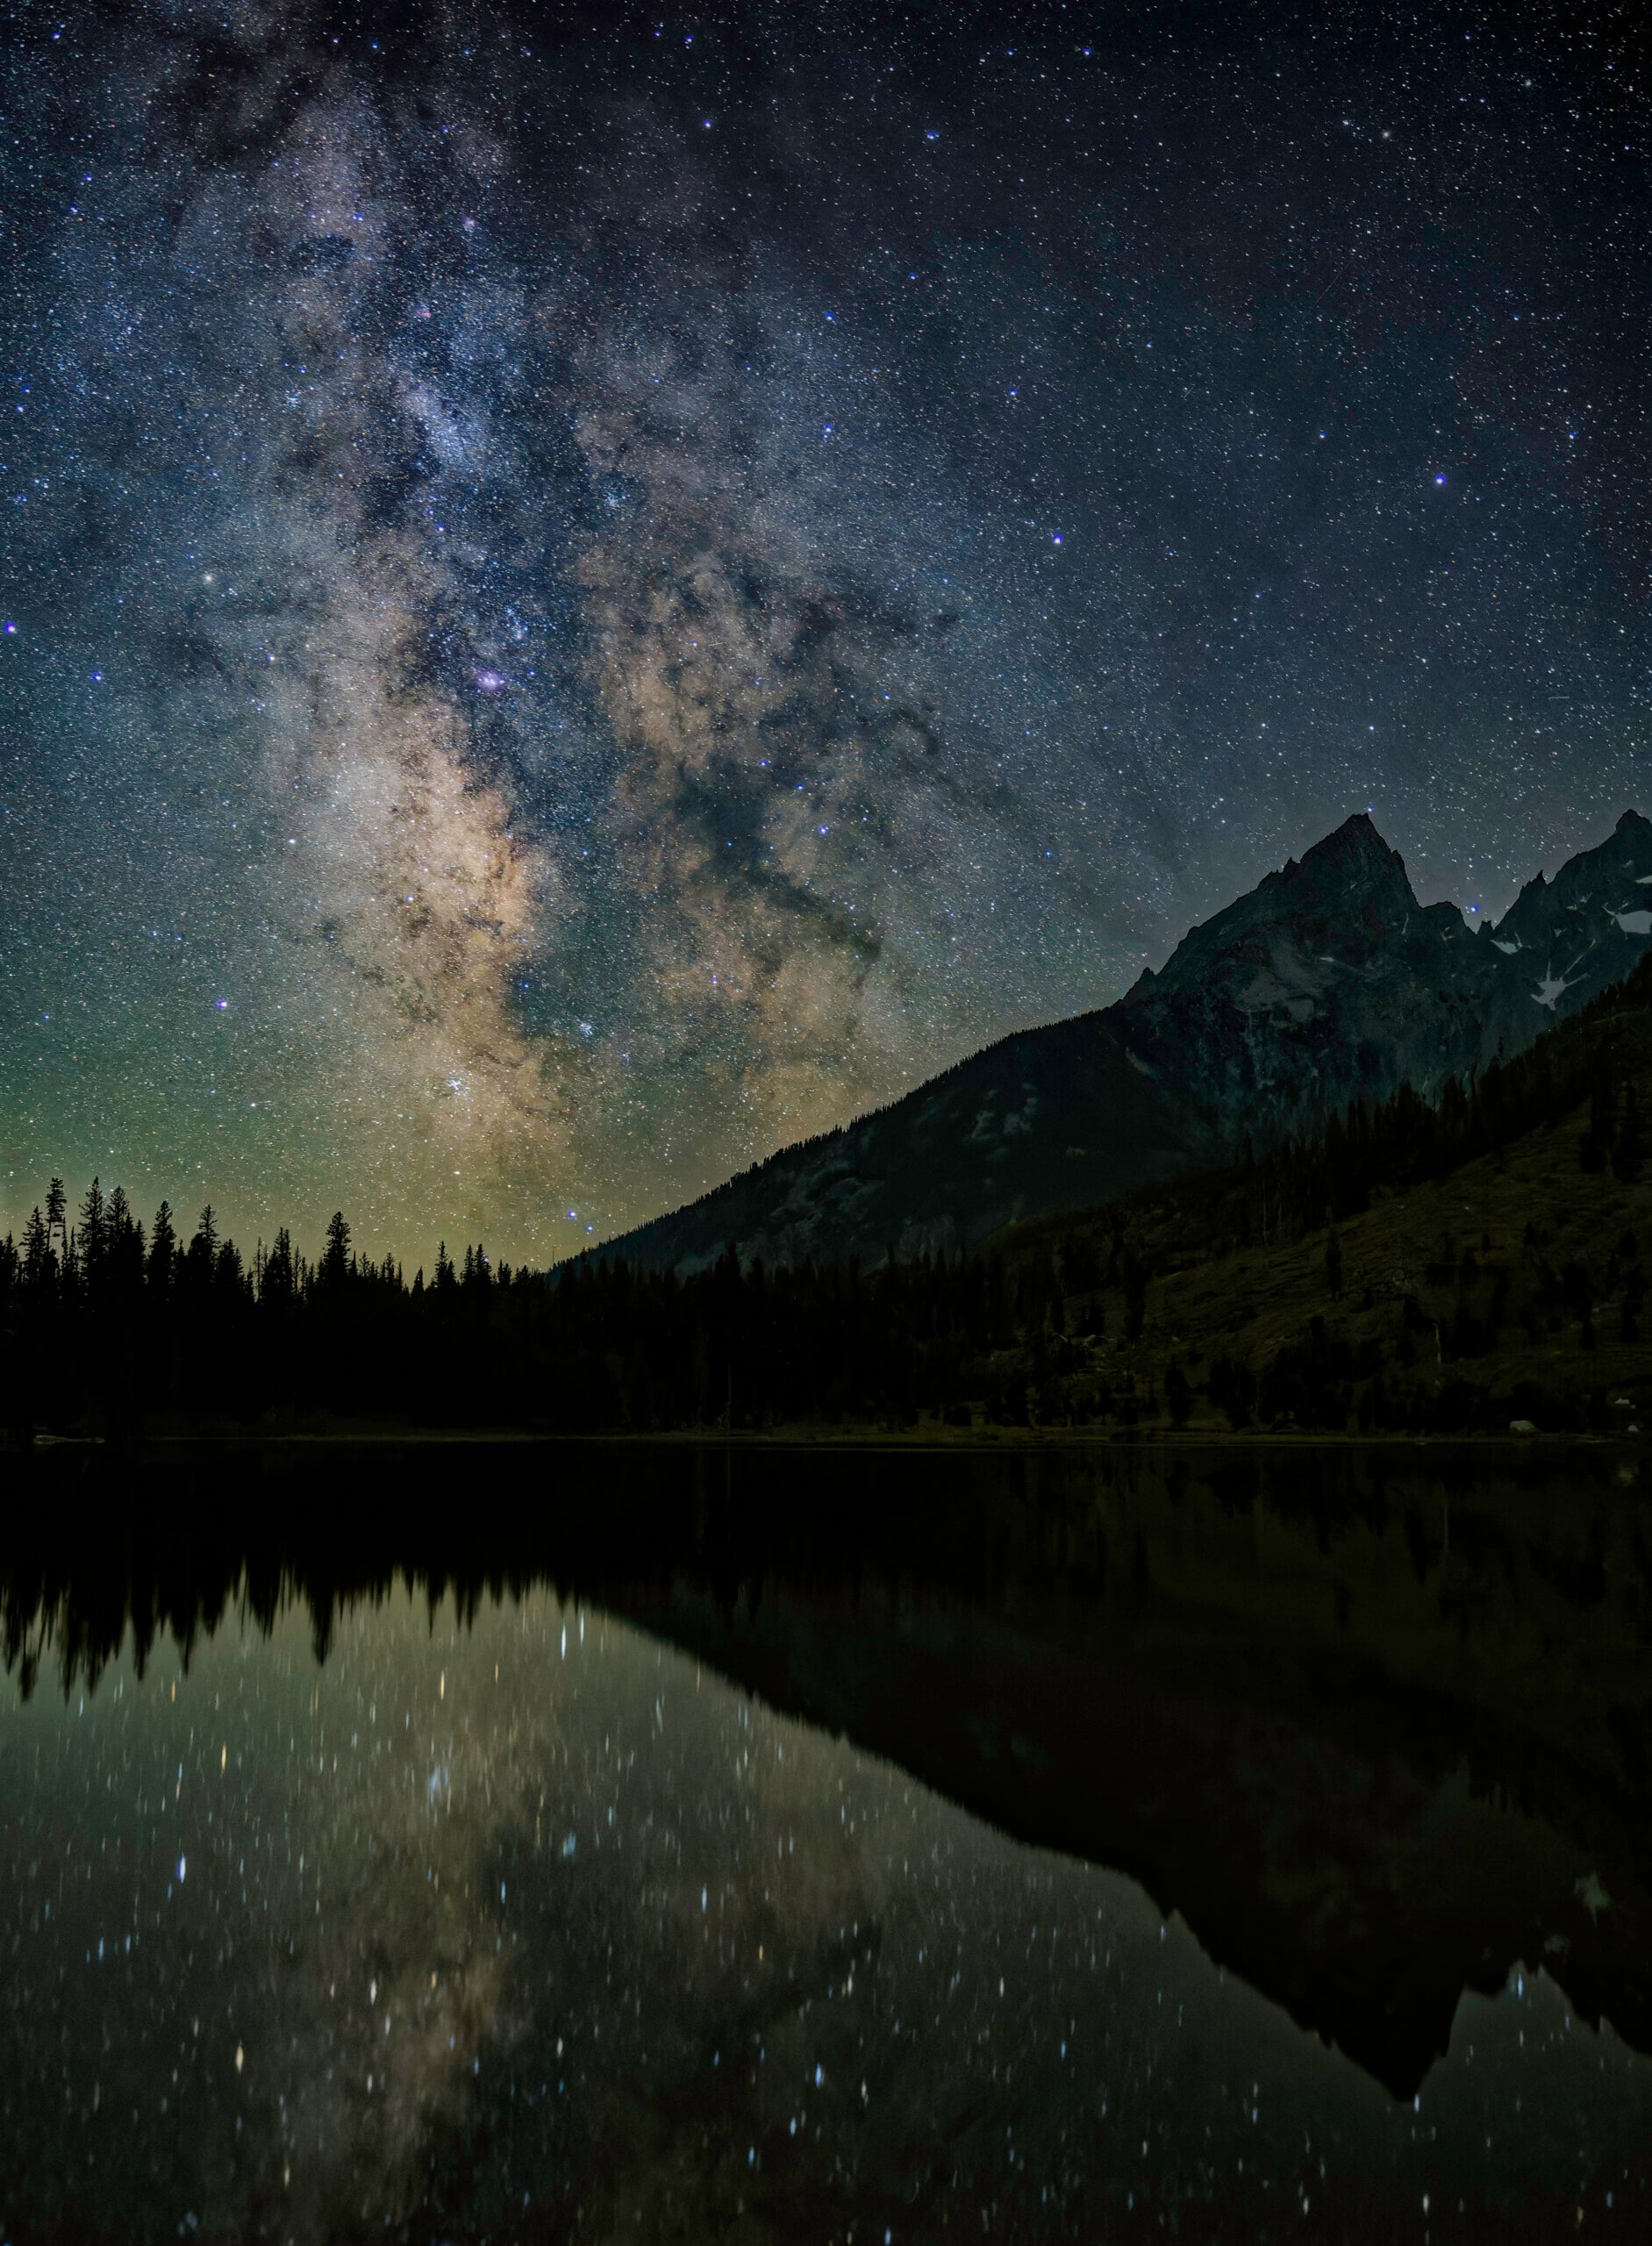
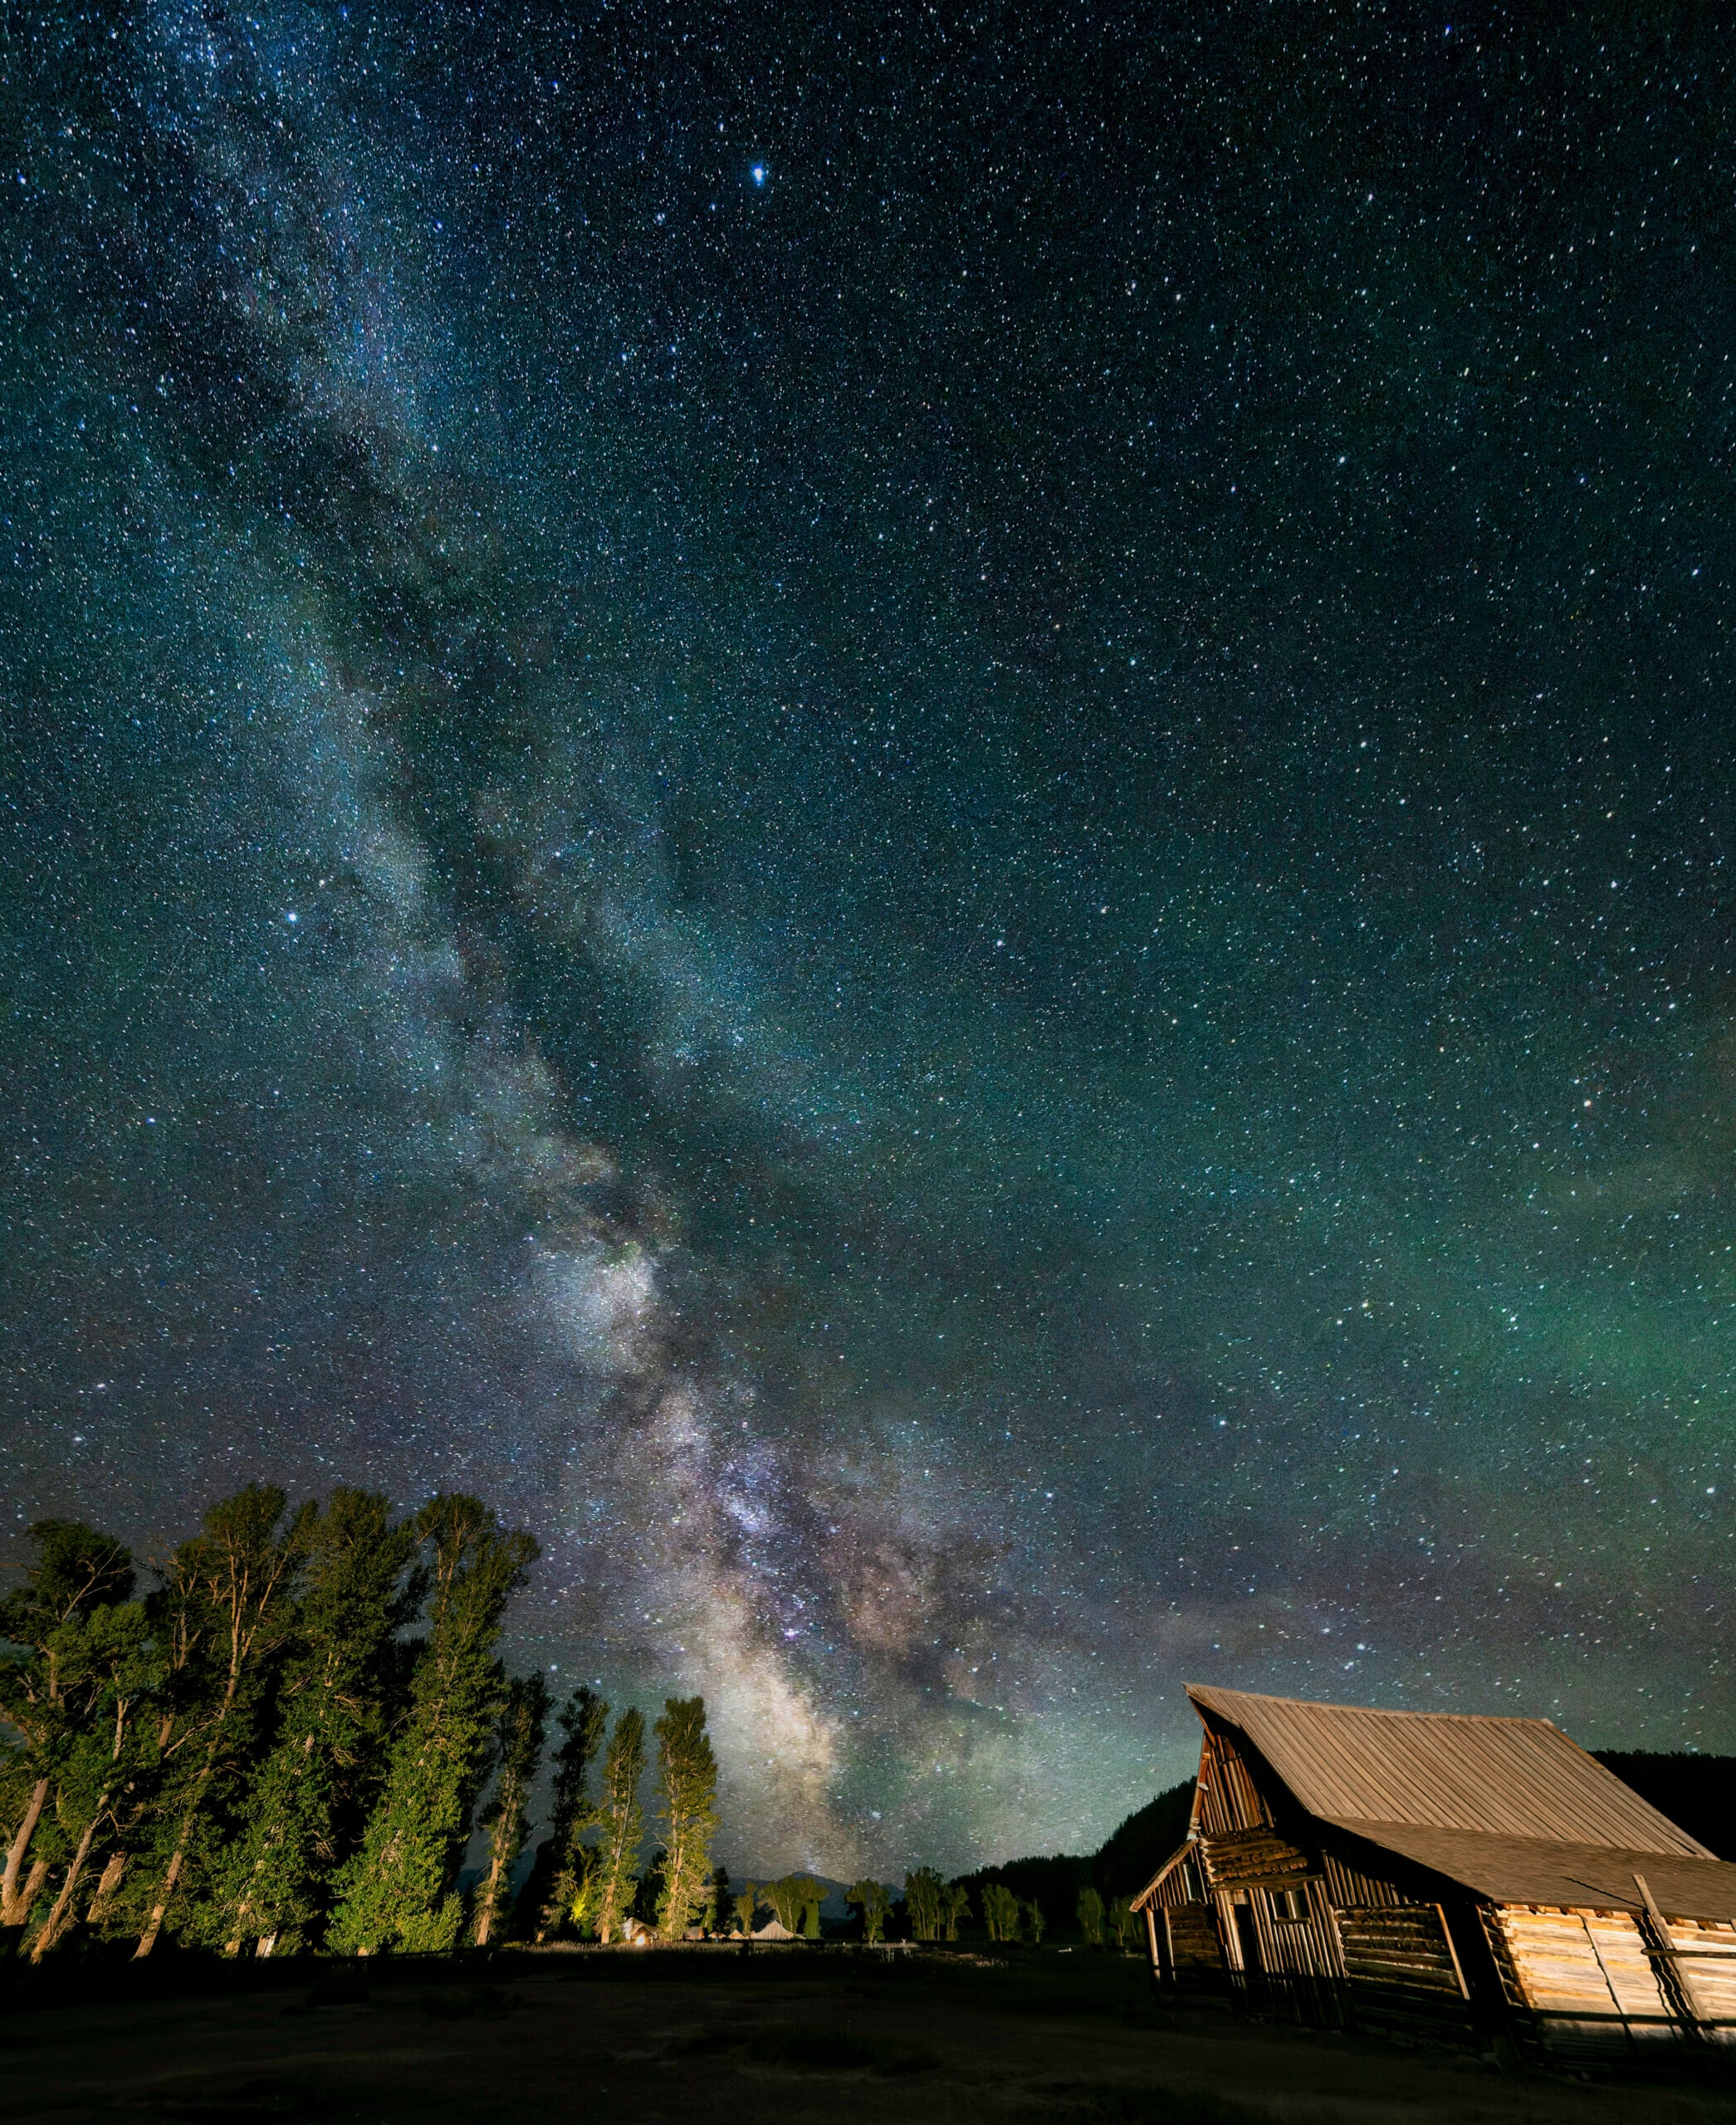
The Milky Way that arched over the Tetons appeared nothing just like the RAW file that got here dwelling. At two within the morning, on Matt Suess’ digicam, it glowed. On his pc the subsequent day it was flat and grey, the core buried in noise, the colour drained out. Every photographer who has pointed a digicam on the evening sky is aware of that hole between the glow on the digicam and the flat file the subsequent morning. Getting that glow again is the actual work.
Full disclosure: This article was dropped at you by DxO. Use the code PetaPixelSummer2026 at take a look at to get 20% off of any DxO product, together with Nik Collection 9 and PureRAW 6 till July tenth (legitimate for brand new prospects solely).
Read The Ultimate Beginner’s Guide to Color Efex.
Read Matt Suess’ 8 Astrophotography Lessons the Beginner Guides Leave Out.
At a Glance
The Picture Isn’t within the File Yet
Noisy RAW information are an issue virtually each astrophotographer faces after an evening chasing the Milky Way. The fast repair is to run a night-sky file by an auto edit in a program like Adobe Lightroom, which leaves you with an overexposed, grainy mess. OM SYSTEM ambassador Matt Suess doesn’t work that manner.
“A night-sky RAW always comes home flat and full of noise,” Suess says. “That’s just what the sensor hands you at two in the morning. The picture isn’t in the file yet, you build it in the edit, and the whole game is doing that without overcooking it.”
Suess has photographed darkish skies for many years and now leads astrophotography workshops in locations like Grand Teton National Park. One of probably the most difficult information he has needed to edit got here from a take a look at of DxO PureRAW, the noise-reduction software program he runs earlier than he edits, when he pushed his ISO far previous his standard restrict.
“I normally cap my Milky Way shots at ISO 6400, but I shot one at 12,800 just to see how far I could push it,” he recollects. “I wanted to know how good a job the noise reduction could really do on a file that noisy.”
Most individuals chase the lacking shade whereas additionally reducing noise by stacking extra frames and pulling more durable on the information. Suess doesn’t.
“My whole approach to a night sky is ‘don’t go too crazy’,” he stresses. “I don’t mind a little bit of noise in the shot. This is a night-sky photo after all, and the second you start pulling too hard, it stops looking like the sky you stood under.”
He works the remainder of the edit the identical manner, a repeatable path from a disappointing RAW to a completed body.
Clean the File Before You Color It
A high-ISO evening body comes off the sensor stuffed with noise, the grainy shade specks a digicam builds up at nighttime.
“The trouble with cleaning a night file the usual way is that the noise reduction smears the stars while it’s killing the grain,” Suess factors out. “The stars are the most fragile thing in the frame. I want the noise gone and the star detail still sharp, and that’s the job I hand to PureRAW.”
PureRAW is a devoted noise-reduction instrument, constructed to wash these specks out earlier than the remainder of the edit begins.
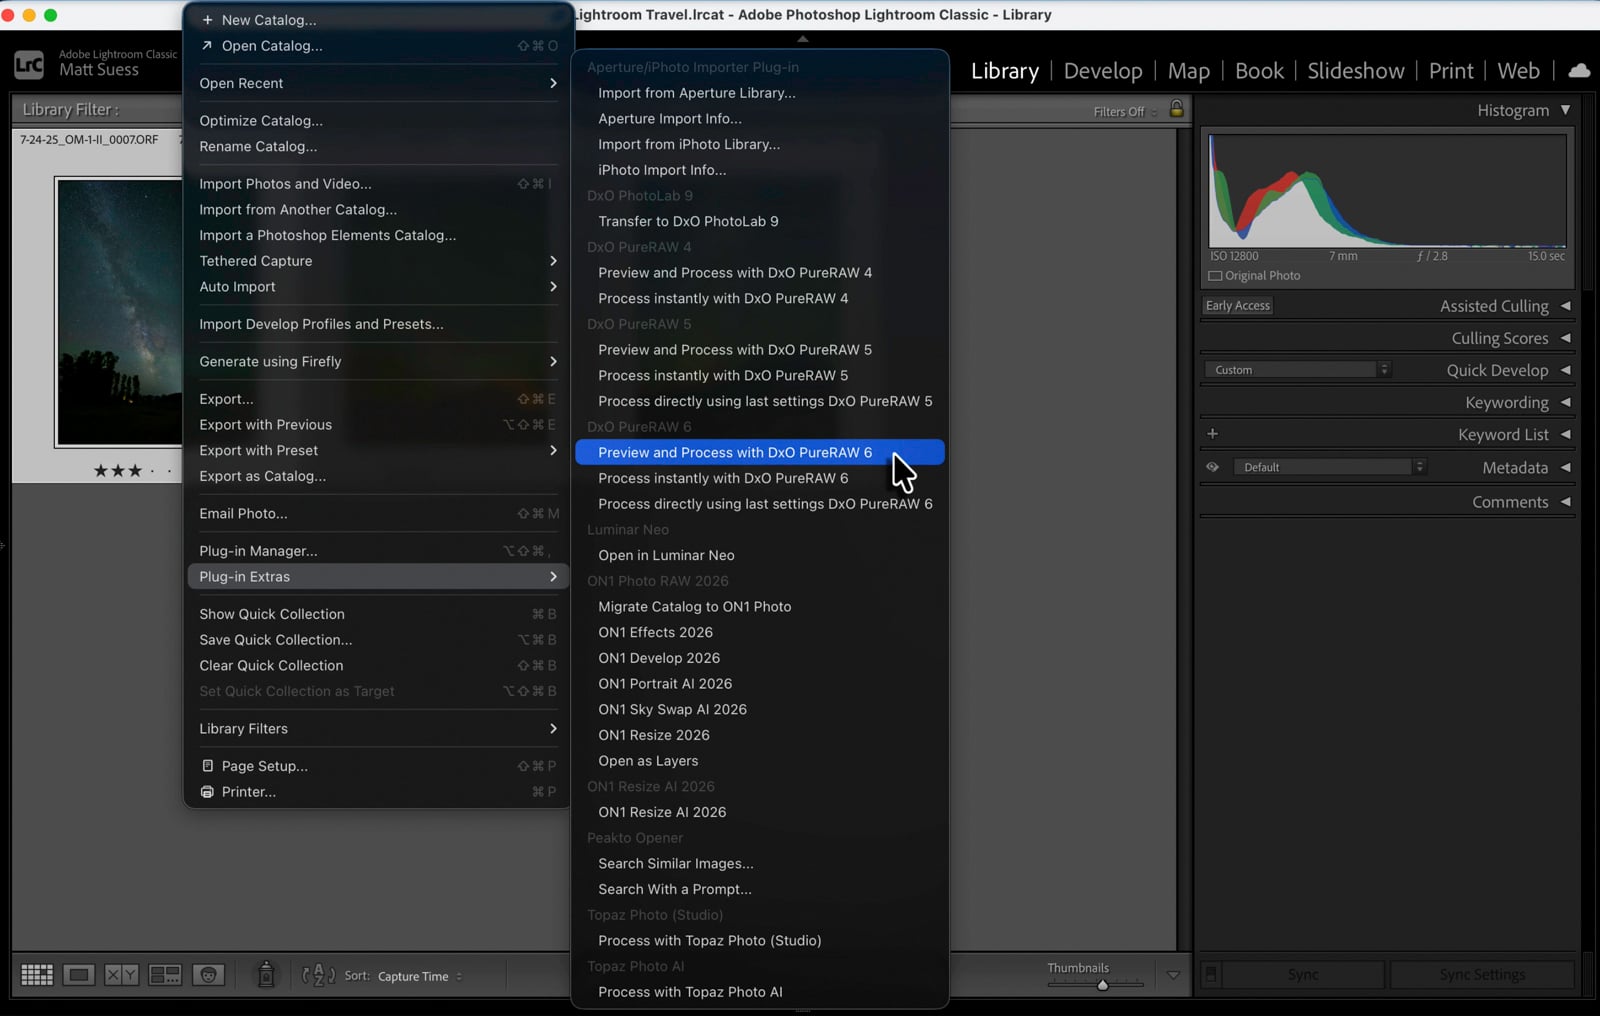
It provides you 3 ways in from Lightroom: course of immediately on its defaults, reprocess along with your final settings, or Preview and Process, which opens the controls first. Suess makes use of Preview and Process, as a result of an evening sky is strictly the place he desires to make these calls himself.
DeepPRIME XD3 is the strongest mode, and the noisiest information are the apparent place for it. On a star area, Suess does the other.
“DeepPRIME XD3 really smooths things out, which is exactly what you want on most files,” he notes. “On a delicate star field, though, that much power can start to soften the stars themselves. I’d rather keep a touch of grain than lose that detail, so for my Milky Way photos, I often go with the slightly less powerful mode, DeepPRIME 3.”
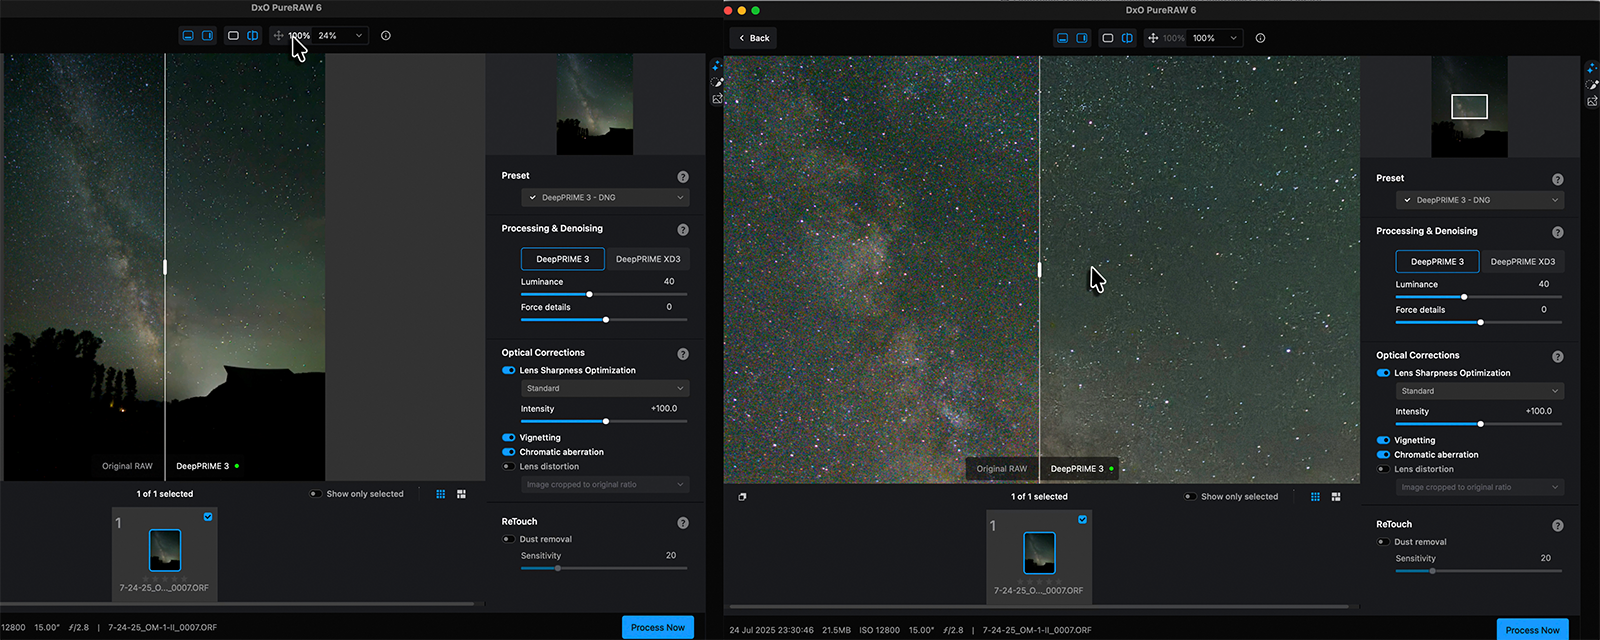
It is a per-image name. The identical instrument additionally demosaics the file, constructing a full-color picture from the one shade every pixel on the sensor really information.
“PureRAW demosaics the RAW file and puts its own little color spin on it,” Suess describes. “I like the color it hands back.”
“I don’t ever develop the RAW before I run the noise reduction,” he explains. “If you sharpen or add contrast to a noisy night file before you clean it, you just bake the grit right in. Clean it first, then you can color it.”
Every lens is slightly comfortable, so PureRAW sharpens to right for it, utilizing DxO’s lab measurements of the precise digicam and lens that took the picture. That management, Lens Sharpness, climbs by 4 ranges: Soft, Standard, Strong, and Hard.
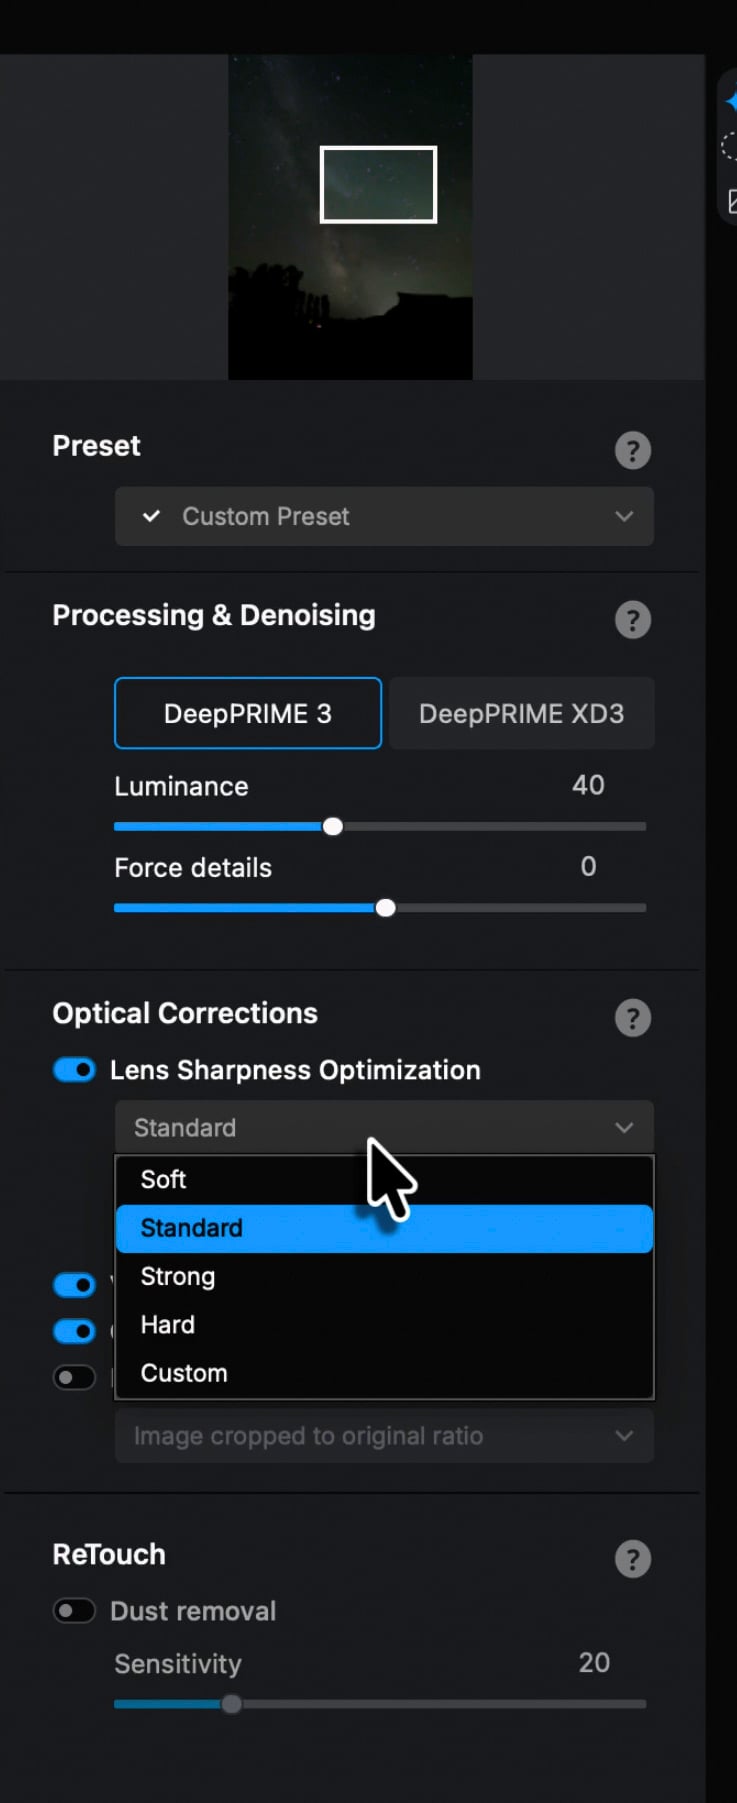
“I keep the lens sharpness on Standard for a night sky,” Suess advises. “If I push it to Hard, it brings up way too much detail and just looks fake, and it starts sharpening the noise right along with everything else. Standard looks much better for my Milky Way shots.”
Where you run that cleanup is determined by the place you already edit. PhotoLab is DxO’s all-in-one editor, a full Lightroom different, so which DxO instrument you attain for comes all the way down to your present workflow.
“If you already work in PhotoLab, everything from PureRAW is built right in,” Suess says. “PureRAW is really for people who’d rather stay in Lightroom. Either way, I finish in Nik Color Efex.”
Develop for the Sky, Protect the Color
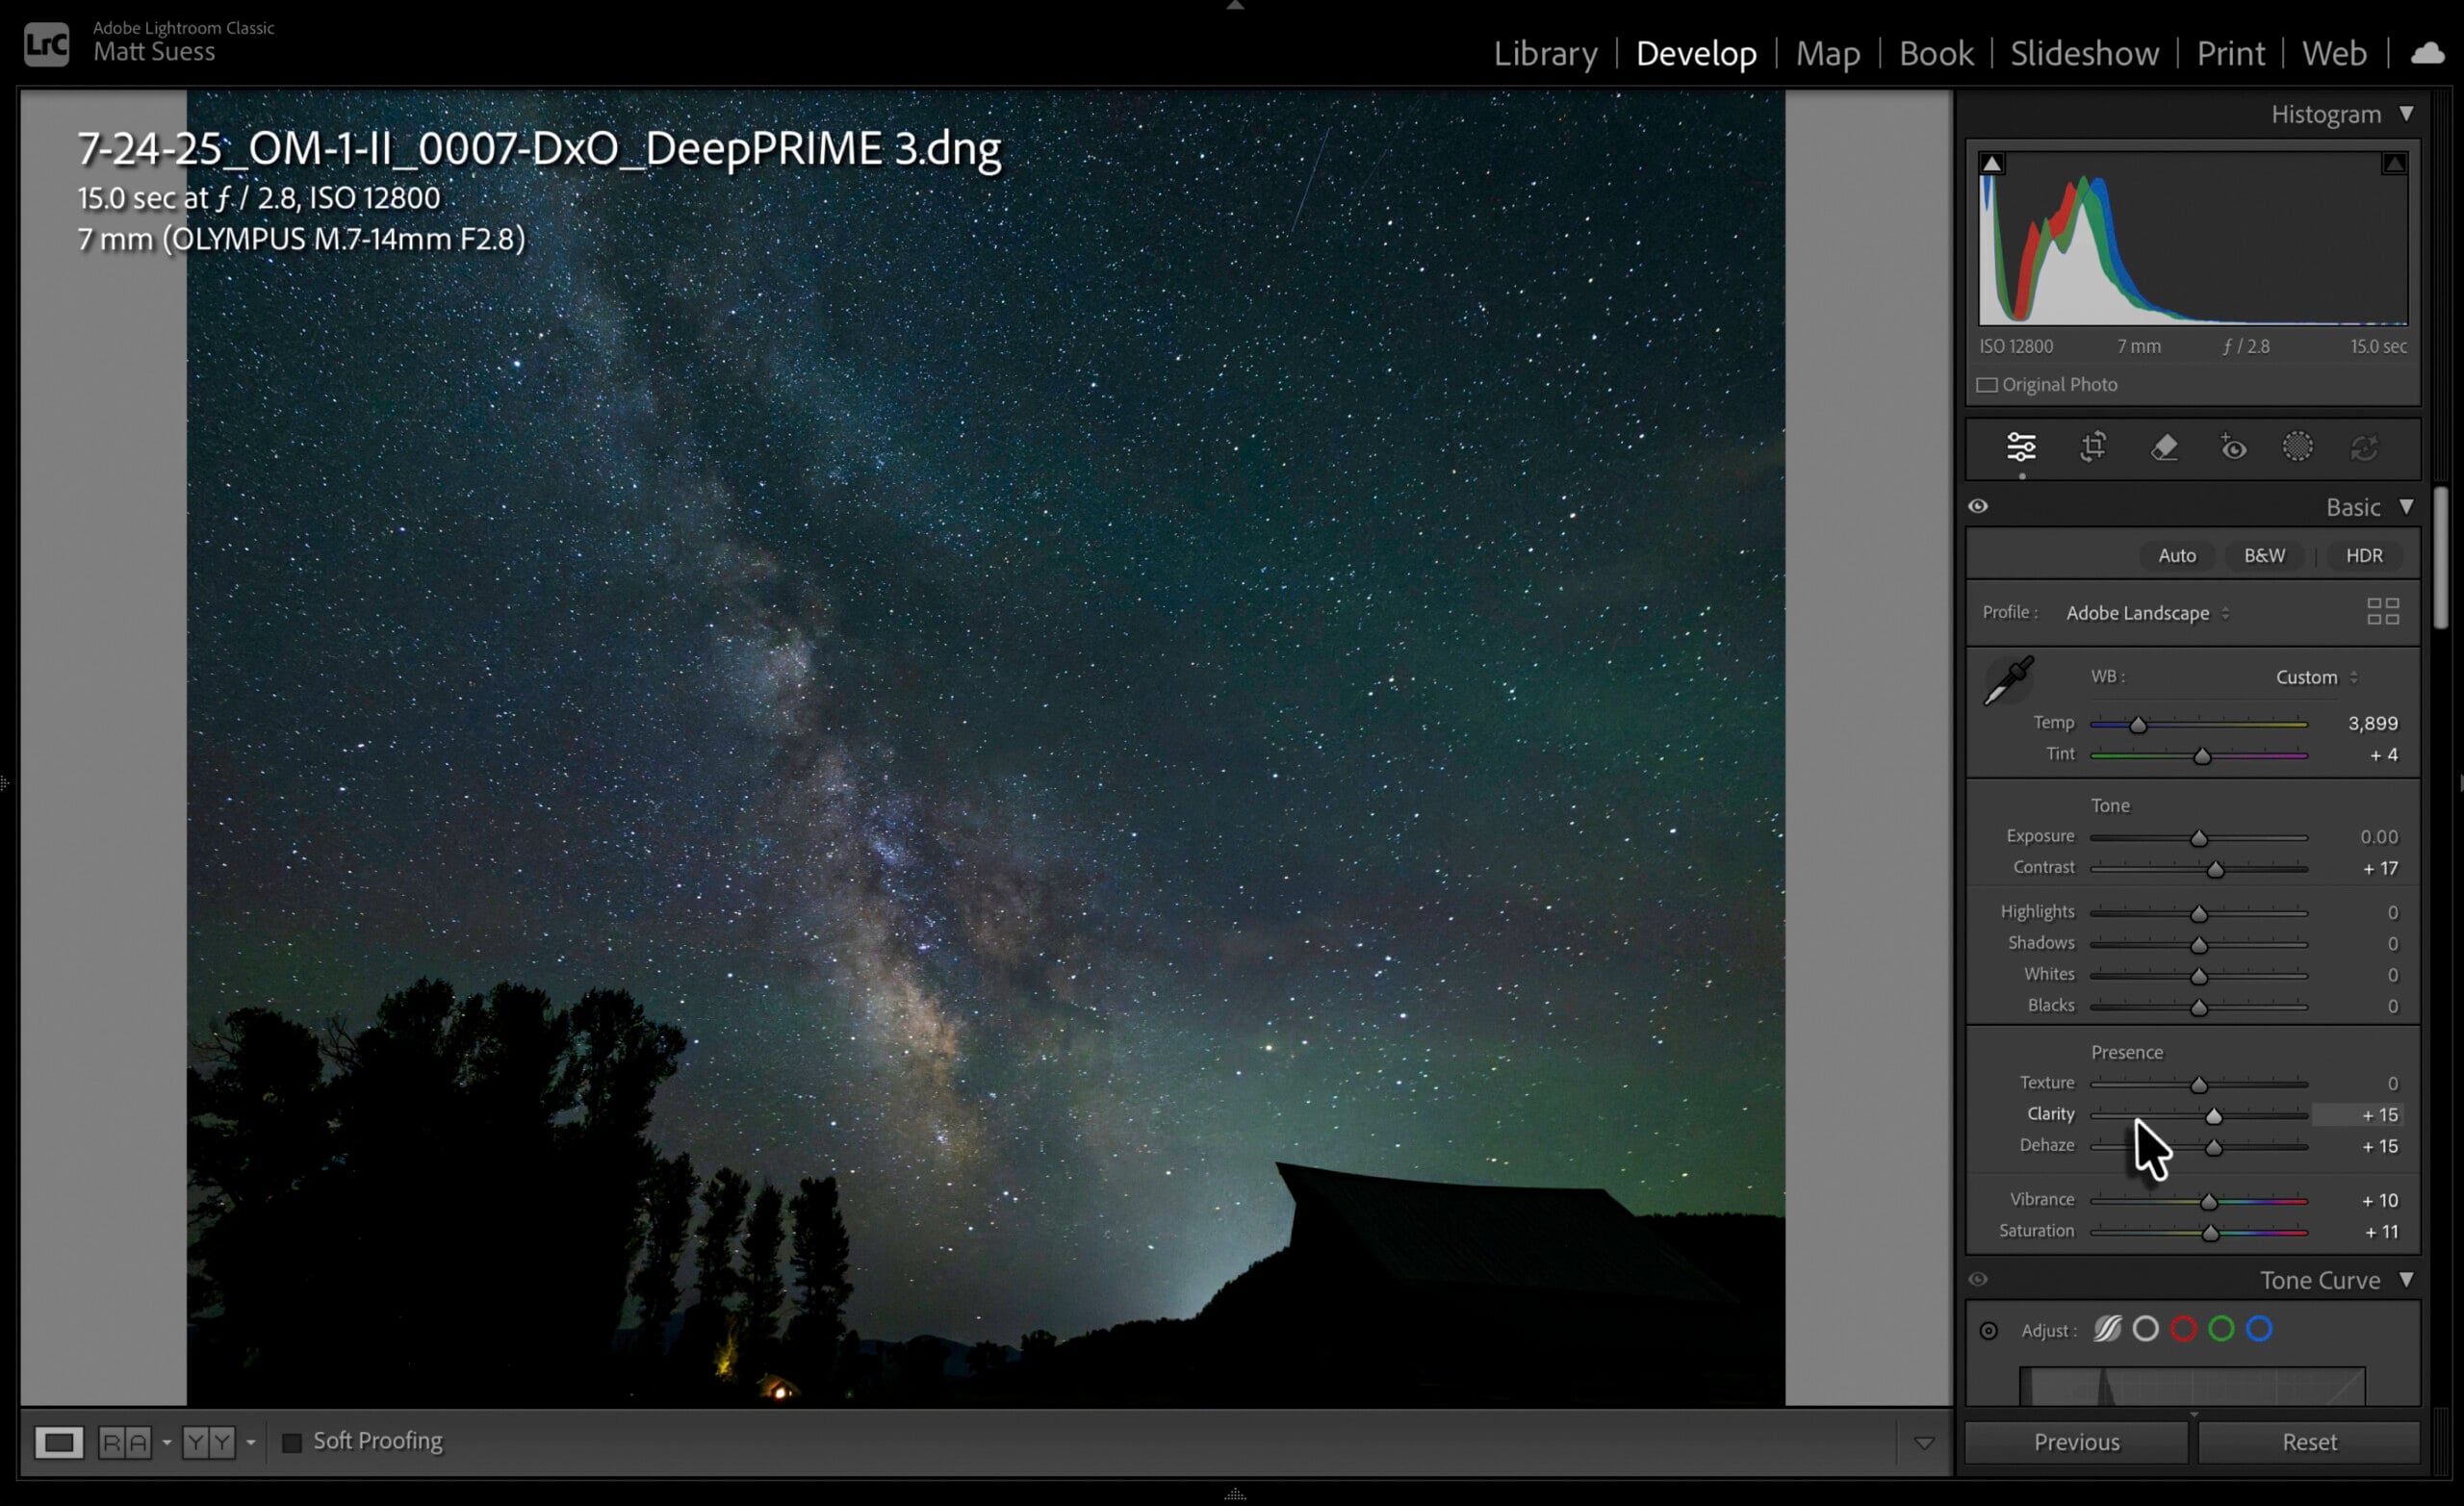
With the noise cleaned out of the night-sky RAW, the file opens in Lightroom’s Develop module for the primary actual shade selections. A sky this darkish typically exhibits a faint inexperienced or magenta tint, and the primary intuition is to right it out like a stray shade solid. Suess sees it otherwise.
“You’ll see green and a little magenta in the sky, and that’s not the aurora, it’s air glow. It happens on these deep dark-sky nights, especially in the Tetons, and I love having it in my photo, so I’m careful not to wipe it out.”
Suess switches to the Adobe Landscape profile, which renders shade the way in which a panorama photographer expects somewhat than the flatter default.
“In the develop module I’m only setting a clean, honest base,” Suess emphasizes. “I’ll give it a little contrast and clarity, but I hold back on moving the sliders too much because I’ve still got the creative steps coming in Nik Color Efex. The develop pass is where you protect the real color, not where you finish the picture.”
White stability is the primary hand adjustment, and Suess tunes it for the Milky Way core.
“I want a little yellowish magenta in there,” he continues. “Push the tint one way and it goes too green, push the other and it’s too purple, so you’re hunting for the spot right in the middle where the core color reads true.”
After white stability comes the strikes that add punch, together with a contact of the dehaze slider, and each carries the chance of including noise again into the file.
“I’ll bump the clarity up to make the Milky Way pop off the sky, but knowing it recreates noise, I add it conservatively,” Suess cautions. “Then I’ll actually knock the saturation back down a little. I’m judging every move by eye, watching what each slider gives me against what it costs in noise.”
A shiny spot within the body will get dealt with with a focused masks somewhat than a worldwide slider.
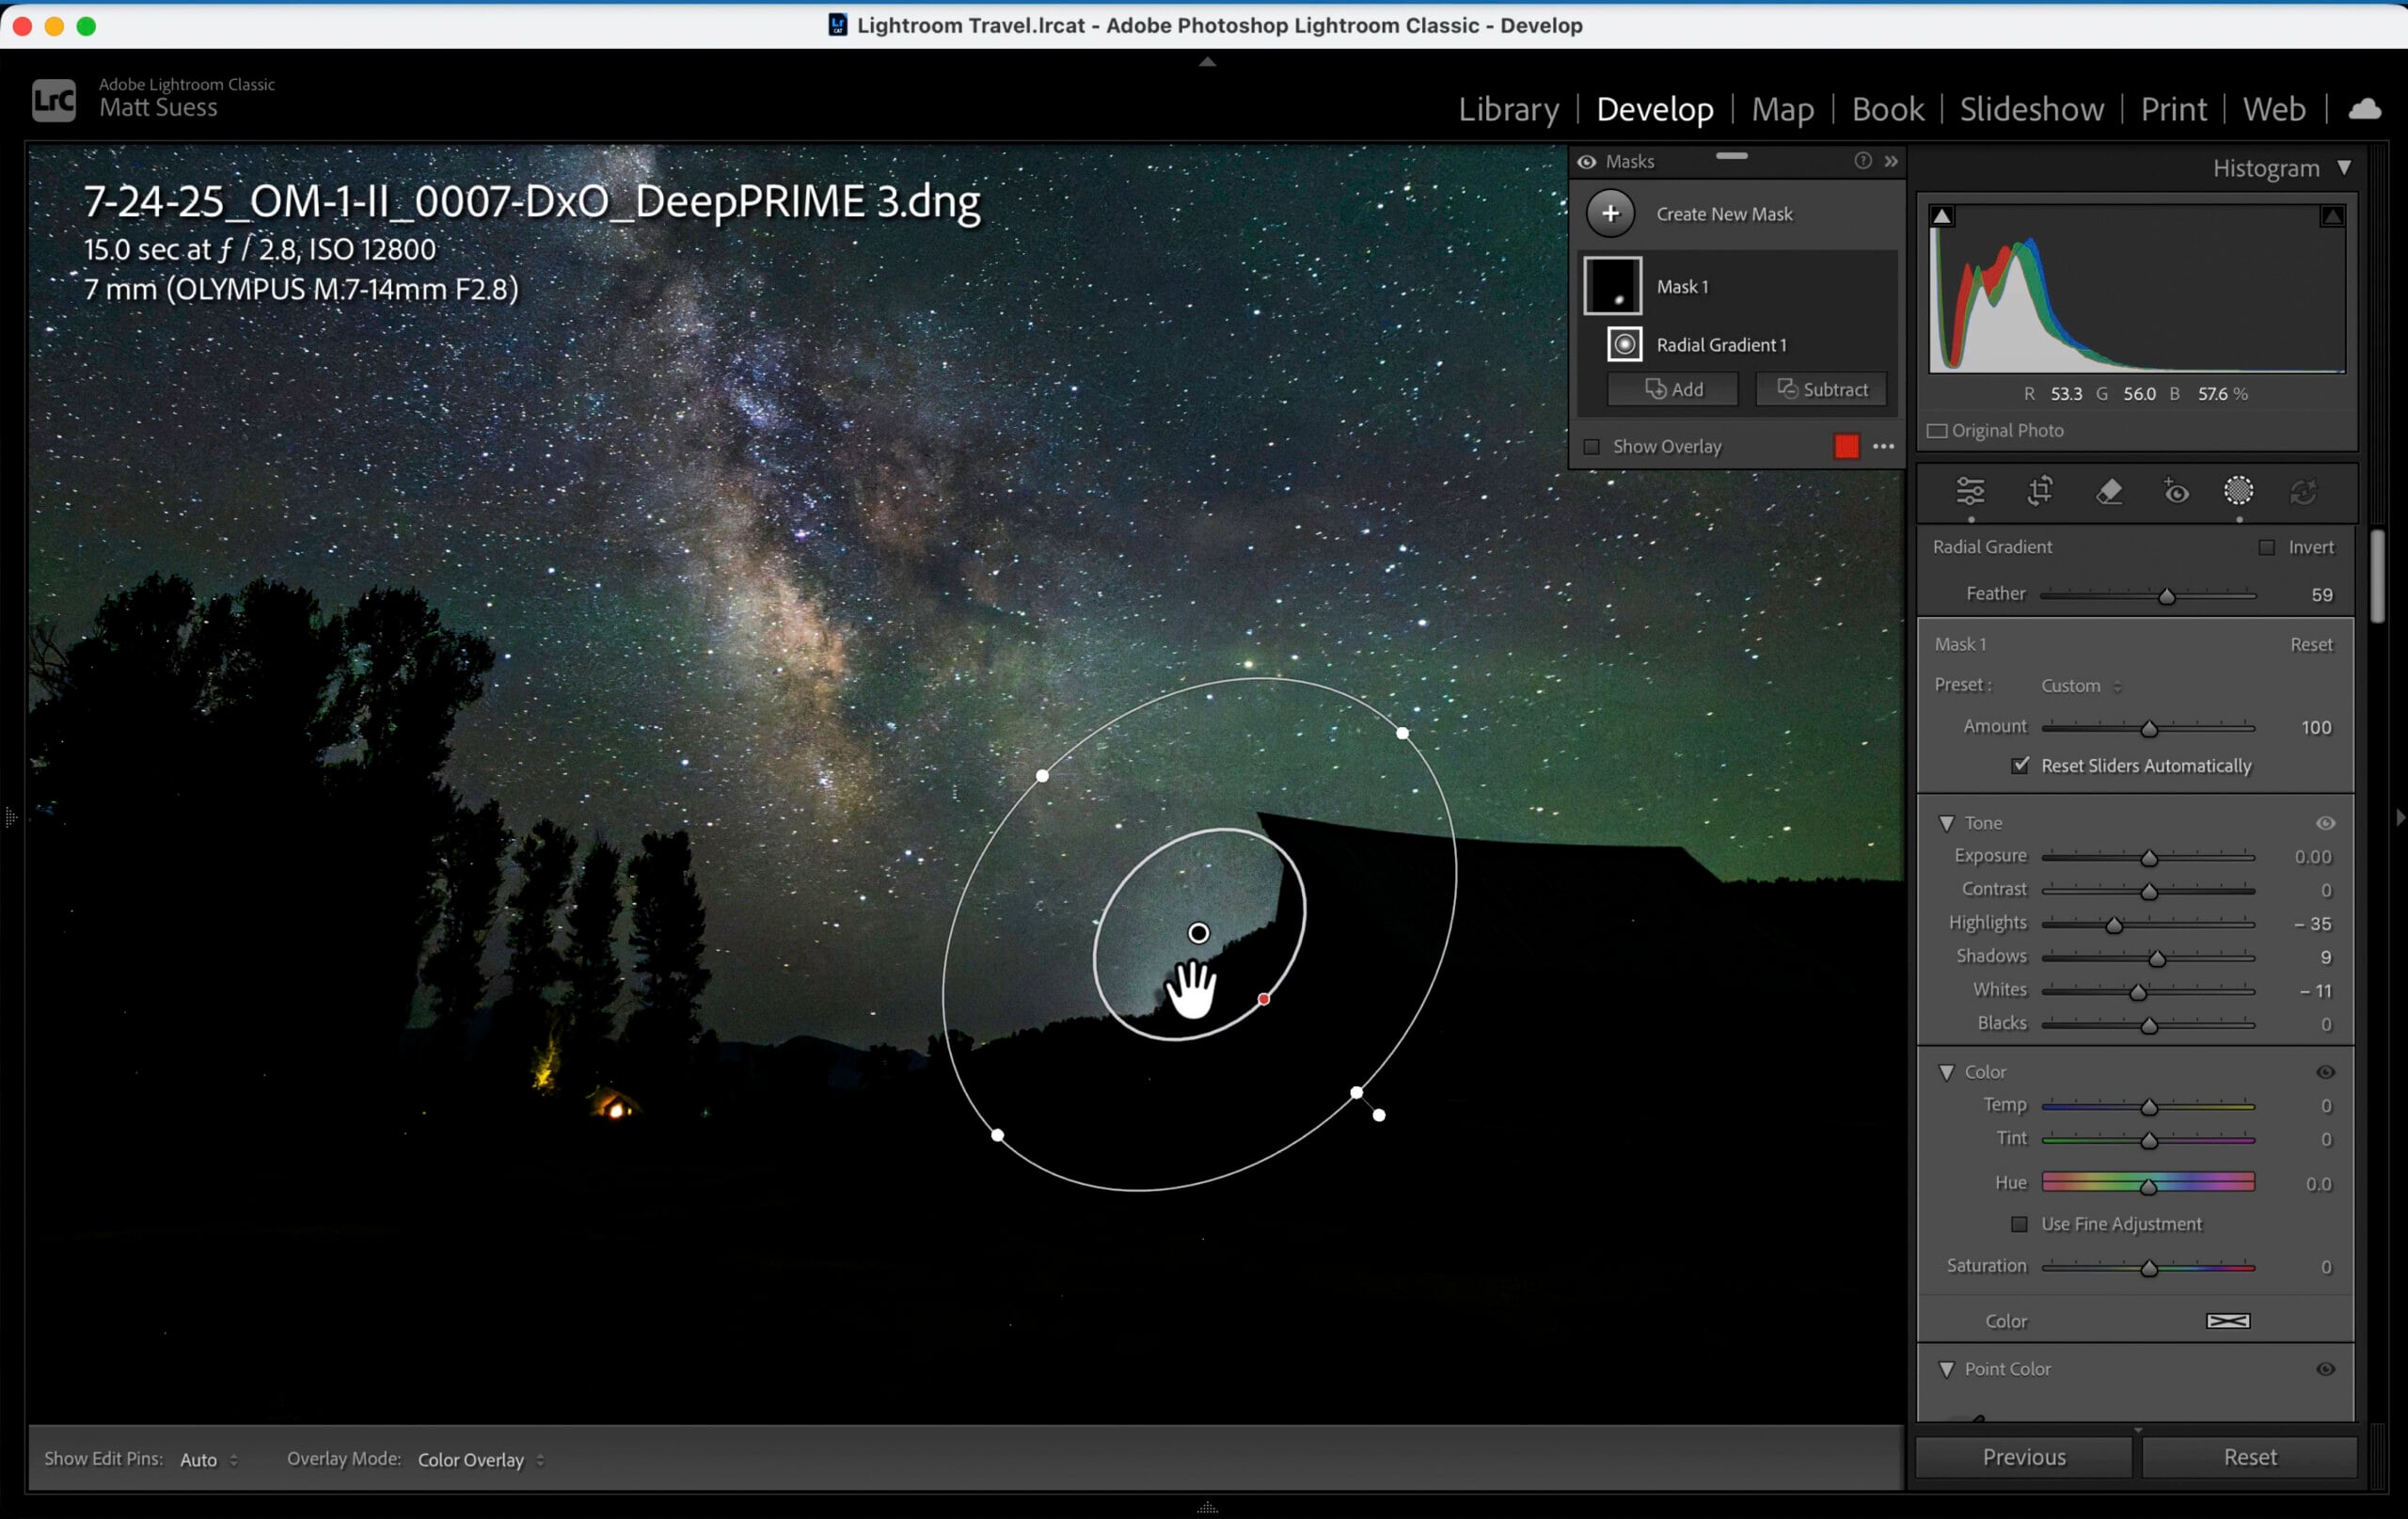
“In some of my Milky Way photos from the Tetons, I’ll sometimes get a glow that is the town of Jackson,” he demonstrates. “Light pollution is common in a lot of astrophotography these days, so I’ll drop a radial gradient on it just to knock those highlights down so it’s not so noticeable. Then I’ll bring a linear gradient down from the top to darken the upper sky, because a dark sky up there leads your eye into the foreground and the core of the Milky Way behind it.”
The Creative Finish, Suess’ Recipe
A clear RAW comes off the noise-reduction move clear however flat, the distinction pulled out of it together with the grit. Turning that file into the {photograph} the digicam really captured occurs in a single place: Nik Color Efex. He makes use of a stack of filters that handles the artistic end on almost each Milky Way picture.
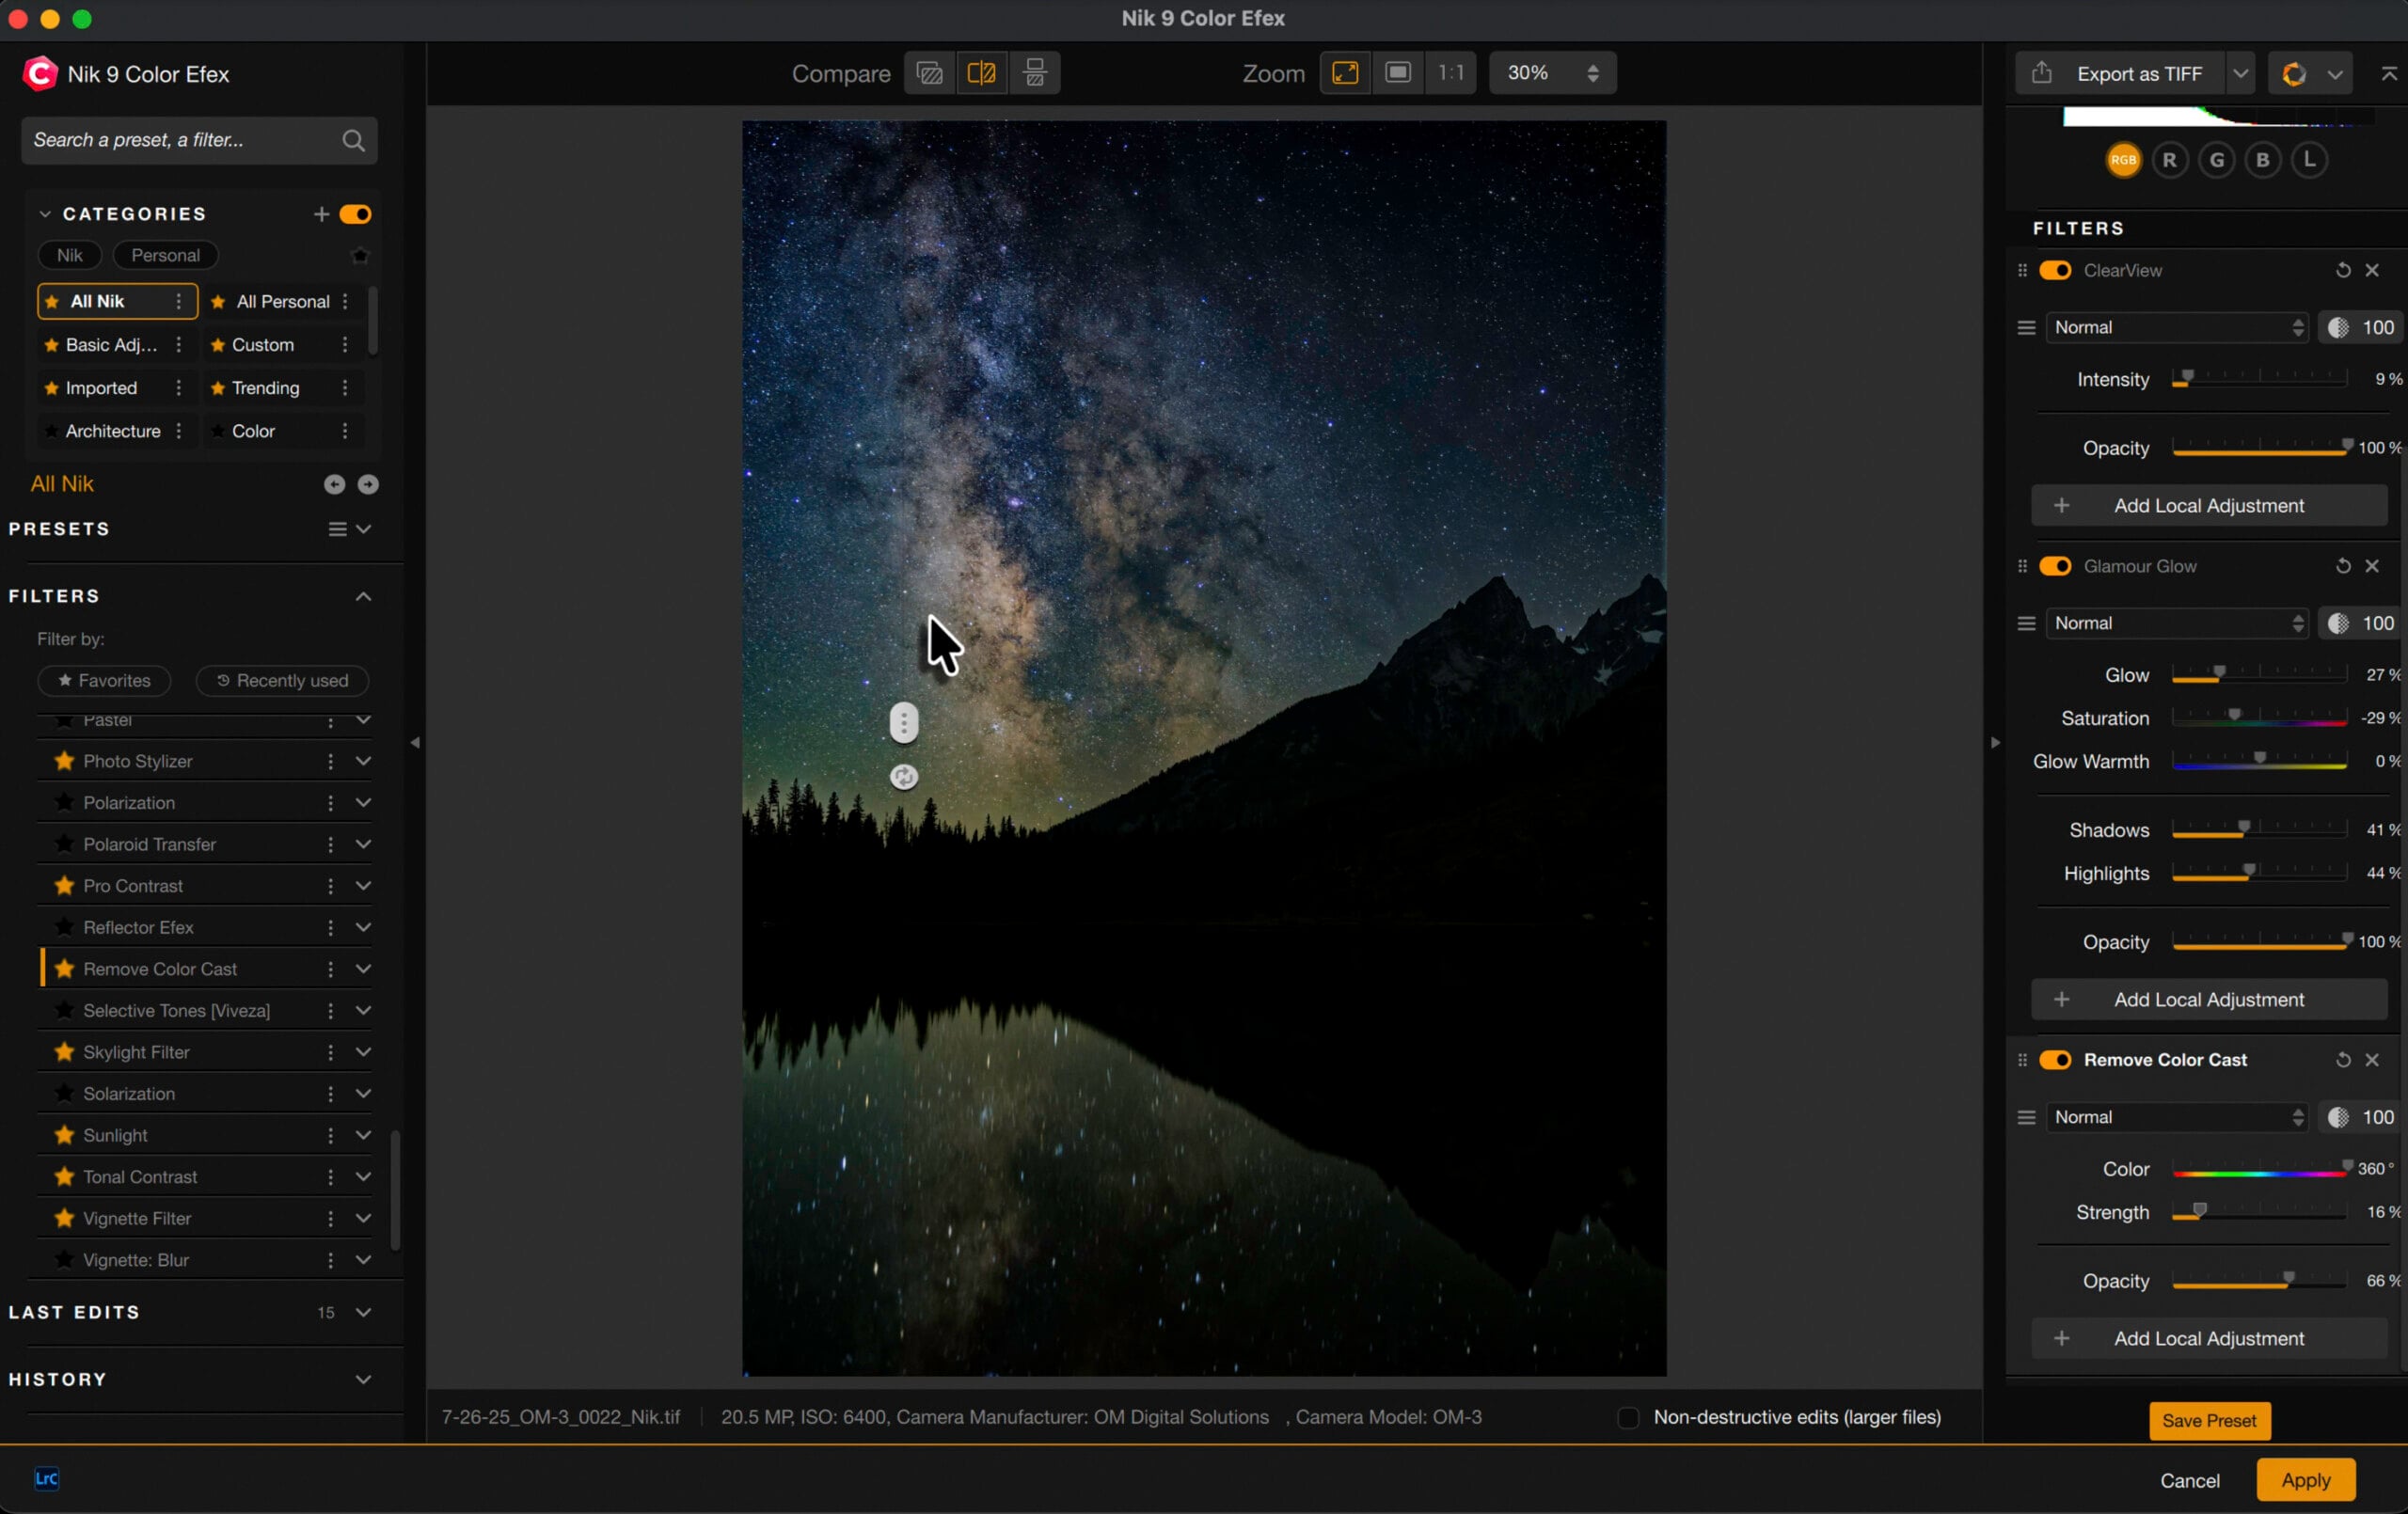
The first filter within the stack goes after the haze. The ClearView filter lifts the faint grey haze that settles over an evening picture and dulls the entire body. With it gone, the nice construction within the Milky Way comes again.
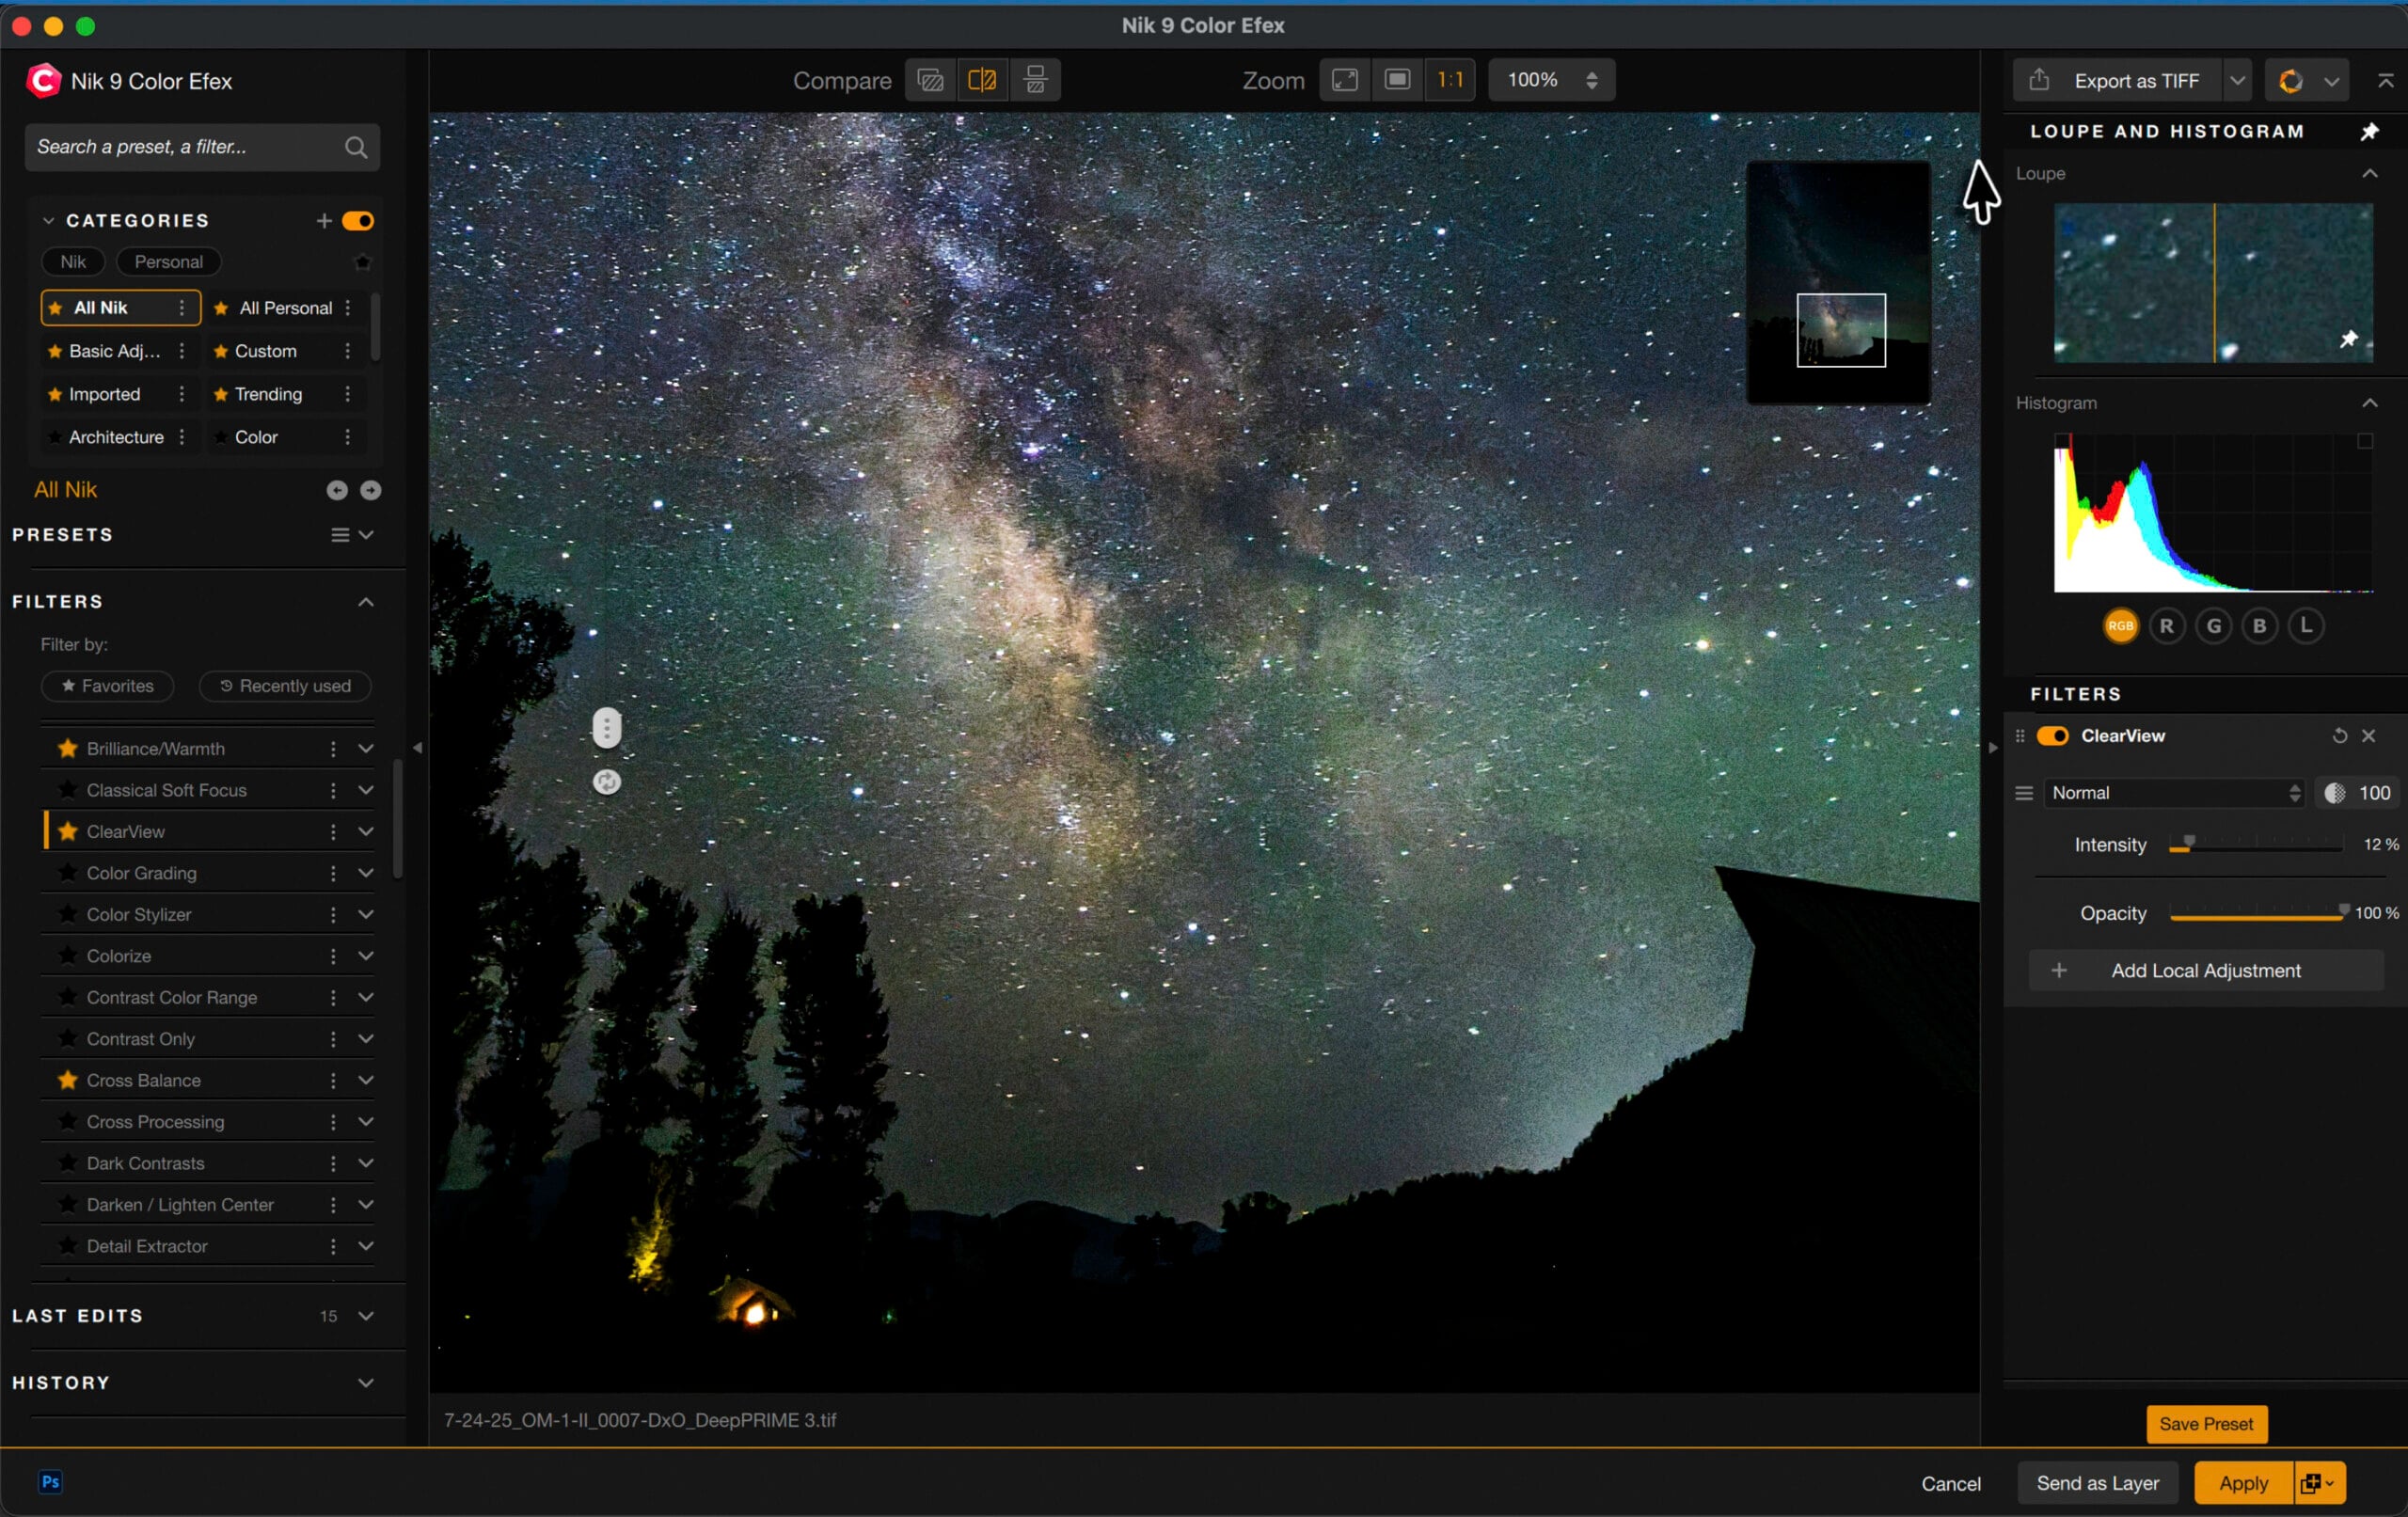
“Of everything in the stack, ClearView is the one I reach for first, and the one I have to stop myself from overdoing,” Suess emphasizes. “I keep the slider around plus 12, because it builds contrast fast, and any more than that starts outlining the stars. I’d rather underdo it and keep the stars clean.”
The subsequent filter is Glamour Glow, which spreads a comfortable bloom of sunshine from the brightest factors. On most pictures it flatters pores and skin and highlights; on an evening sky, it settles onto the celebrities.
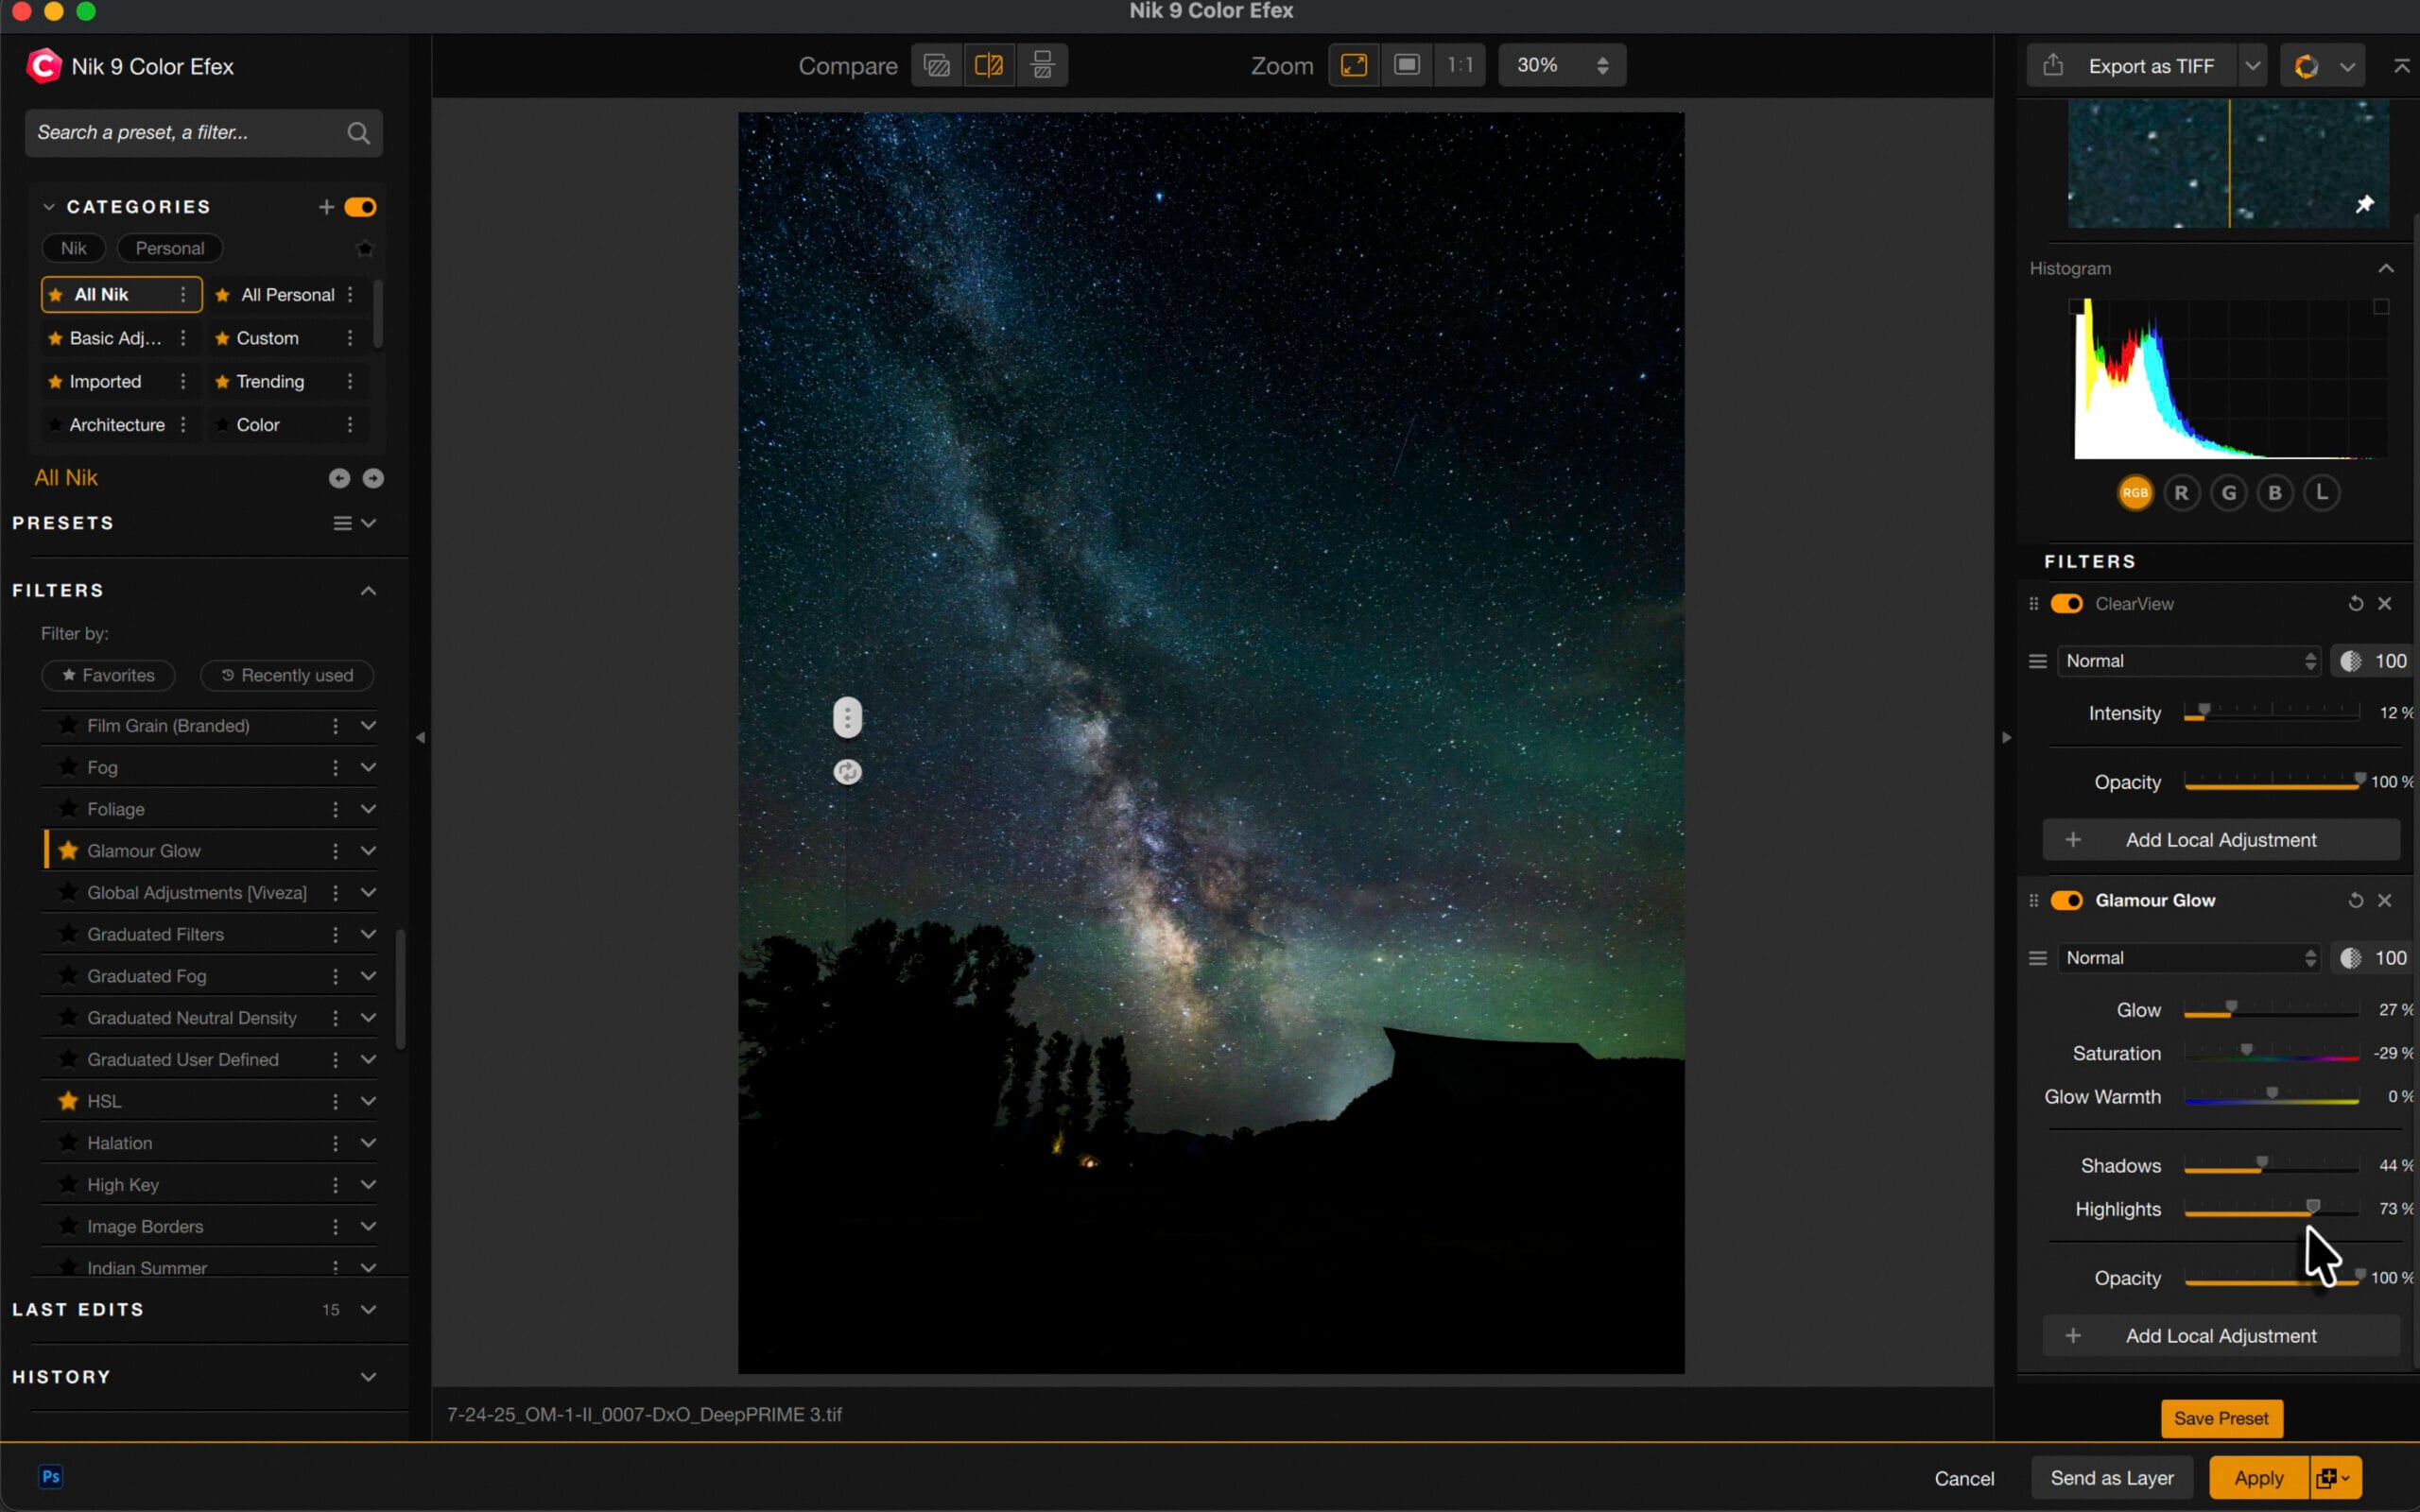
“Every so often I’ll add a little Glamour Glow,” he provides. “It softens the stars and quietly hides any noise you’ve still got hanging around. I keep it gentle, just enough to take the edge off without smearing them.”
Even a cautious develop move in Lightroom can go away a faint tint behind within the core. Color Efex’s Remove Color Cast filter pulls one undesirable shade out of the body, the stray orange or blue that may survive the sooner edits, whereas leaving the colours you meant to maintain alone.
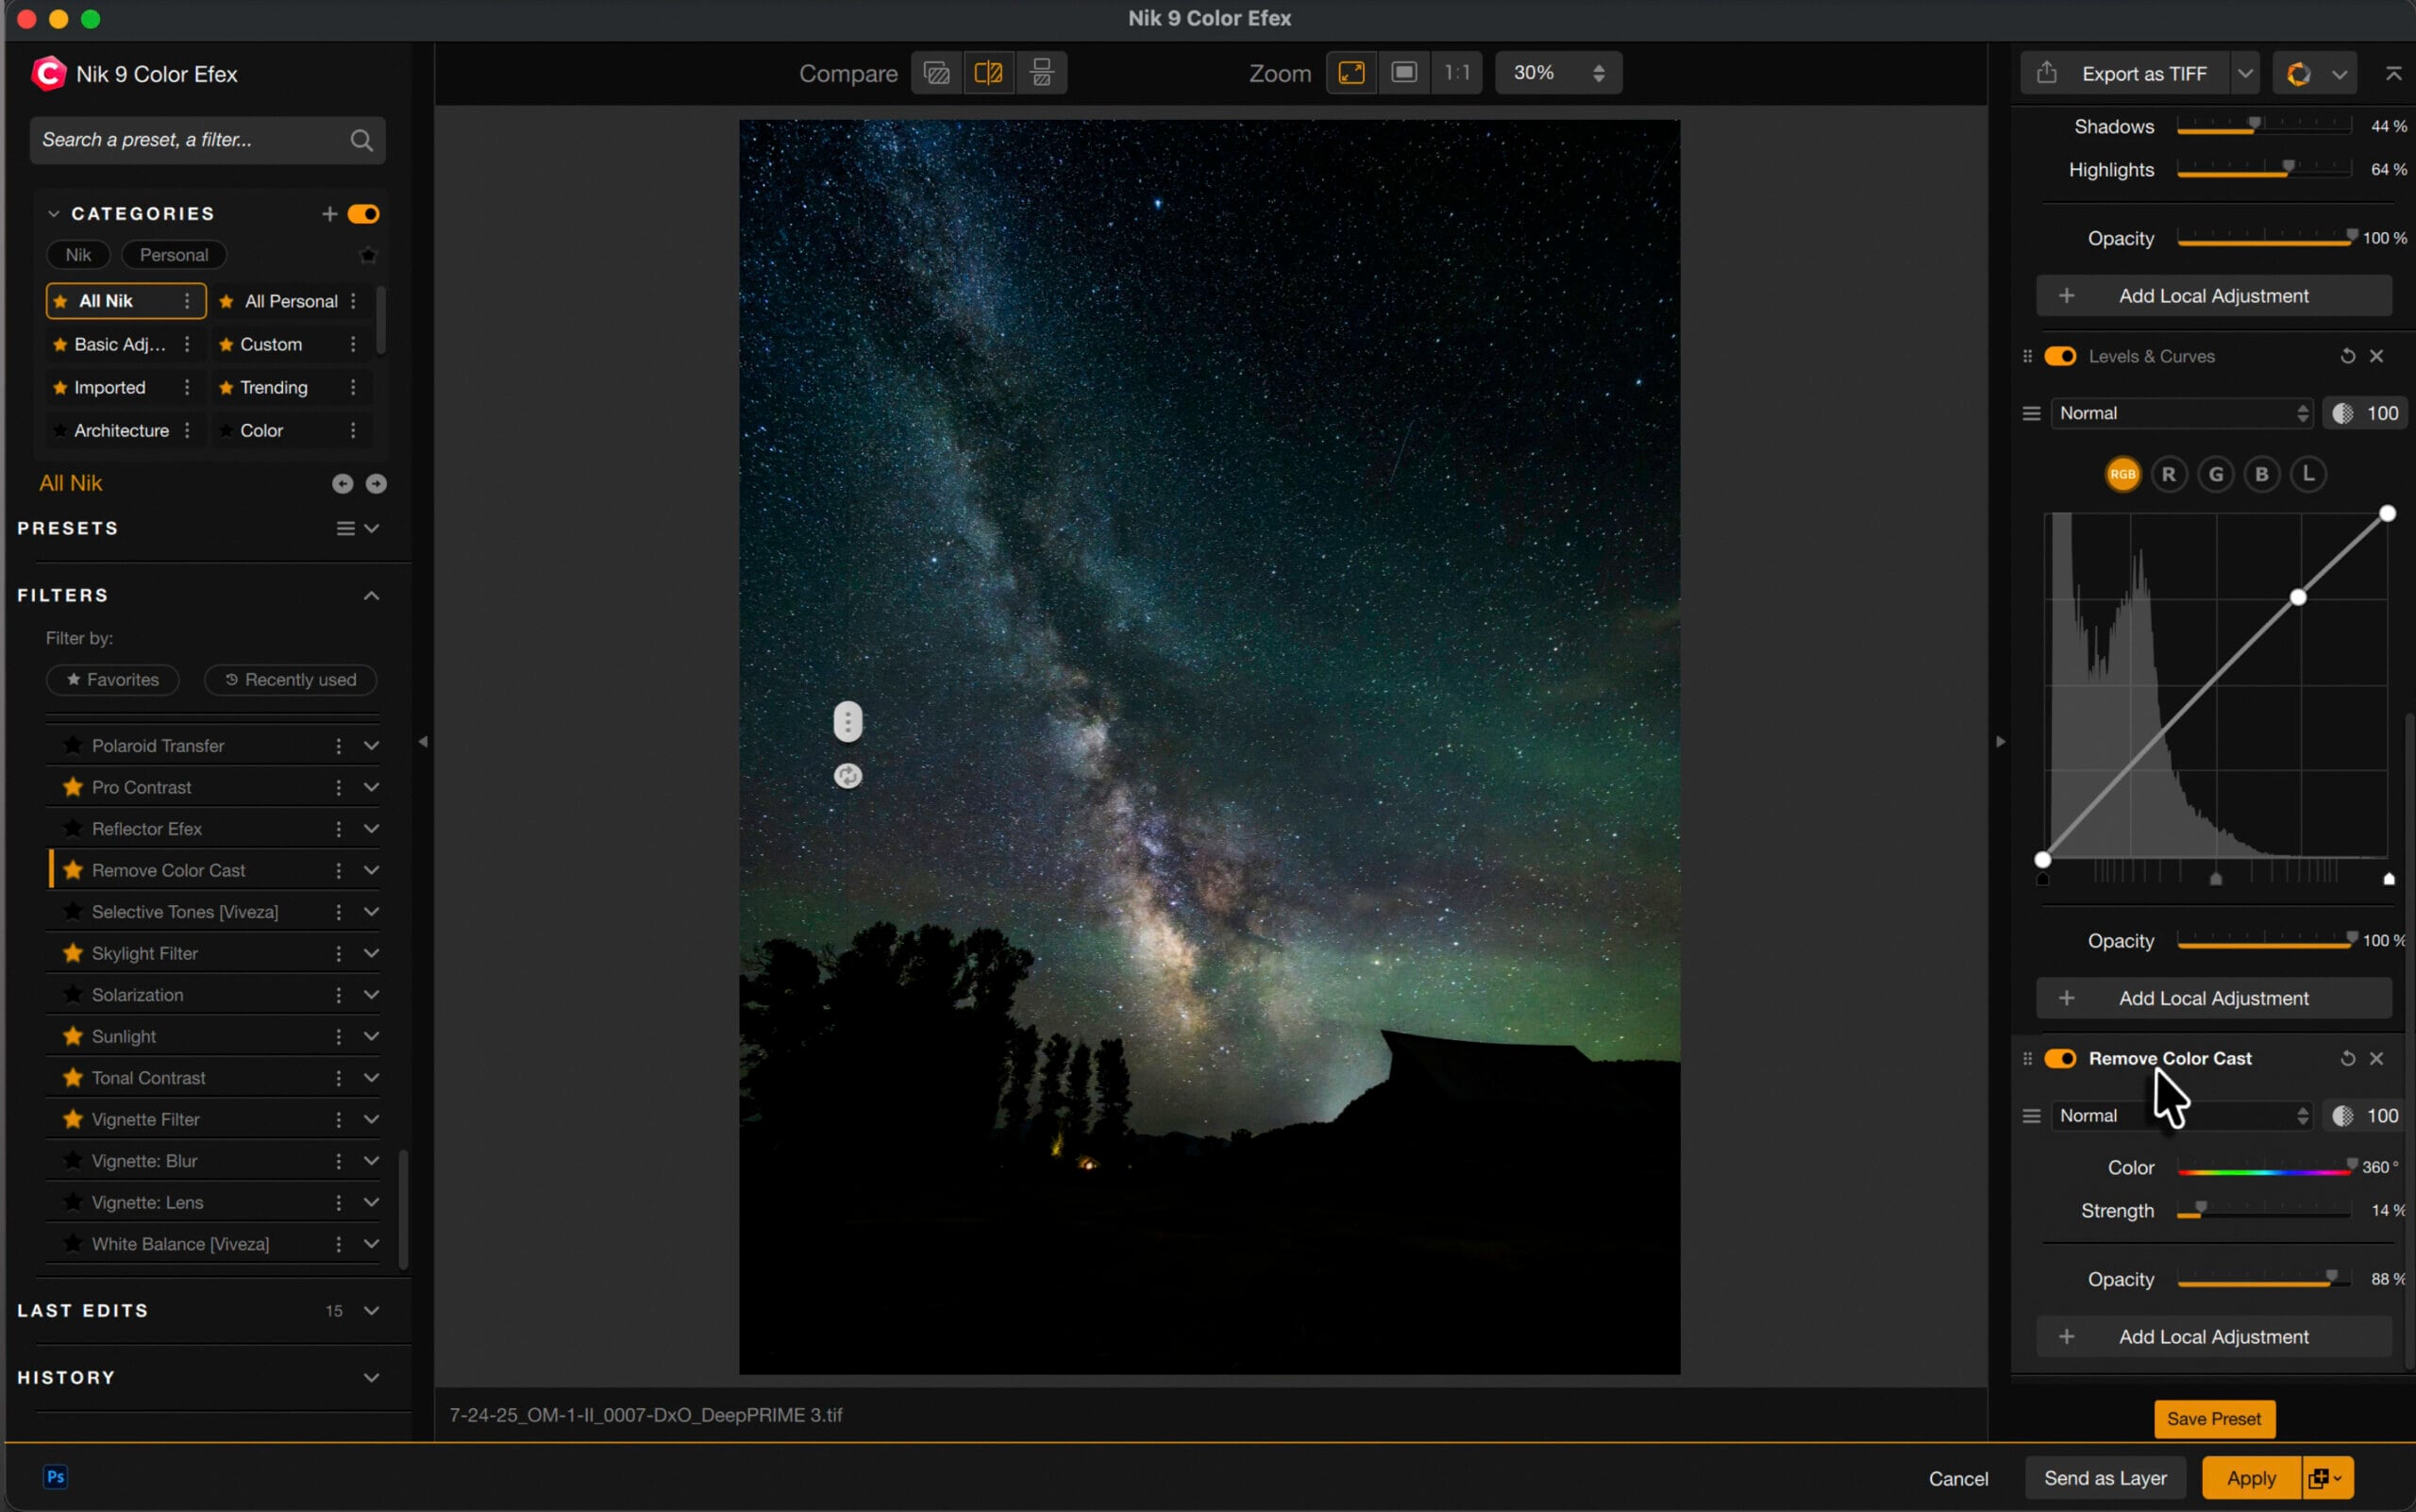
“The core will sometimes come out reading a little cool,” Suess describes. “I’ll run Remove Color Cast and walk the slider around the wheel until the core reads true again, usually warming it back toward red. It’s a small move, but a cool core never looks right.”
The transfer that does the heavy lifting on the Milky Way is the final one. The Tonal Contrast filter raises distinction individually within the shadows, midtones, and highlights. The Milky Way’s construction lives within the midtones, so lifting that band is what makes the core stand out from the sky behind it.
“It’s the one that makes the core pop,” he notes. “It sets the highlights and shadows to plus 25 by default but leaves the midtones flat, so I’m always bumping the midtones up to match. A little there and the core comes forward without me touching the rest of the sky.”
None of it’s judged from the small preview.
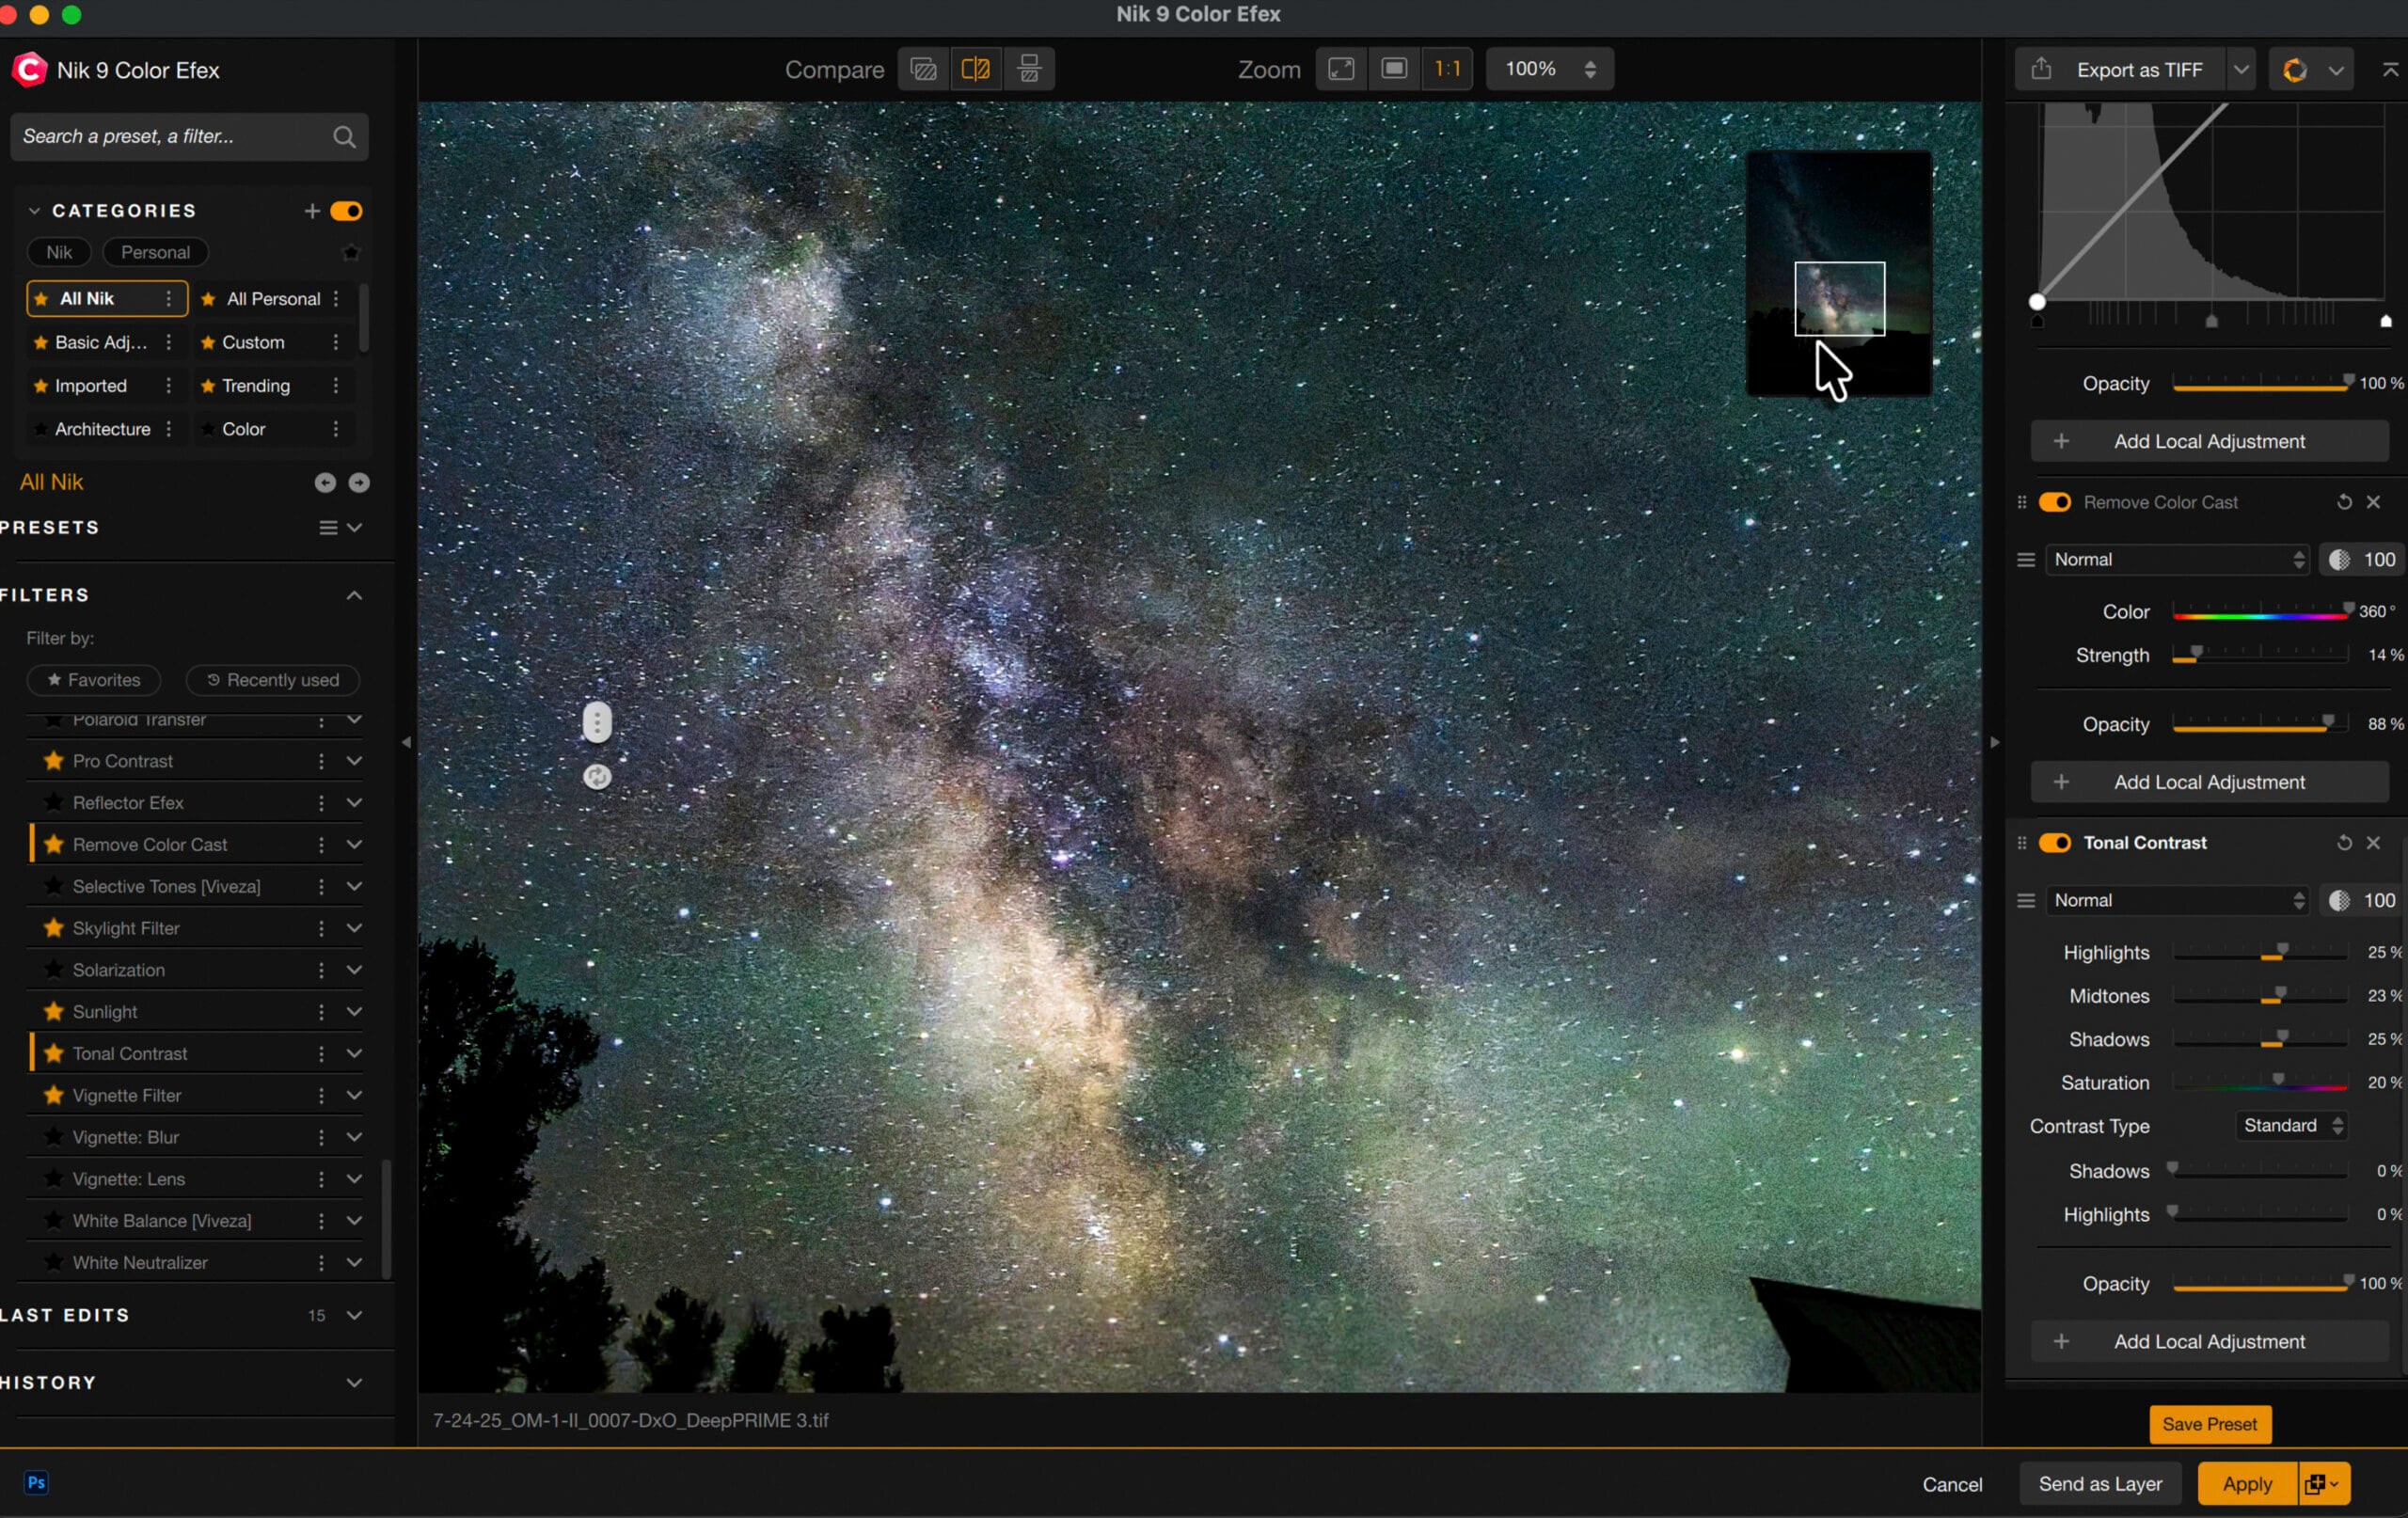
“Every move, I zoom to 100% and do a before and after comparison,” Suess stresses. “With Tonal Contrast especially, I’m checking the core at full size for halos around the bright stars. The thumbnail will lie to you. You only know if it’s working when you look at it one to one.”
“I run the same handful of filters in the same order on basically every Milky Way: ClearView, a touch of Glamour Glow, Remove Color Cast, then Tonal Contrast,” he explains. “That’s my recipe. Once you find the stack that works for your night sky, you can save it as a preset and quickly apply it on the next photo. That’s the part that turns a one-off edit into a repeatable look.”
Target One Color Without Touching the Rest
A saved filter stack will get a Milky Way many of the manner there, however one shade nonetheless slips by it.
“That green and magenta air glow is the easiest color in the whole frame to lose, and it’s real, so the last thing I want is to wreck it,” Suess displays. “Push the whole sky up with one saturation slider and it doesn’t just get stronger, it goes garish and electric, a tint that was never there that night. What I really want is to put my hands on just that one color and leave everything else alone.”
This nonetheless occurs in Color Efex. The Color Mask isn’t one of many filters; it’s a Local Adjustment you add inside one, and it does the choosing that used to imply masking a shade by hand and hoping the sting held.
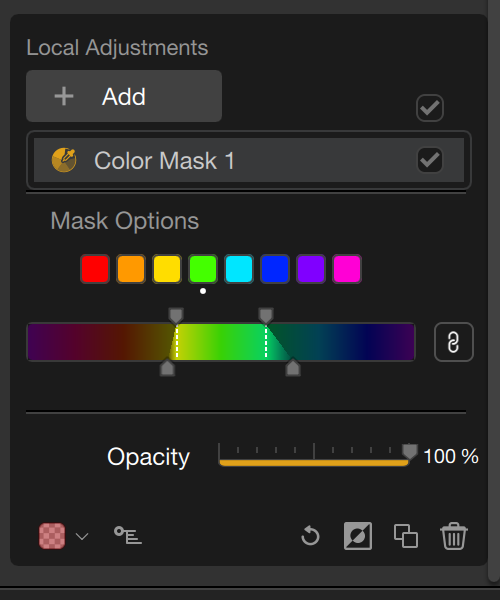
“When I want to work just that air glow, I’ll add a Color Mask to the filter and place it right on the green, and it grabs that color across the whole frame,” he describes. “From there I can push that one color around without touching the rest of the sky.”
With that one band remoted, the colour stays the place it was that evening.
Build the Foreground, Then Blend
The sky is barely half the body. Everything on land is a second {photograph} with its personal issues.
“The foreground is its own job,” Suess instructs. “When I’m working the sky, I ignore the foreground completely, and when I’m working the foreground, I forget the sky exists. I want to keep the ground a little dark so it doesn’t fight the Milky Way, and then I blend the two.”
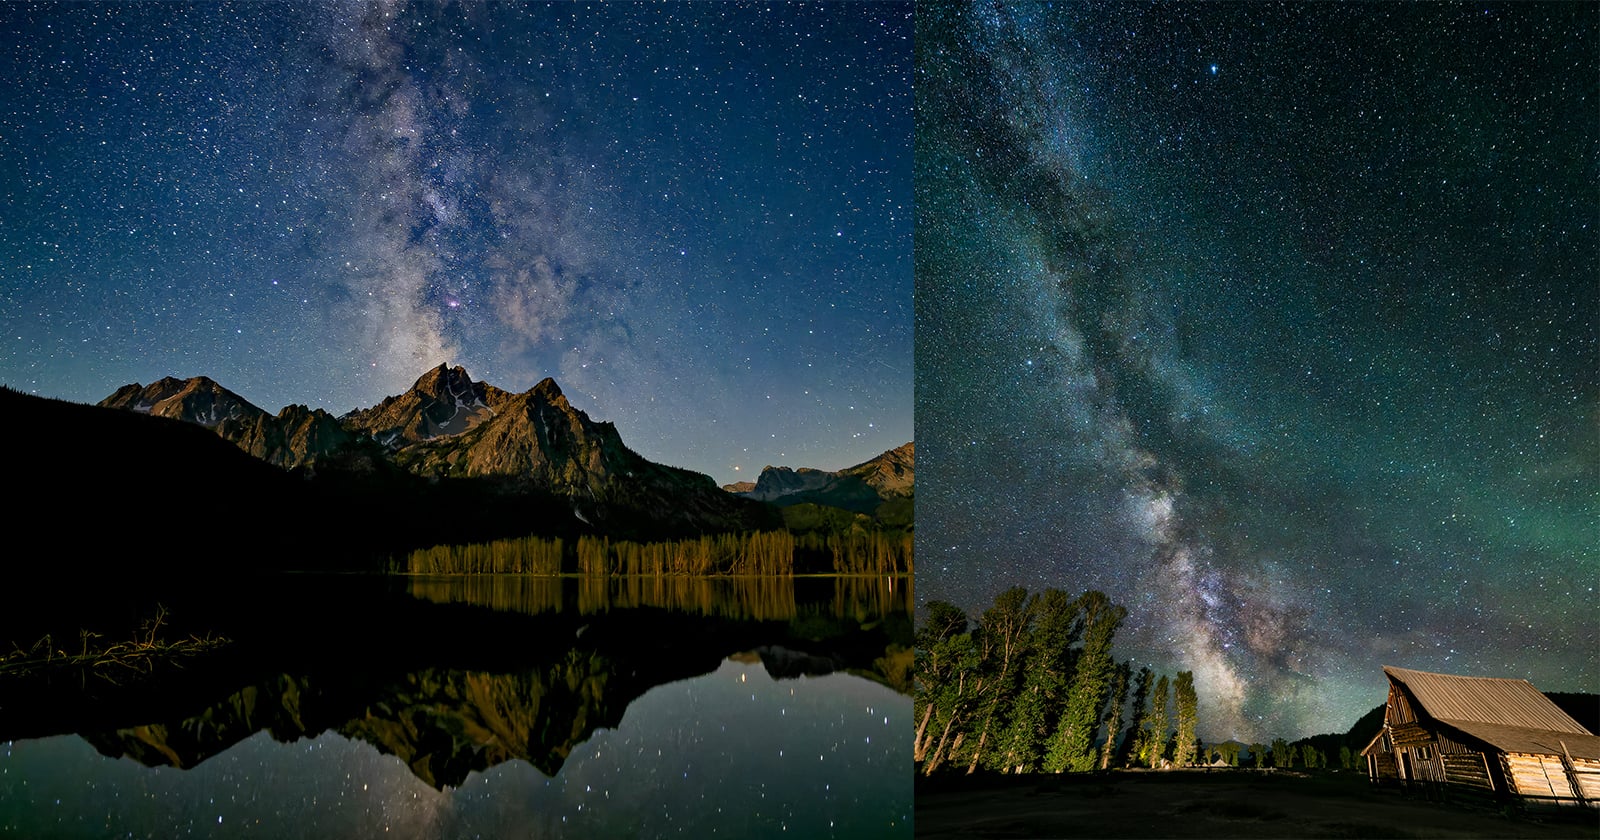
“A night scene has way too much range for one frame: a faint Milky Way and a dark foreground don’t expose the same,” he factors out. “So I shoot the sky with a shorter exposure and high-ISO, and I give the foreground a long exposure. One night in the Tetons, a car drove by mid-exposure and lit a barn in my foreground, the kind of thing you can’t set up on purpose. Two exposures, blended, beats one compromised frame every time.”
Working the foreground by itself surfaces an issue the sky by no means exhibits: a shade solid baked into the darkish floor.
“My grass comes out kind of green in these night files, and that’s a real thing,” Suess admits. “Some cameras get magenta in the shadows, my OM SYSTEM cameras put a little green in there. In Lightroom, I’ll mask the natural ground, pull the saturation and temperature down, and that makes the green a lot less visible without touching the rest of the frame.”
The foreground may require a stronger edit in a single spot than throughout the entire body. A Color Efex filter usually works on the whole picture, so Suess reaches for the AI Object Masks instrument to goal one at a single aspect as a substitute.
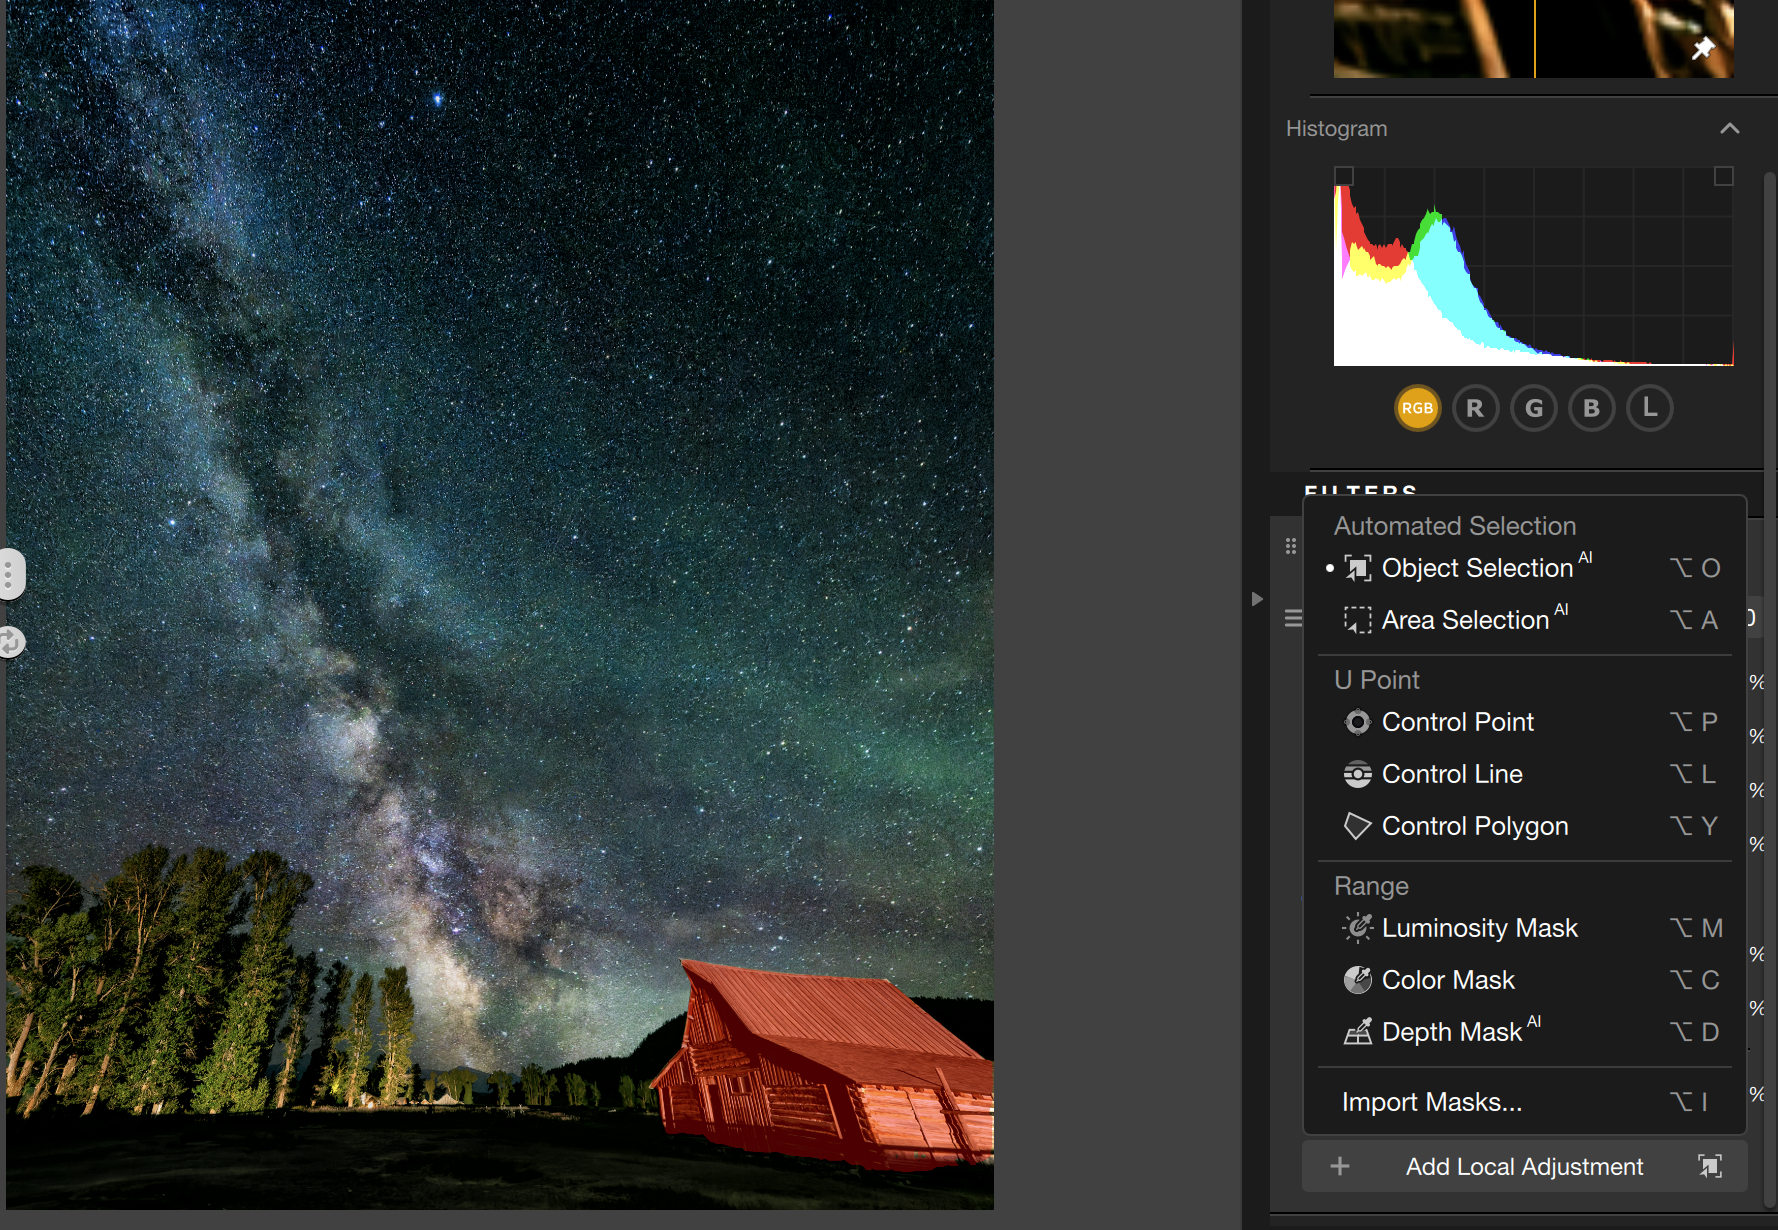
“Sometimes I don’t want a filter working on the whole image,” he explains. “I’ll use the AI object selection to grab one thing in the scene, a particular foreground element, and push something like Tonal Contrast just on that. It lifts the one area I want without overdoing it everywhere else.”
With each exposures completed, the final step is to make them one picture.
“To combine them I use Photoshop’s Sky Replacement, drop my processed sky into the foreground frame, and feather the edges so the mountain line blends clean,” Suess advises. “Done right, the two exposures come together like they were one shot, with no seam where the sky meets the ridge.”
Know When to Stop
An evening sky is straightforward to overcook. The instruments can take it effectively previous the purpose the place it nonetheless seems to be just like the sky you stood underneath.
“The mistake I see most on a night sky is people going too crazy with it,” Suess admits. “I catch myself wanting to, every time. You turn one slider up and it looks better, so you turn the next one up, and pretty soon it looks unrealistic. Knowing when to stop is most of the skill.”
The very first thing a heavy edit brings out is noise. It is why he cleans the file in PureRAW earlier than anything and retains the distinction strikes restrained as soon as the sky is clear.
“Almost every slider that adds punch also adds noise,” he cautions. “Clarity brings out the Milky Way and the grain at the same time. So I weigh every move, and the second it takes more than it gives, I back off.”
“Halos are the giveaway of an over-processed night sky,” Suess warns. “Auto-selecting the sky can leave a big halo around the mountains, and too much contrast rings the bright stars. So I check the edges at 100%, every time, and if I see a halo starting, I pull it back.”
Two extra traps come from chasing the look too laborious. Push saturation and the pure sky shade turns to neon, so he retains it restrained and lets the actual shade carry. Raise RAW sharpening early and the celebrities bloat into fats dots, so he avoids pushing sharpening earlier than the artistic end.
“The tools can do almost anything now, which is exactly why you need the discipline to stop,” he insists. “I can always push the file to look more dramatic, but that’s not what I’m after. When a move stops making the picture better, that’s where I stop.”
What the Work Is Really For
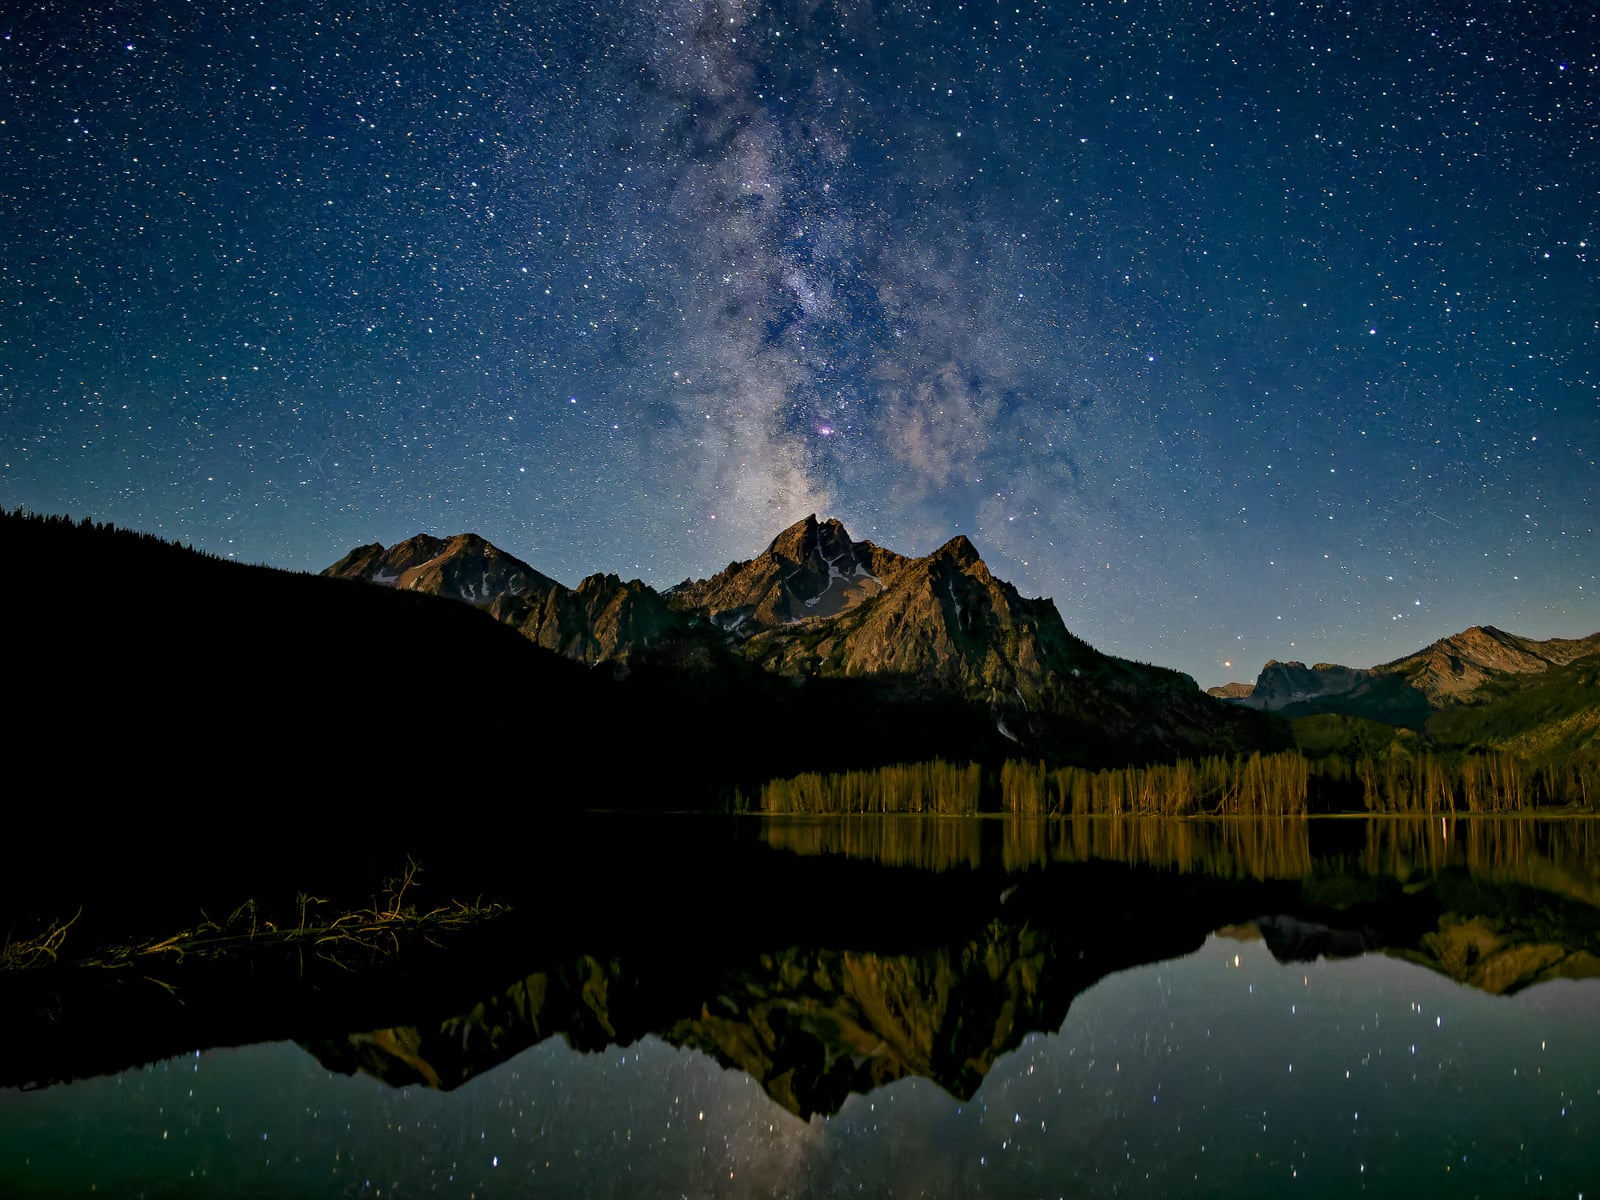
The completed body holds the inexperienced and magenta air glow, the nice and cozy trustworthy shade within the core, and the nice texture between the celebrities. None of it was seen within the flat file that got here off the digicam.
“When I started, this was a noisy ISO 12,800 RAW file, the kind of file you’d usually throw away,” Suess recollects. “By the end it looked the way the night actually felt. It still surprises me what you can pull back out of a file like that.”
The entire workflow, from the primary noise-reduction move to the final filter, exists to shut one hole.
“Out there that night the sky was glowing, and the flat file the camera handed back hid every bit of it,” Suess displays. “The camera actually catches more than my eyes ever could, right down to air glow I can’t even see standing there, and all this editing is really just me bringing that back honestly. When the frame finally shows the night the way it really was, that’s the whole reason I drove out into the dark.”
More from Matt Suess will be discovered on his website, Facebook, YouTube, and Instagram.
Image Credits: Matt Suess
Full disclosure: This article was dropped at you by DxO. Use the code PetaPixelSummer2026 at take a look at to get 20% off of any DxO product, together with Nik Collection 9 and PureRAW 6 till July tenth (legitimate for brand new prospects solely).
Read The Ultimate Beginner’s Guide to Color Efex.
Read Matt Suess’ 8 Astrophotography Lessons the Beginner Guides Leave Out.
This web page was created programmatically, to learn the article in its unique location you may go to the hyperlink bellow:
https://petapixel.com/2026/06/24/how-to-turn-a-flat-noisy-raw-into-a-finished-milky-way-photograph/
and if you wish to take away this text from our website please contact us