This web page was created programmatically, to learn the article in its authentic location you’ll be able to go to the hyperlink bellow:
https://fstoppers.com/astrophotography/behind-scenes-secrets-light-painting-desert-cabin-night-901148
and if you wish to take away this text from our website please contact us
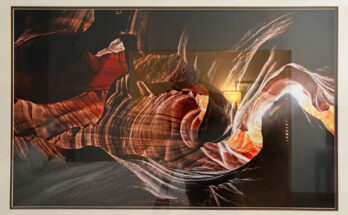
I got down to {photograph} and light-weight paint a mysterious, dilapidated homestead cabin within the Mojave Desert beneath moonlight. With nothing greater than a flashlight and a single lengthy publicity, I turned it right into a glowing, cinematic scene. Here’s precisely how I did it, and how one can too.
I’ll additionally focus on a few of the points one may run into whereas trying to {photograph} this deserted cabin. I did all the picture in a single publicity, nonetheless.
But first, let’s discover out what “light painting” is.
What on Earth Is ‘Light Painting’ in Night Photography?
“Light painting” is usually used loosely to explain including any type of mild to a scene. But technically, it is utilizing a handheld mild supply to “paint” throughout an extended publicity. Your flashlight is the comb, and the scene is your canvas. You’re the director. You resolve what will get lit and what disappears into shadow. This is an extended custom amongst evening photographers, who’ve been doing this for many years.
Why do I like handheld mild portray? Because it is quick, versatile, artistic, and ridiculously enjoyable. No want for mild stands, no heavy gear. Nope. It’s simply you and your mild shaping the scene.
The superb secret right here is the flexibility to show invisible! Keep shifting, and you will not present up in your lengthy publicity picture. Incredible, eh? If you stand nonetheless for about ten % of the full publicity, you start “registering” within the picture. So sure, simply maintain shifting! And block that mild from shining within the digital camera (or onto you).
I take advantage of a ProtoMachines LED2, which is sadly discontinued. We are hoping that ProtoMachines releases new merchandise. You may additionally use different LED flashlights, such because the Wurkkos FC11C, which has a satisfying heat white mild (however no different coloration choices).
The Challenges of Light Painting a Cabin with Many Holes
Most of the time whenever you mild paint an previous cabin, you’ll be able to cover behind partitions after which start lighting every little thing. Here, although, this was difficult. After all, I do not wish to shine the sunshine immediately by the various holes and into the digital camera lens and create flares, scorching spots, or in any other case damage the picture. I needed to be very aware.
Fortunately, my tripod has glow-in-the-dark tape. I sometimes use this so I do not lose observe of the place I left my tripod and digital camera. However, it additionally has one other added bonus: at evening, if the tape is glowing, I can see the place it’s and attempt to keep away from shining my mild immediately into the lens. I cost the tape for a couple of seconds with my mild, and it glows sufficient that I can see the tripod from over 30–40 toes away.
After that, it is a query of shifting round whereas making an attempt to cover the sunshine behind one thing: a part of the wall, my physique, maybe a chunk of cardboard, or no matter works!
Lighting the Opposite of How One Might Typically Light
Most of the time, somebody may mild the surface of the cabin when creating a photograph like this. After all, that’s the major a part of the topic. However, I did the other: I solely lit the within. Why? Because there have been plenty of holes. I attempted to reap the benefits of that. I felt that the sunshine spilling out from the inside could be extra fascinating than merely lighting up the surface.
Therefore, the fundamental thought was to face inside and basically mild the bottom from the inside. That modified the strategy. I additionally felt like I used to be doing one thing extra artistic as I attempted to think about how the shadows would look if I shifted the angles. This was very enjoyable, and I spent somewhat little bit of time seeing the way it may look if I angled the sunshine larger to mild up the creosote bushes, or if I angled it down. I additionally tried to maintain the sunshine nonetheless at sure angles to create better-defined shadows.
Despite how small the cabin was, there have been a number of rooms. Therefore, I repeated this strategy, illuminating the wooden frames and angling a few of these geometric shapes out onto the bottom. Fun!
Four Steps for Light Painting the Cabin
As talked about, mild portray is form of like being a movie producer. You resolve what’s illuminated and what stays in shadow. Therefore, mild portray is just not a random exercise. It’s not merely spraying mild on a topic to mild it up and nothing extra. There is composition, shadows, element, and extra to think about. I used to be extra methodical about this and took the next steps to ensure it got here out the best way I envisioned it.
Step One: Creating the Main Shadows
I walked inside and stood roughly within the middle of the primary room. From right here, I felt like I may maintain the angle of the shadows roughly constant. Although I initially experimented with the peak and angle to a sure diploma on my check pictures, as soon as I made a decision on them, I saved them constant. Also, preserving the sunshine at an analogous angle and comparatively nonetheless enabled me to create extra definition within the shadows.
Step Two: Illuminating the partitions
To illuminate the inside, together with the partitions, I aimed the sunshine straight up at what was left of the ceiling. There wasn’t a lot, however fortunately, there was sufficient to bounce the sunshine off it, thereby illuminating the partitions.
Why did I select this angle? Because it could look barely extra pure, as if there have been nonetheless a ceiling mild.
Step Three: Illuminating the Back Room
I then walked to the again room, which was principally picket beams, and did the identical factor as I had earlier than, illuminating what was left of the ceiling.
Step Four: Light Pouring Forth From the Door
For the ultimate contact, I walked again to the primary room, crouched down low, ensuring that the beam wasn’t shining by the holes within the wall, and skimmed the sunshine out the door. I like the feel that this creates on the bottom. I did this just for a short while since there had already been some mild popping out from the door.
Experimentation Is Key
Trying totally different angles and approaches is essential to creating one thing that you simply like. Although it is nice to go in with a selected imaginative and prescient and maintain your mild portray constant, it is also good to be versatile and permit for experimentation.
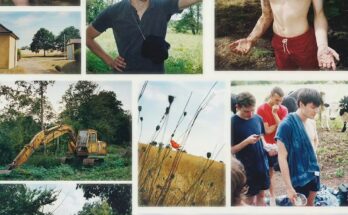
I photographed the home from many various angles, typically with totally different coloration lights, as seen within the picture above.
Can’t Get Enough of Night Photography within the Southwest?
If you want to be taught extra about evening pictures, mild portray, star trails, Milky Way pictures, or associated gadgets and want to {photograph} in Southwest ghost cities, deserts, and mountains, I do train night photography workshops with Tim Little several times a year.
This web page was created programmatically, to learn the article in its authentic location you’ll be able to go to the hyperlink bellow:
https://fstoppers.com/astrophotography/behind-scenes-secrets-light-painting-desert-cabin-night-901148
and if you wish to take away this text from our website please contact us